Crystal Caverns aka Baylor
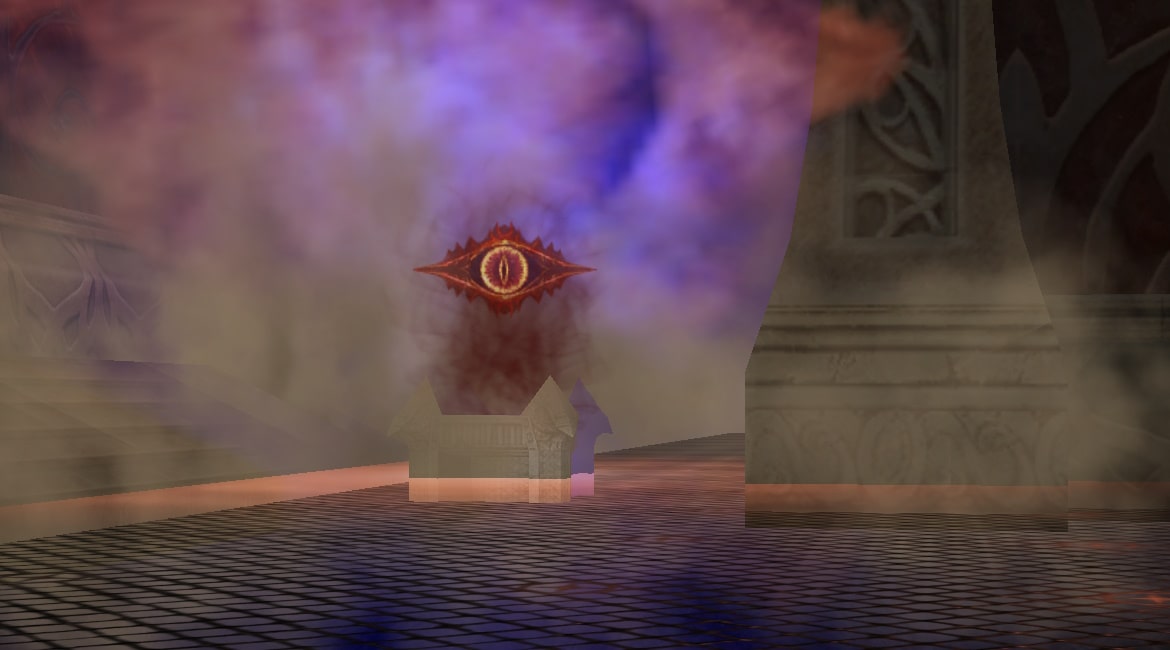
Have a seat, stranger, I want to tell you a story, about evil pierced in our world and captured the most beautiful parts of Innadril, corrupting them for years. I want to give you a knowledge, the most powerful weapon, that are going to help you to defeat evil forces. And if you are driven by a lust for gold - then take away from them what they have been collecting for centuries.
The story starts from one of the Shilien's child, water dragon Fafurion, who came to the lands of Innadril and conquered Isle of Prayer. He was full of pain and anger after being defeated in a battle with Lionel Hunter. But Parme, priestess of Eva, found the way to cure his soul and became his close friend! In gratitude, dragon's servants built her a beautiful palace under the island. And there were peace, and there was harmony, but all this lasted until Beleth arrive. Ivory Tower's best student, in pursuit of power he started learning demon's magic and moved to the side of dark forces. By poisoning the Isle of Prayer he enslaved the servants of Fafurion and prisoned Eva's priestesses, led by Parme. Fafurion became furious and swore revenge - he left the Isle of Prayer and gathers forces for a new battle.
Beleth left Baylor, prison warden, to guard Parme and hold the island with his demons and servants: Darnel, Kechi and Tears. Darnel – Beleth's maidservant, carried out any of his instructions. Her beloved Kechi, who longed to become the leader of the island's demons and Tears – former maid of Parme, poisoned by Beleth. Only they know how to find Baylor and Parme imprisoned by him. All three of them have to be defeated to do that.
Guide's author — iMessiah, Masterwork player
Basics
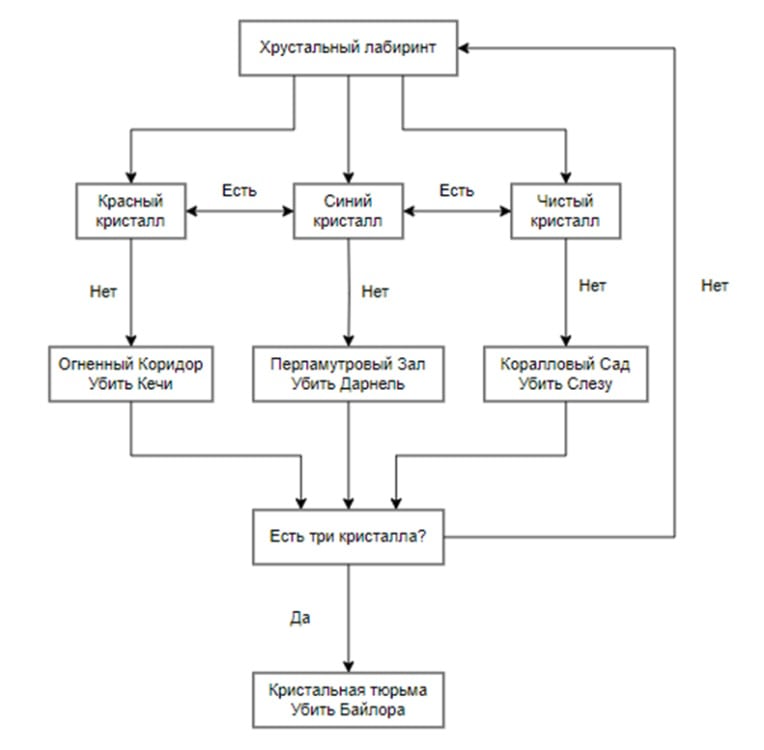
Crystal Caverns or Baylor, as it named by players — complex instance, divided in four areas, where bosses lives:
-
Steam Corridor — boss
 Kechi Fire
Lv. 78
. Keeping
Kechi Fire
Lv. 78
. Keeping
 Red Crystal
NG
Red Crystal
NG
-
Emerald Square – boss
Darnel Torture Maiden
Lv. 78
. Keeping
 Blue Crystal
NG
Blue Crystal
NG
-
Coral Garden – boss
 Tears Ice
Lv. 78
. Keeping
Tears Ice
Lv. 78
. Keeping
 Clear Crystal
NG
Clear Crystal
NG
-
Crystal Prison – boss
Baylor Warden
Lv. 80
. Last zone, that only available if each
character in a party have


 three crystals (one of each type) in quest inventory
On Masterwork realms Baylor instance is a great place for exping, farming attribute stones, S-grade gear, unique jewelry and leveling your soul crystals (SA).
Entry conditions and cooldown
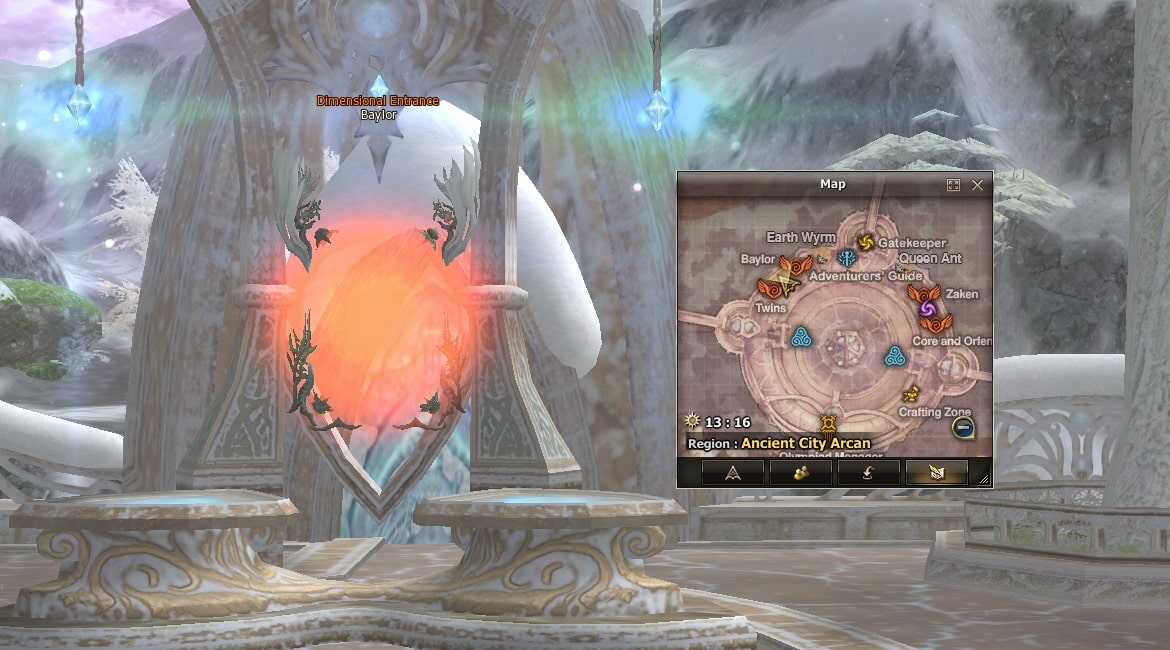
- Zone entrance:
 Baylor Dimensional Entrance
in Arcan.
Baylor Dimensional Entrance
in Arcan. - Players in a group: 5 - 9
- Level limitations: 76 - 85
- Time to complete: 120 minutes
- Cooldown: 3 times a week, on Tuesday, Thursday and Saturday
Most common messages at Party Matching window:
- Kechi / Kechi only — that means that party will only kill Kechi to get Red Crystal
- Darnel / Darnel only — that means that party will only kill Darnel to get Blue Crystal
- Tears / Tears only — that means that party will only kill Tears to get Clear Crystal
- "Boss" + Baylor — means that party will kill "boss" first and then go to Baylor
When entering group "boss" + Baylor, you should have at least 2 crystals in your quest inventory. Best case scenario, if you have 2 different crystals, and you enter group, that is going through the boss, whose crystal you don't have yet. Example:
Tuesday — killing Kechi, gathering Red Crystal.
Thursday — killing Darnel, gathering Blue Crystal.
Saturday — joining group Tears + Baylor, gathering Clear Crystal and then going to kill Baylor.
Boss route diagram
Any crystal can be traded to another by NPC
Baylor Dimensional Entrance
with additional payment:
Items
Blue Crystal NG
Blue Crystal NG
Blue Crystal NG
Blue Crystal NG
Red Crystal NG
Red Crystal NG
Red Crystal NG
Red Crystal NG
Clear Crystal NG
Clear Crystal NG
Clear Crystal NG
Clear Crystal NG
Blue Crystal NG
Blue Crystal NG
Blue Crystal NG
Blue Crystal NG
Red Crystal NG
Red Crystal NG
Red Crystal NG
Red Crystal NG
Clear Crystal NG
Clear Crystal NG
Clear Crystal NG
Clear Crystal NG
Blue Crystal NG
Required
 Master Coin NG
Red Crystal NG
Master Coin NG
Red Crystal NG
Please note that three crystals of different colors will disappear when you visit Baylor, and you will have to collect them again.
Group composition and tactics
Tips for party leader:
If you are planing to kill Baylor — before entering instance ask all members to link their crystals, to make sure that everyone have required crystals and coins to exchange.
Try to make group with "live" support and well-geared DPS.
Recommended composition: tank, bard, healer, buff, judicator and 4 DPS. Judicator and bard should have bows, at least one for Ivory Coin. If you are in a mages party — we recommend to add 1 EE/SE.
Archers + summoner in archer's transform. Easiest setup while transferring to S-grade. Tank provokes Baylor and running in circles, archers and summoner shooting.
Mages + summoner in mage's form. Tactics are the same — tank running in circles, mages kills. For that setup 2 EE/SE with "chickens" highly recommended.
Melee. Hardest setup at early Gracia stage. Tank provokes and running, all melee shoots from their bows or using ranged skills. By boosting abilities and defensive skills cooldown tank stops, all melees attacking Baylor until defensive buffs are running out, then tank start running again, waiting for skills to refresh.
Make sure you have death penalty removing scrolls — they may be useful, because it's very hard not to die from Baylor.
Pay attention!
Bosses have incoming damage limitations:
Kechi, Tears and Darnel — 25 000 damage.
Baylor — 35 000 damage.
Instance entry
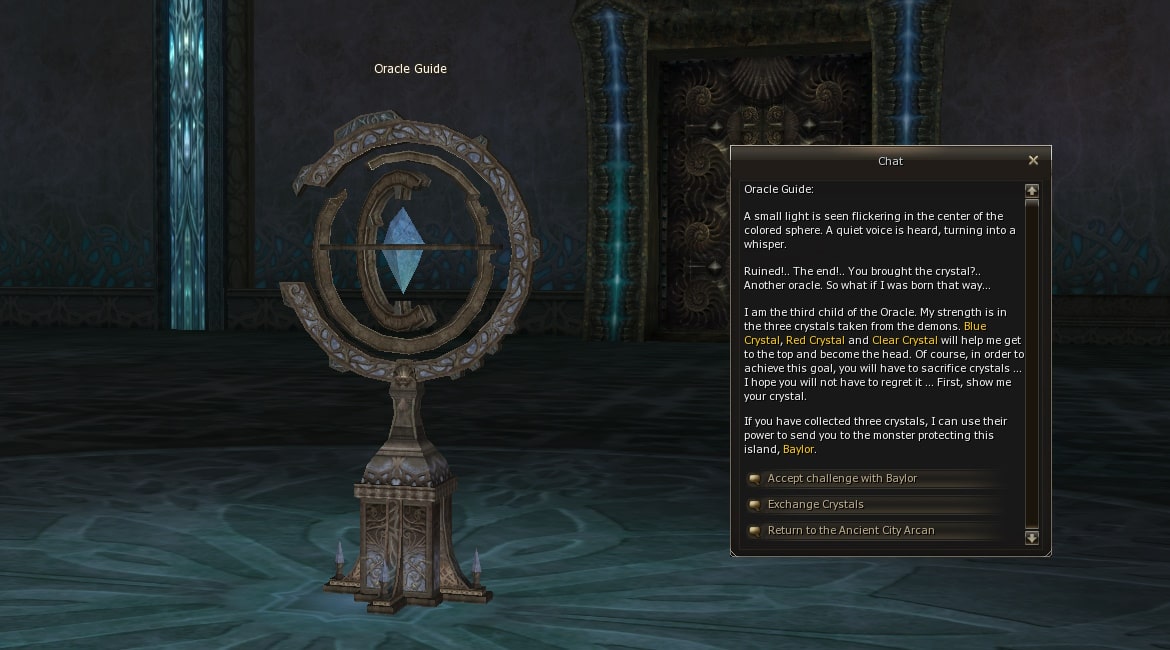
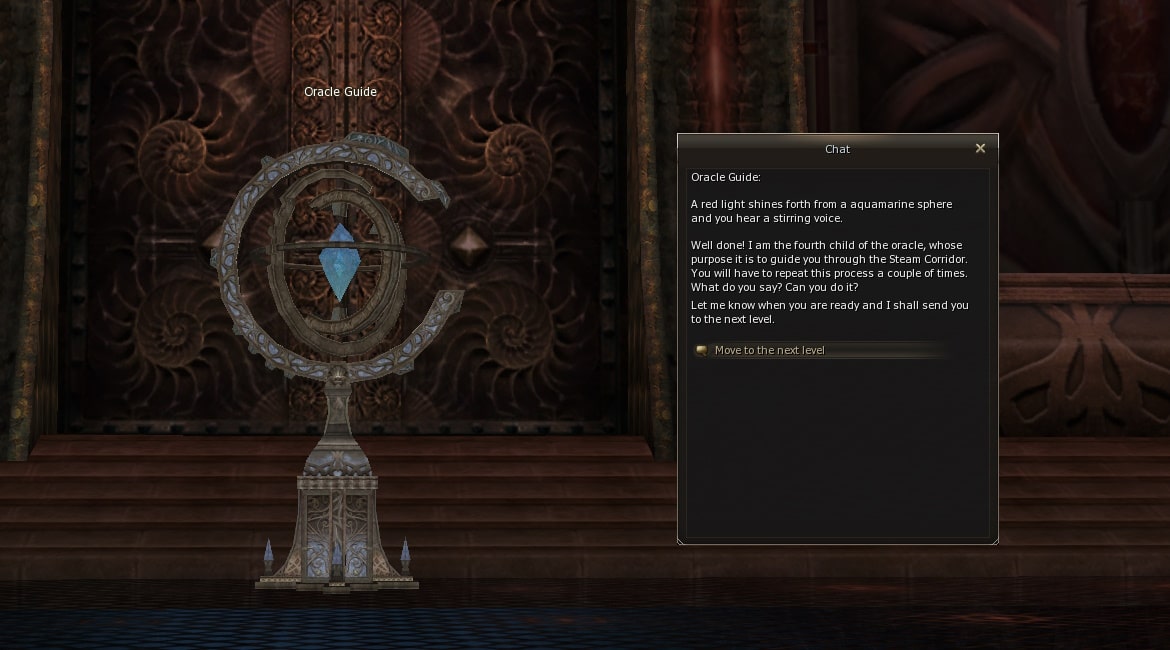
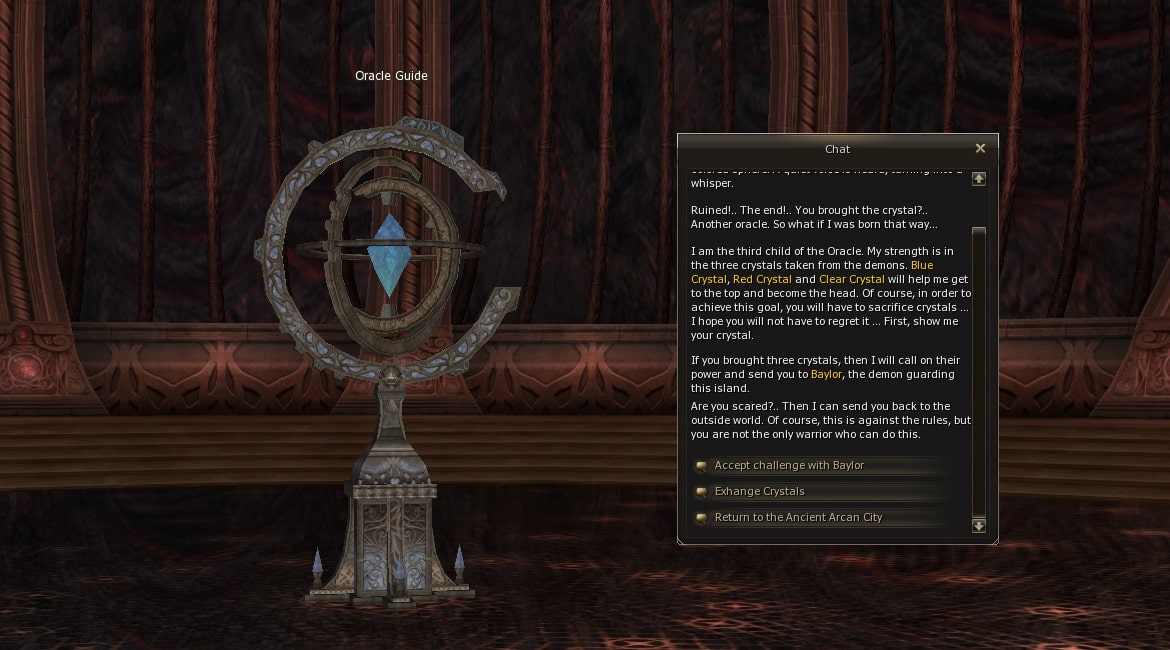
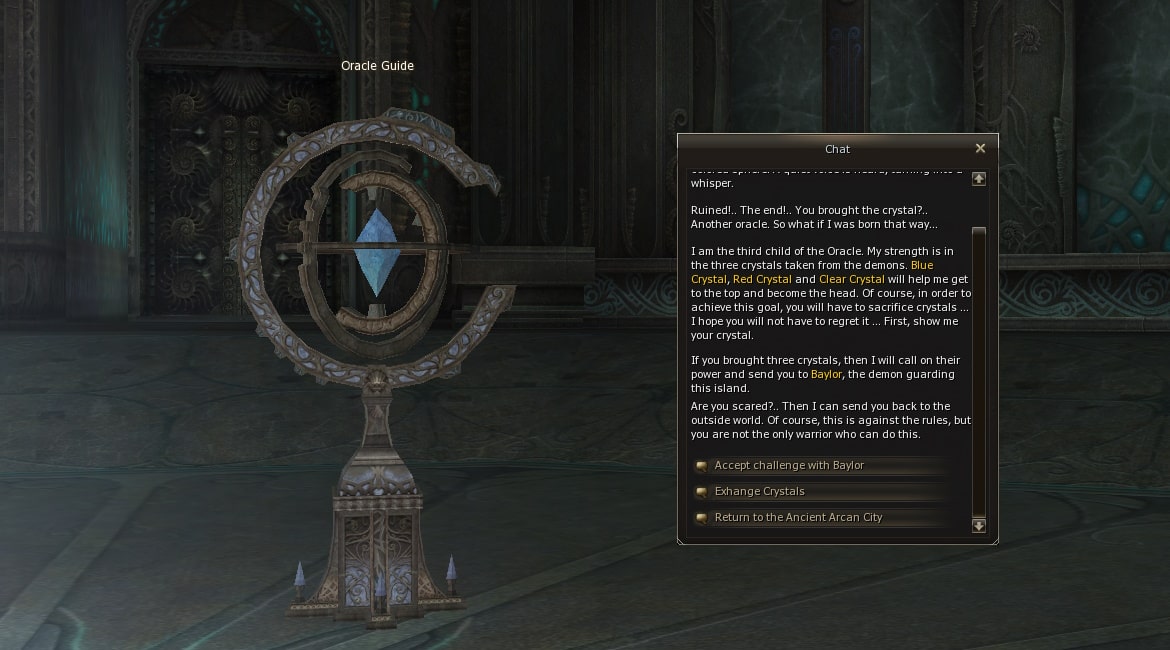
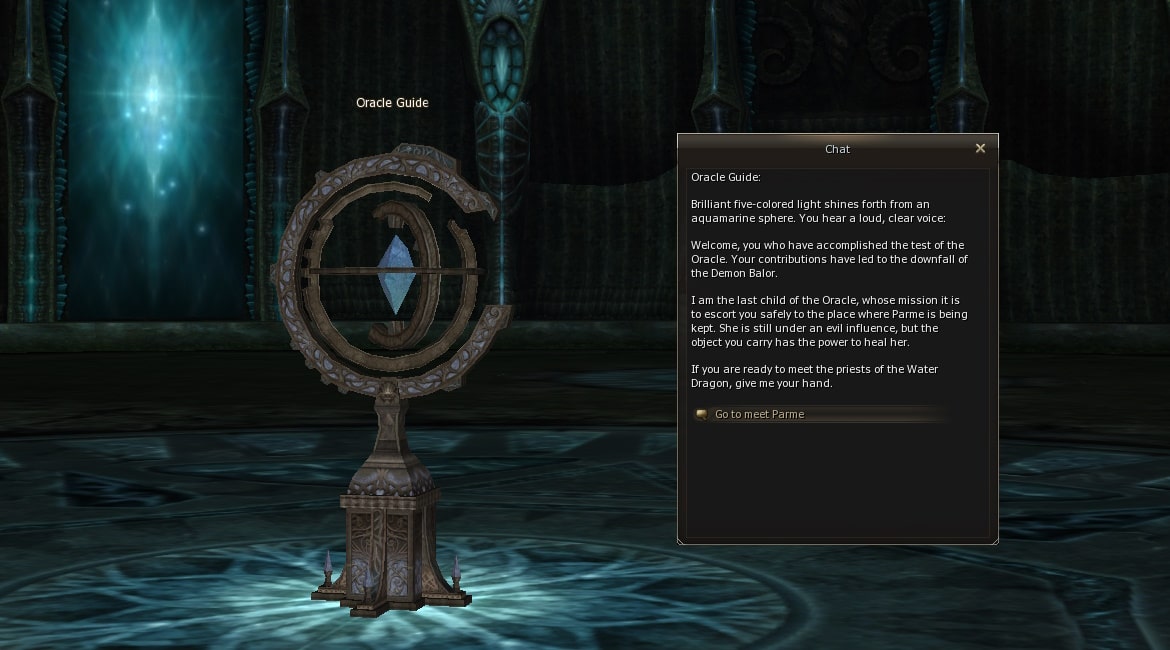
After entering instance, your party will appear in Crystal Caverns, where you will meet
NPC
 Oracle Guide
.
Oracle Guide
.
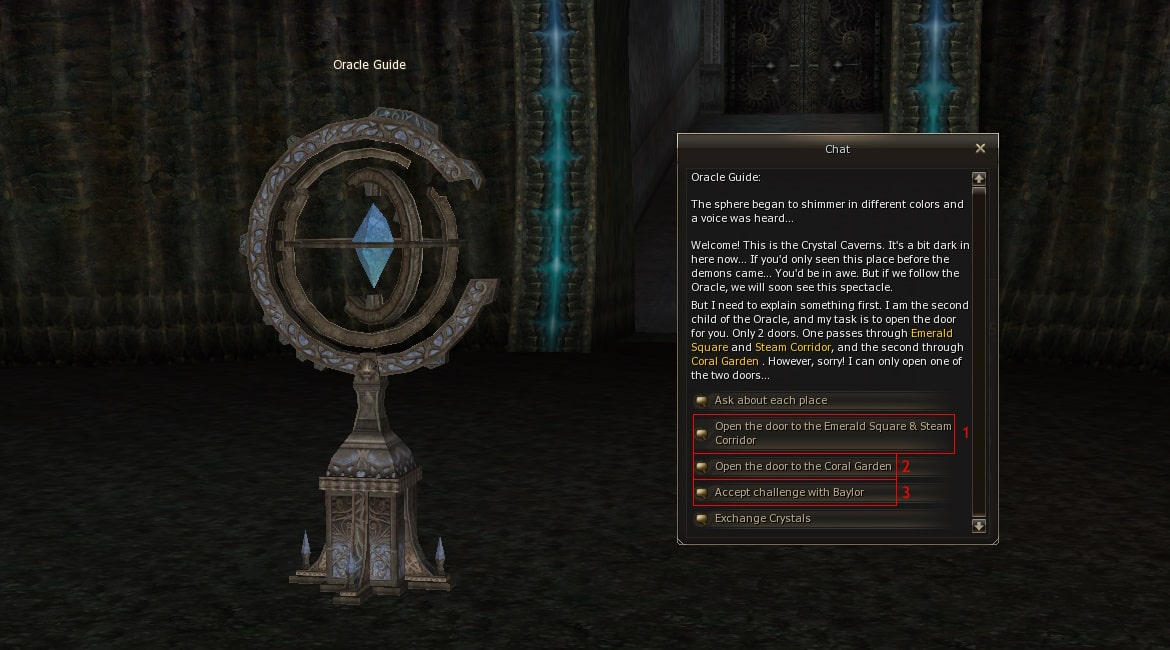
Party leader have to talk to the Guide and select boss to kill. That action can't be undone. Further options are available:
- Open the door to Emerald Square (Darnel) to get blue crystal and Steam Corridor (Kechi) for red crystal.
- Open the door to the Coral Garden (Tears) to get clear crystal.
- Challenge Baylor. Each party member must have 3 crystals in inventory.
Party members can trade their crystals from Oracles Guide by the rate, provided above.
If you choose Emerald Square, the door to the second zone opens, where you have to find keys to enter Darnel's or Kechi's hall.
If Coral Garden where chosen, passage to Tears will open immediately.
Gatekeepers
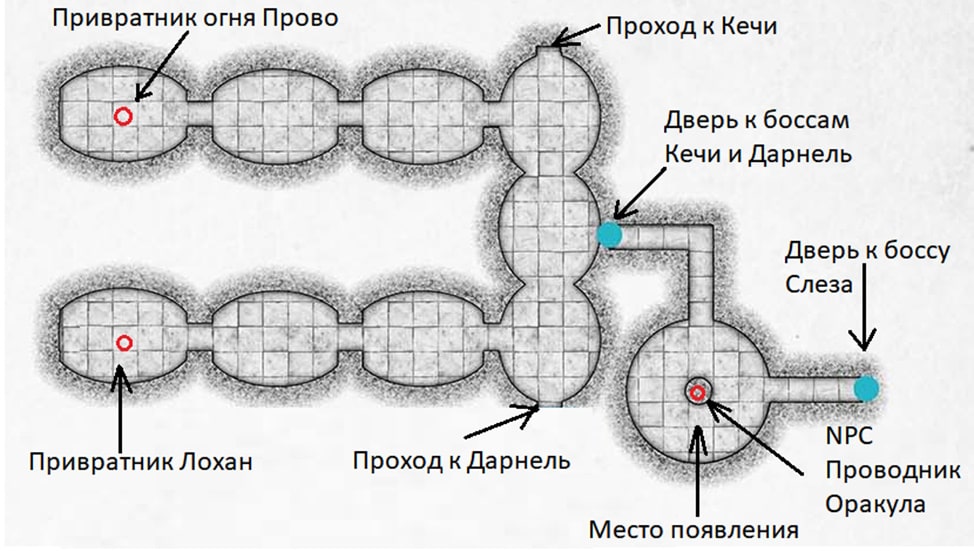
At the second part of the caverns you will meet monsters. They are social and aggressive, but for well-equipped (A-grade on early Gracia stage) and alive party monsters are not dangerous.
Depending on the boss you choose, you'll need to kill one of the gatekeepers to get the key:
-
Gatekeeper Provo Lv. 76
for Kechi —
 Red Coral Key
NG
Red Coral Key
NG
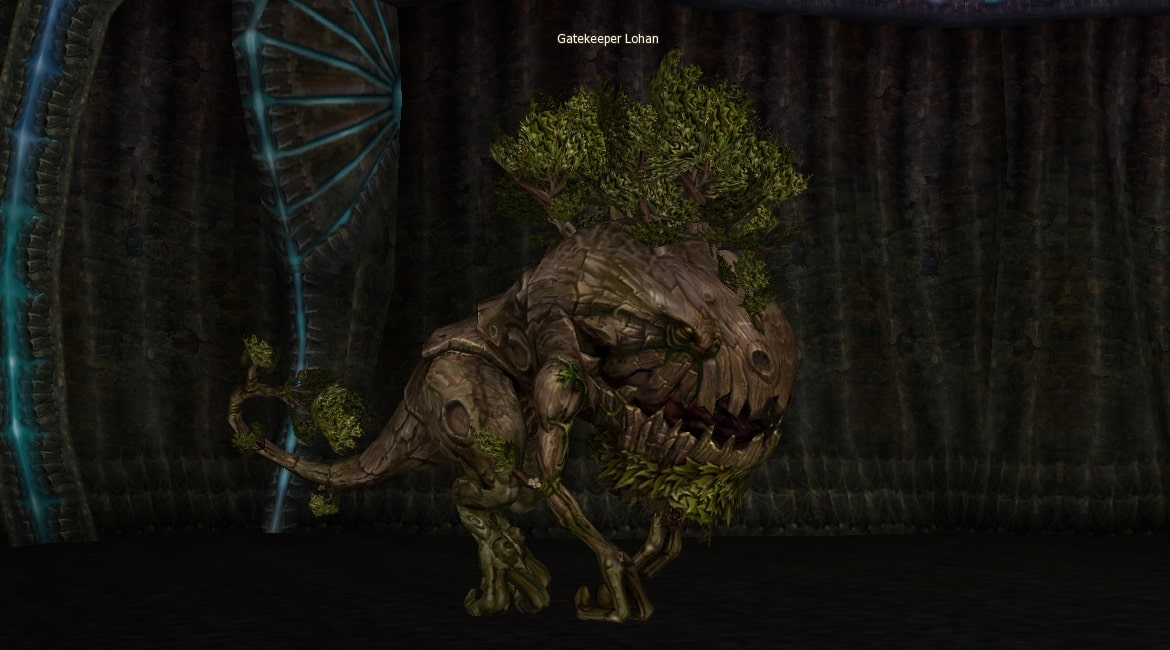
-
 Gatekeeper Lohan Lv. 76
for Darnel —
Gatekeeper Lohan Lv. 76
for Darnel —
 Blue Coral Key
NG
Blue Coral Key
NG
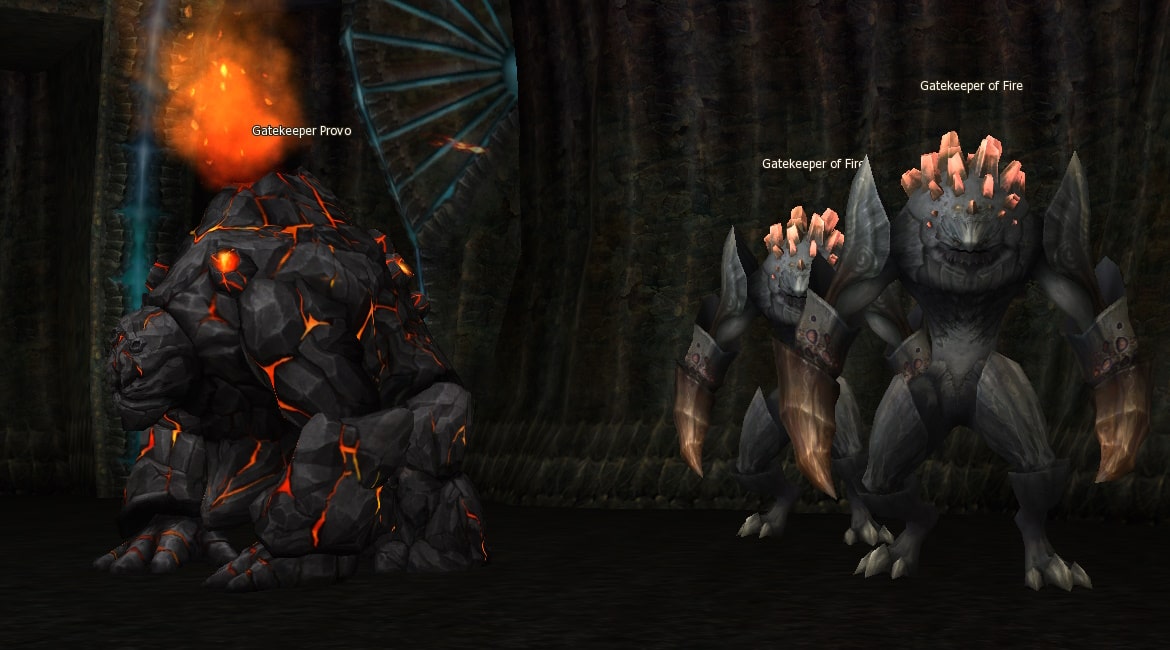
Pay attention!
After you attack a gatekeeper, another one will disappear. Because of that you can get just one key anytime you enter the instance.
Key always drop to the ground, even if all party have autoloot. If party loot set to random, note who got the key — only this person can open the door to the boss.
To open the pass to the boss, use the key on the gate near the corresponding gatekeeper in the common corridor:
Darnel
- Difficulty – medium, will have to run
- Requirements for group composition – no special requirements
- Availability for different classes (Archers/Mages/Melee) – high
So, you decided to kill Darnel and get Blue Crystal. To do that party leader have to pick 2nd row
in Oracle Guide dialogue window. Group have to kill
Gatekeeper Lohan Lv. 76
and get
Blue Coral Key
NG
.
The one with the key have to come up to the Sapphire Gate near
To the Emerald Garden Darnel Watcher
,
target them and right-click on the key in the inventory.
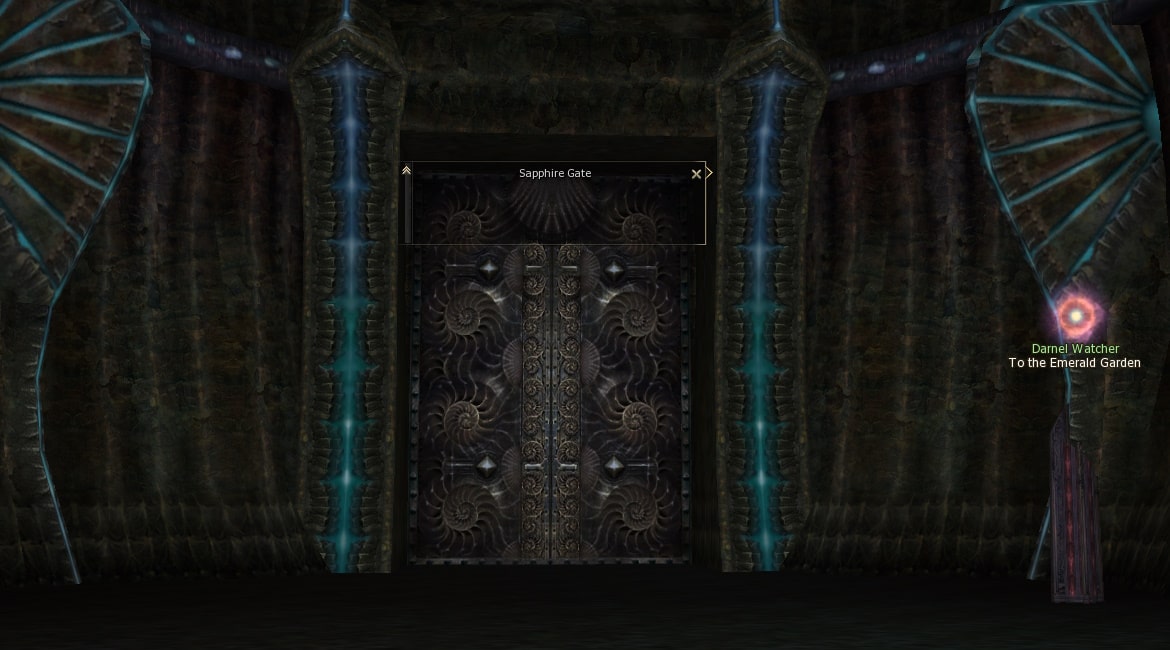
Door will open and group will be able to get inside, where a very beautiful hall awaits. The author of the guide recommends turning on maximum graphics settings and looking up and around.
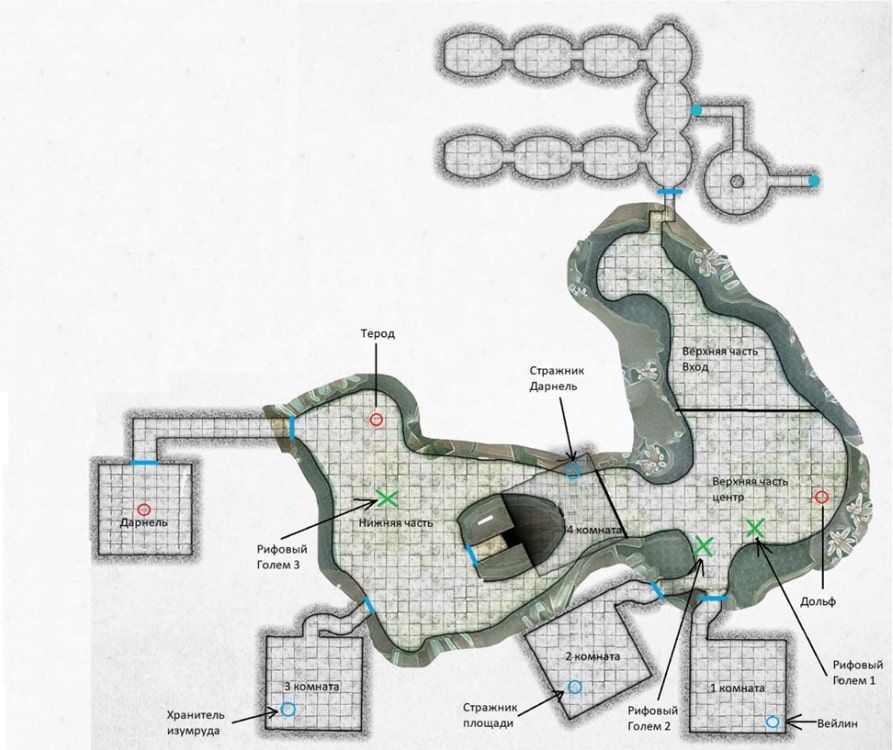
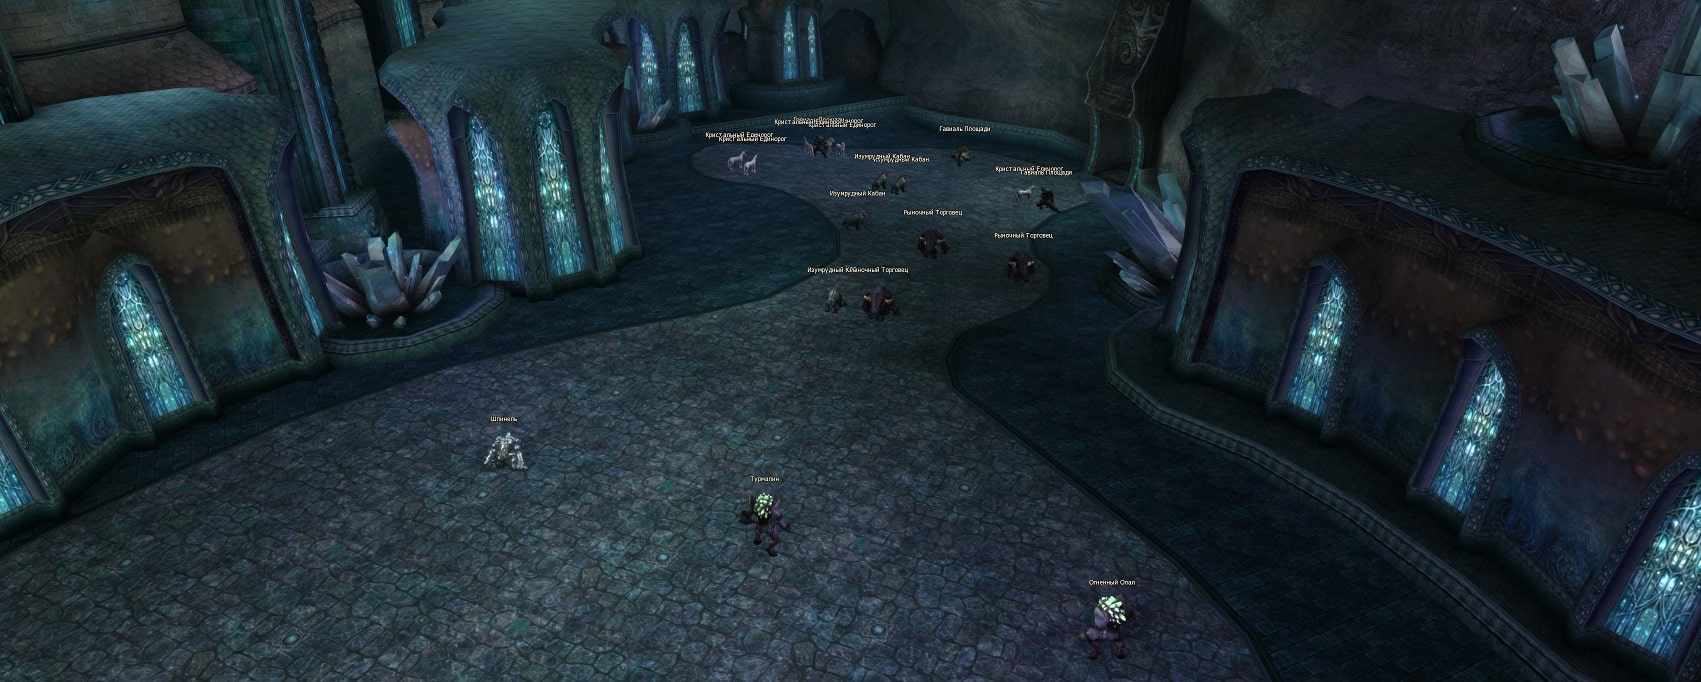
Emerald Square consists of 3 parts and 5 hidden rooms.
- Upper part - Entrance
- Upper part - Center
- Lower part


Tactics
First you have to kill all monsters in appropriate area. Monsters are aggressive and social, but not very strong. If you have a good gear they will not be a real problem.
 Secret Key
NG
drops from monsters that required to open rooms. Keys drop to the ground,
even if the whole group have autoloot. Pick up keys, they will become useful later.
Secret Key
NG
drops from monsters that required to open rooms. Keys drop to the ground,
even if the whole group have autoloot. Pick up keys, they will become useful later.
After killing all monsters in each zone
Reef Golem Lv. 76
will spawn. There will be
3 golems, their spawning spots are marked on the map.
After killing
Reef Golem Lv. 76
a corresponding mini-boss will appear, spawn spots also marked
on the map.
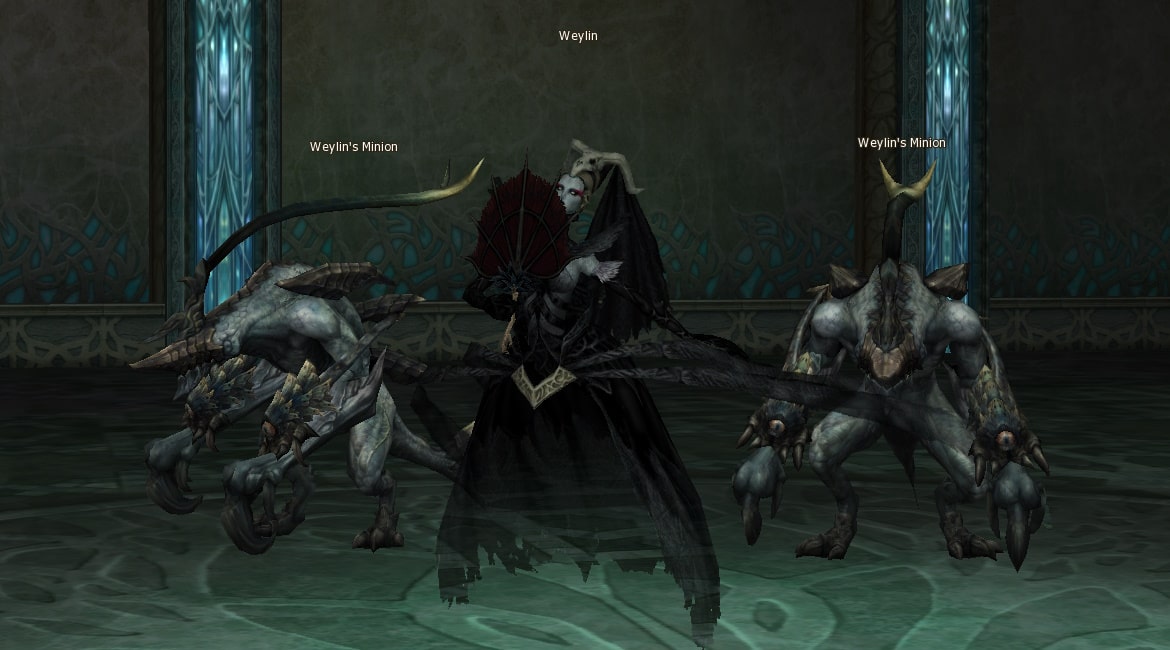
Reef Golem 1 responsible for spawn of
Weylin Lv. 76
in a 1st room.
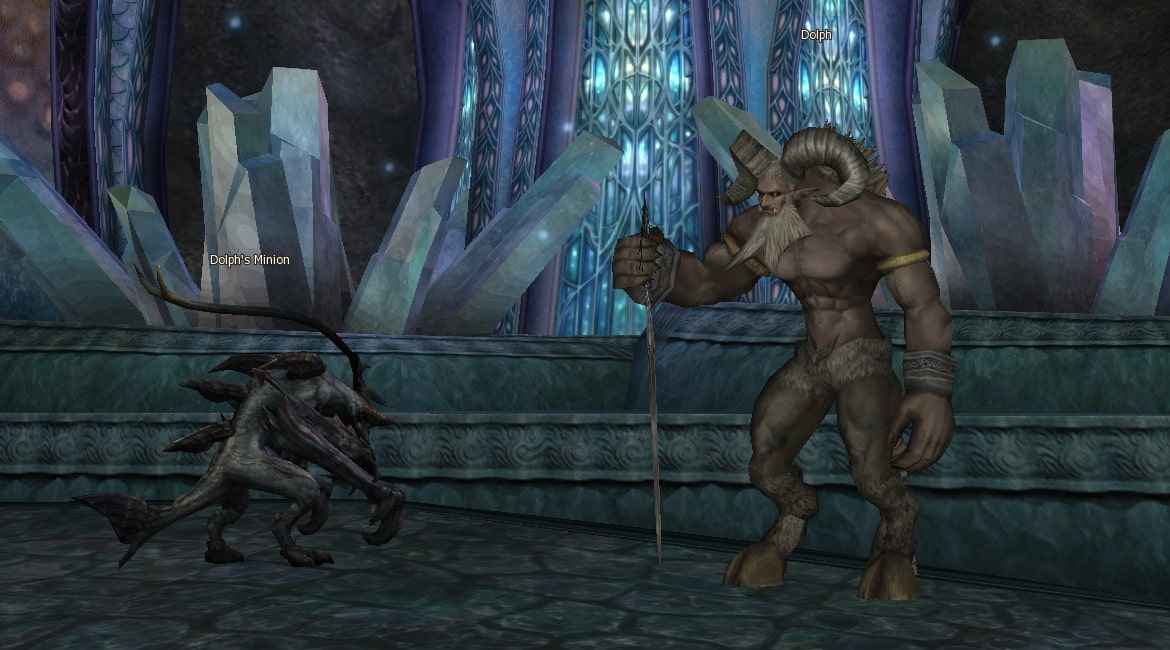
Reef Golem 2 responsible for spawn of
 Dolph Lv. 76
in an Upper part - Center.
Dolph Lv. 76
in an Upper part - Center.
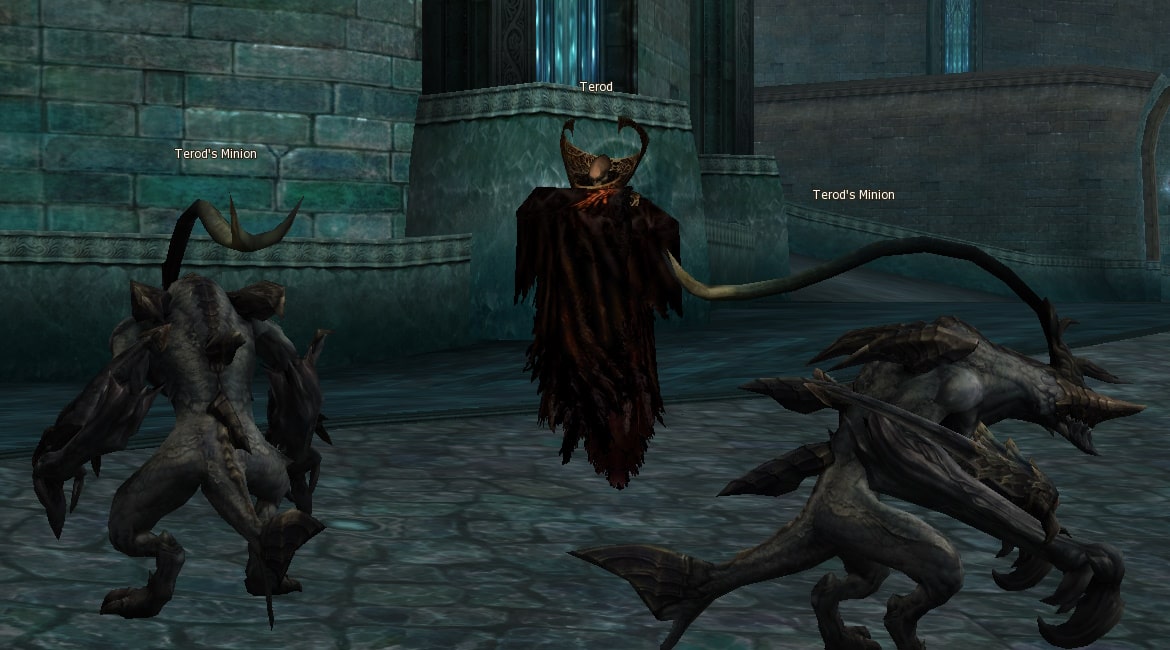
Reef Golem 3 responsible for spawn of
 Terod Lv. 76
in a Lower part.
Terod Lv. 76
in a Lower part.
Usually, when entering the hall, the group provokes all the monsters in the open space and kills them, moving from Upper parts - Entrance to Lower part, killing Terod at the end of the Lower part and returns to the top, to kill Reef golem 2 and Dolph in the Upper - Center. After that clears all rooms from 1 to 4.
After killing Dolph and Terod, the doors to the rooms for which you were collecting keys, will be activated.
To open the door, stand far from it and slowly move closer. When character reaches required area - door will open. Stay where you are until your group clear the room.
Pay attention!
A pre-selected character, not involved in killing mobs, must open the door (BD/Judicator/Buffer).
If the person who opened the door goes inside, the door will close and the entire group will be locked. In that case only re-entering instance will help.
It's very easy to go through the rooms:
- Character with a key comes to the door
- Door opens, party entering
- Party killing main monster in the room
- Group leaves the room
- The character who opened the door moves away
To open 5th door to Darnel, monsters in rooms 2, 3 и 4 have to be killed. No need to kill other monsters in rooms, they will despawn right after door closes.
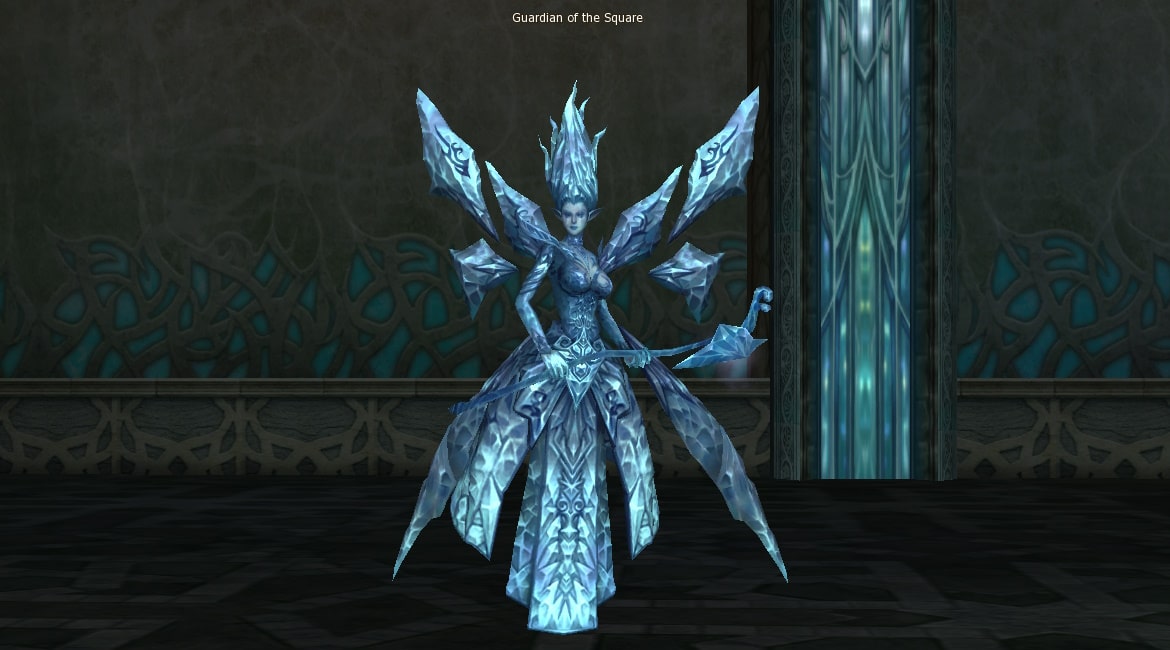 Guardian of the Square Lv. 76
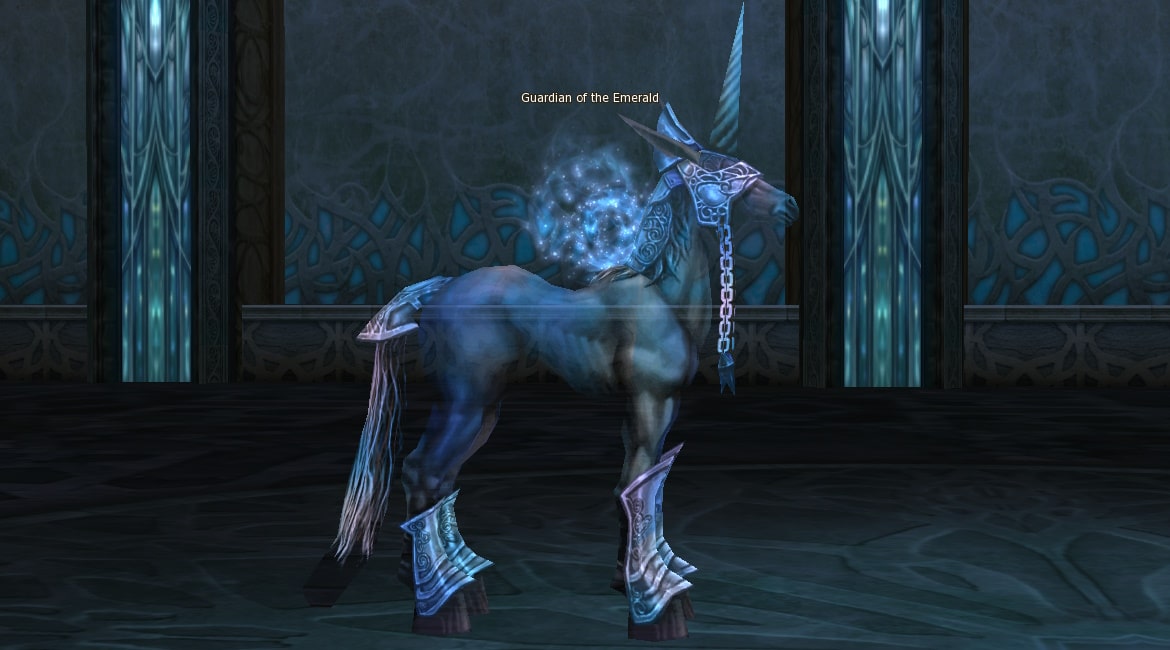 Guardian of the Emerald Lv. 76
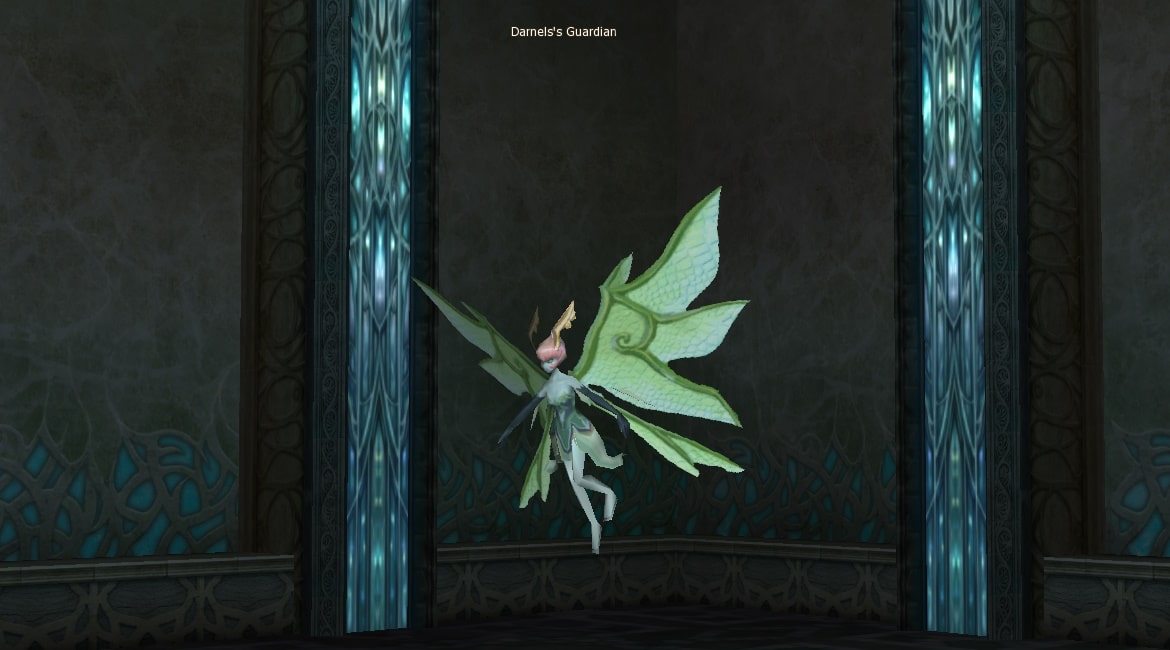 Darnels's Guardian Lv. 76
Interesting mechanics
Mini-Boss in 1st room
Weylin Lv. 76
does not affect opening the door to Darnel, so
you don't have to go there. From all above following strategy comes from:
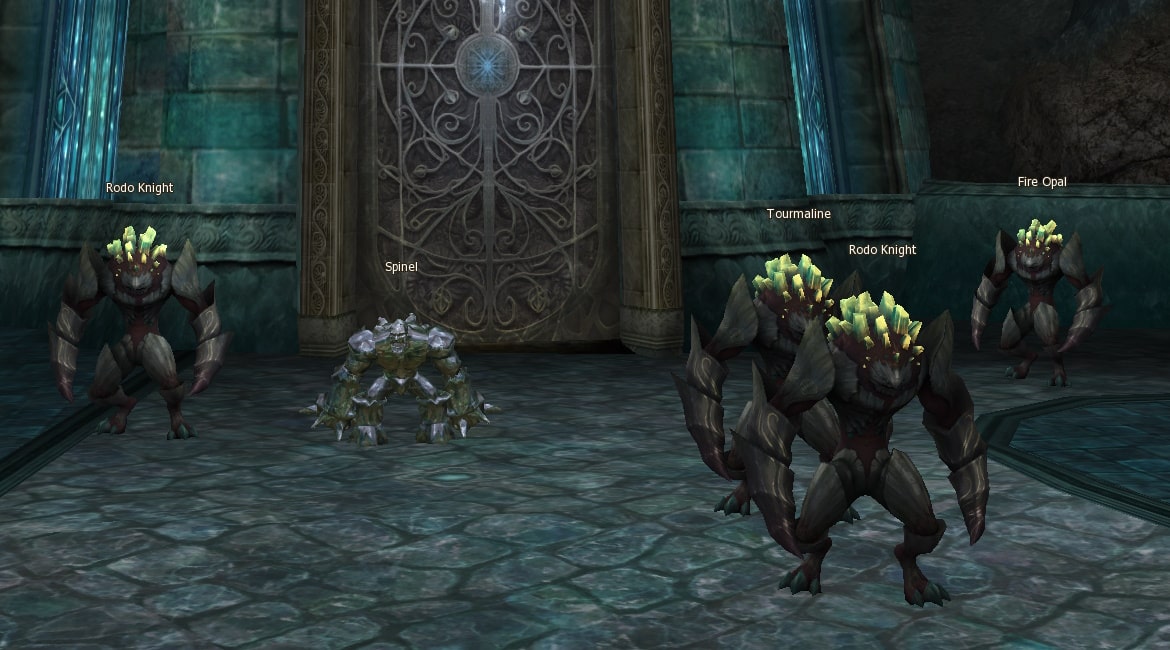
You can skip killing Reef golem 1, who is responsible for the appearance of Weylin. In this case you can
avoid killing monsters in Upper part - Entrance and run straight to Upper part - Center under the effect
of bard's
 Rhythm of Shadows Lv. 1
. Then kill there only required monsters:
Tourmaline Lv. 76
,
Spinel Lv. 76
,
Fire Opal Lv. 76
,
Rodo Knight Lv. 76
. If you do so Reef Golem 2 and mini-boss Dolph will appear immediately.
Rhythm of Shadows Lv. 1
. Then kill there only required monsters:
Tourmaline Lv. 76
,
Spinel Lv. 76
,
Fire Opal Lv. 76
,
Rodo Knight Lv. 76
. If you do so Reef Golem 2 and mini-boss Dolph will appear immediately.
Fighting Darnel
After the death of all three Guardians, the door to
Darnel Torture Maiden
Lv. 78
will open.
| HP | 3 246 552 | MP | 3 794 |
| P.Atk. | 40 506 | M.Atk. | 19 322 |
| P.Def. | 1 597 | M.Def. | 1 684 |
| EXP | 15 210 000 | SP | 2 500 000 |
| Attack Attribute | Unholy, 250 | Defence Attribute |
Fire, 65 Water, 65 Wind, 65 Earth, 65 Holy, 25 Unholy, 135 |
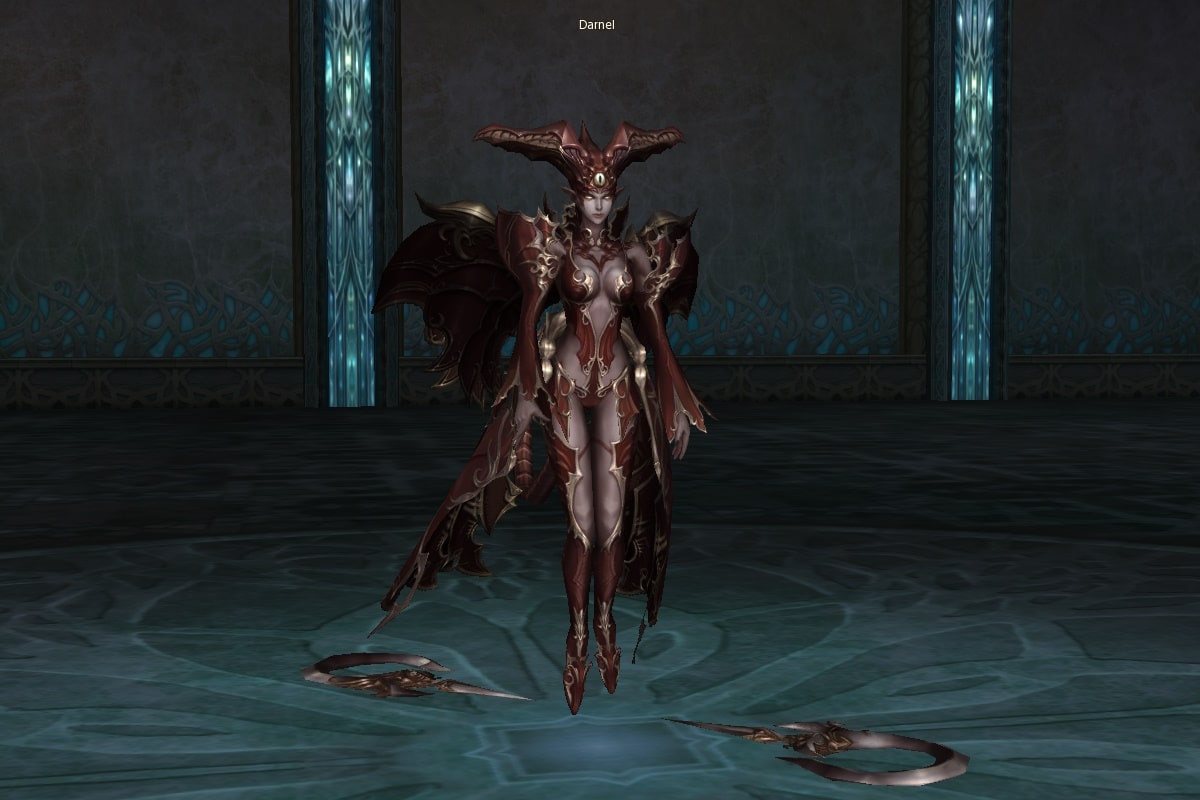
Pay attention!
Make sure that whole group entered Darnel's room — the door will close after the first hit.
If someone did not have enough time to come in, this player will have to return to the city and enter instance again. He immediately will end up near the boss.
Maximum damage to boss — 25 000 points.
Darnel herself is very simple, but has 2 distinctive features:
Sometimes Darnel uses mass paralysis. Don't worry, it can be removed by healer's skills, but you need to take care of not to get trapped in it by the whole group.
A huge number of traps appear in Darnel's hall, which she periodically explodes. Don't try to disable them — they work almost instantly.
After boss dies each party member will get
Blue Crystal
NG
. An NPC
Oracle Guide
will appear,
that can teleport group to Baylor (1), or send back to town (3). Everybody can trade (2) extra
crystals for needed ones.
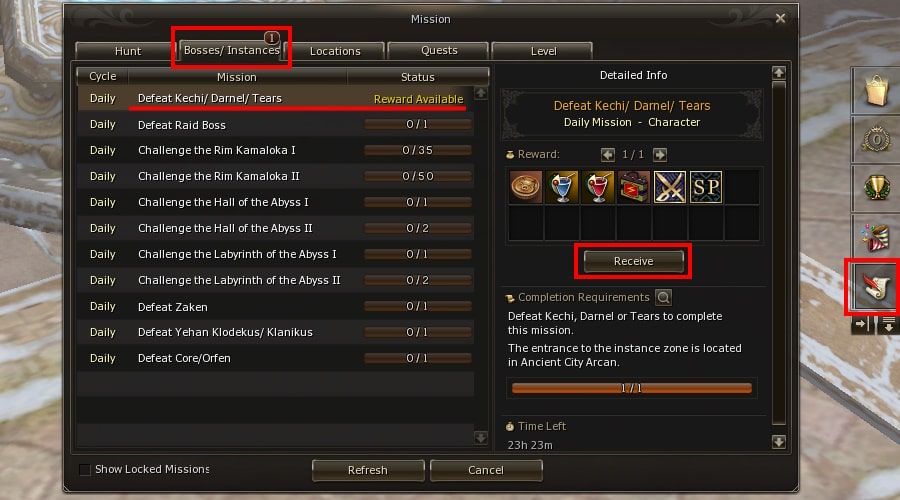
Congratulations with a successful raid! Don't forget to pick up your reward in Missions.
Darnel's droplist
Masterwork 2024
| Item | Amount | Chance |
|---|
Masterwork Eternal


Kechi
- Difficulty – easy, but you will have to heal
- Requirements for group composition – no special, good equipment and alive heals are recommended
- Availability for different classes (Archers/Mages/Melee) – high
Now you decided to kill Kechi and get Red Crystal. First of all party leader have to choose 2nd row
at the begging of instance. Group have to kill
Gatekeeper Provo Lv. 76
and get
Red Coral Key
NG
.
The person with the key in inventory should approach the Corridor Gate after
To the Steam Corrdior Kechi Watcher
,
target it and right-click on the key in the inventory.
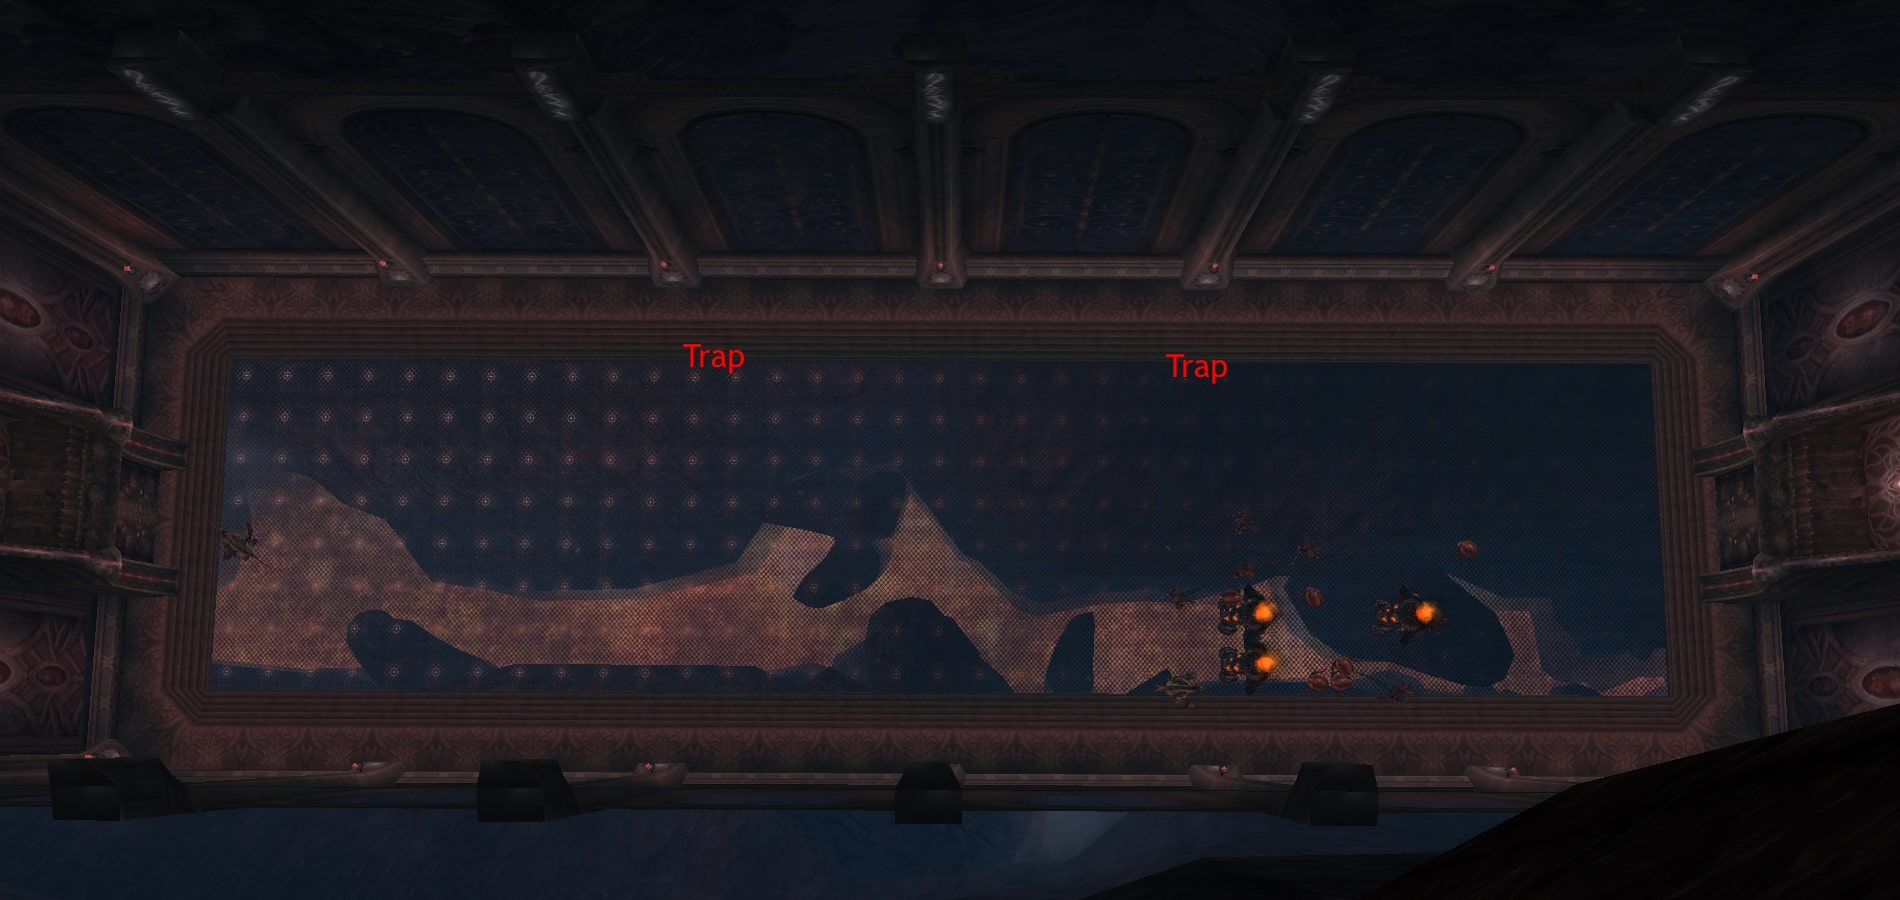
Door will open and group can get inside, where a very dark gloomy corridor awaits you.
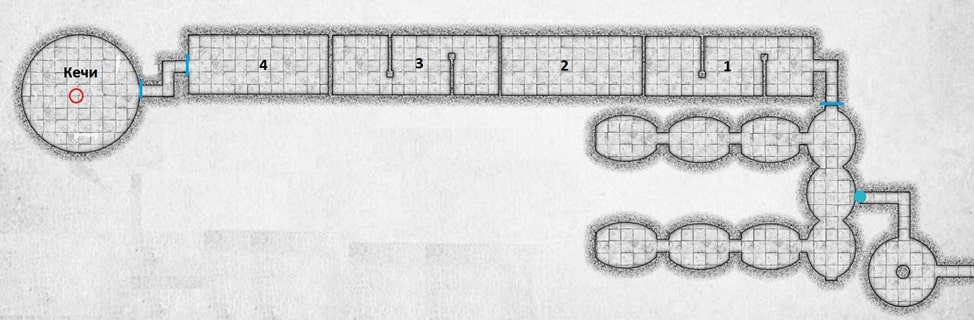
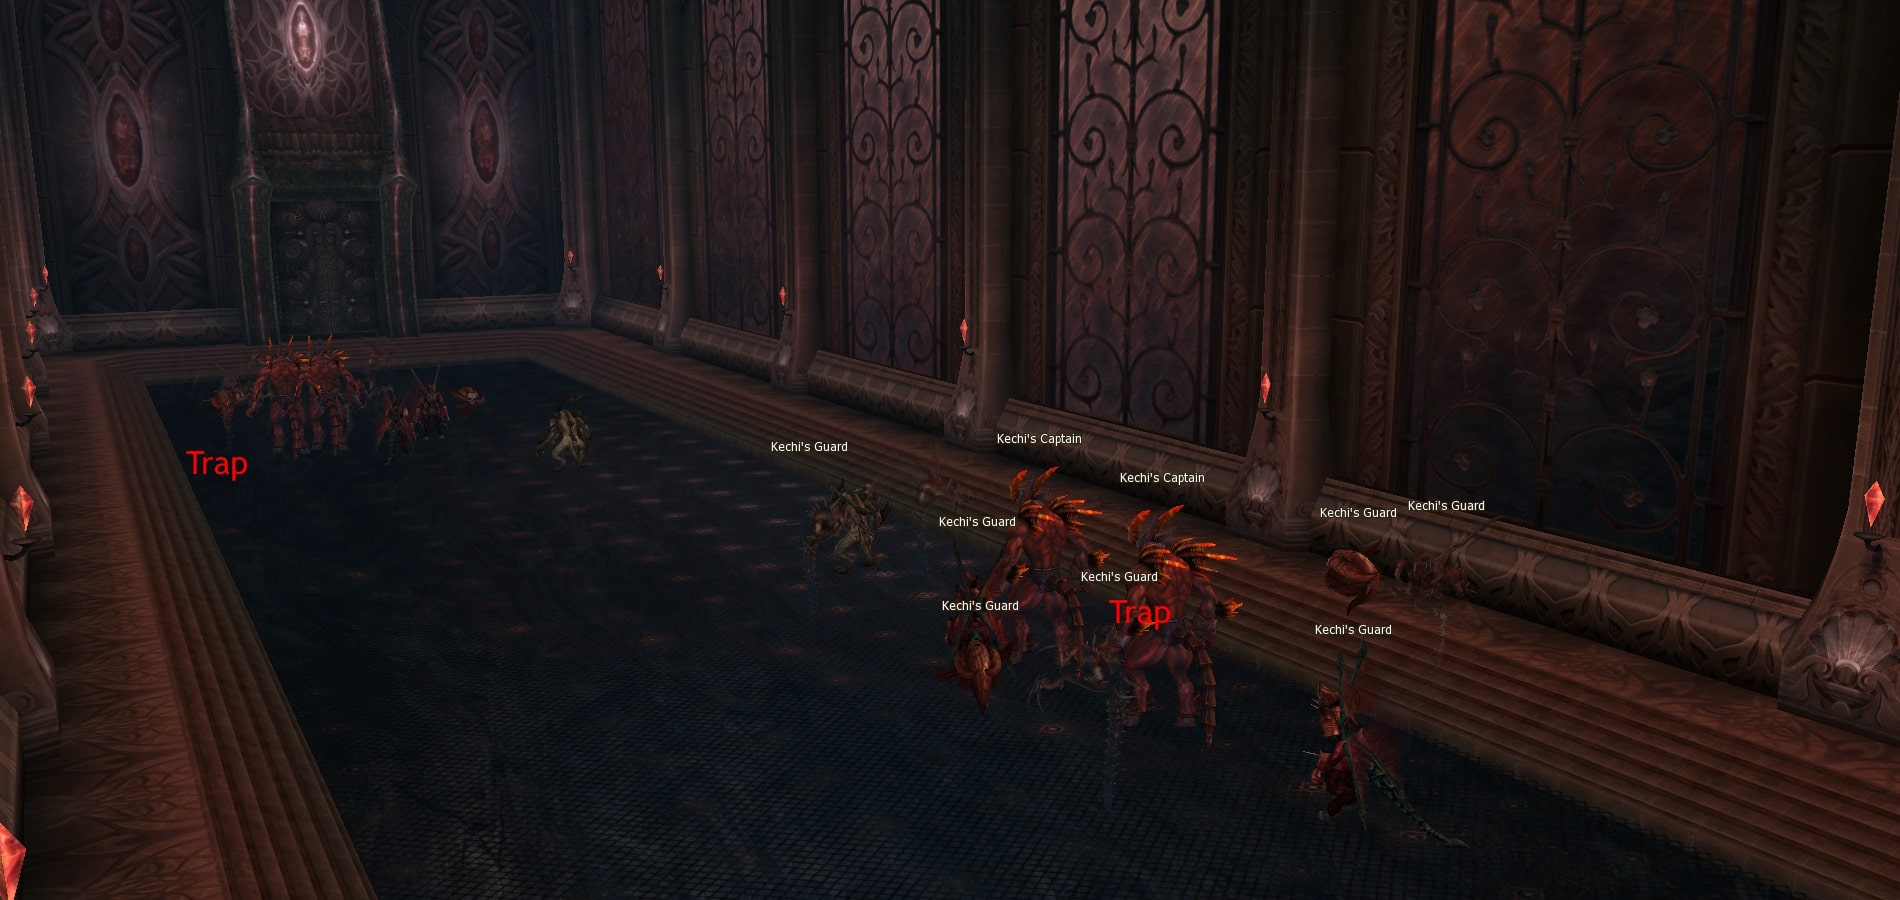
As you can see on the map, 4 consecutive rooms and the last round boss-room will be there.
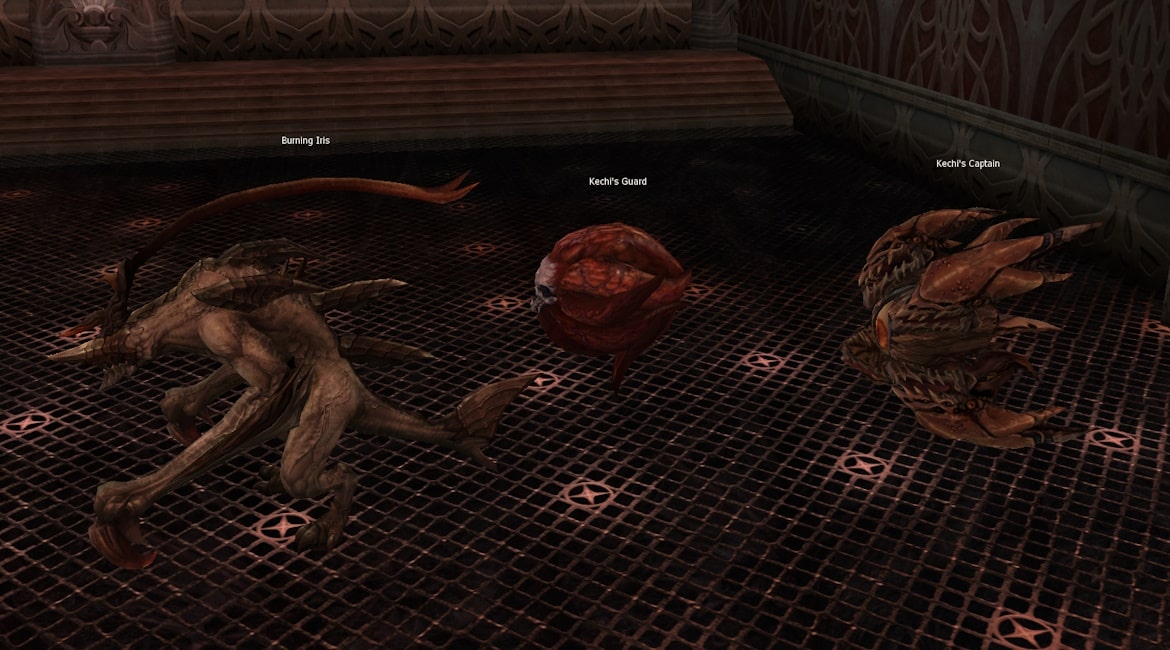
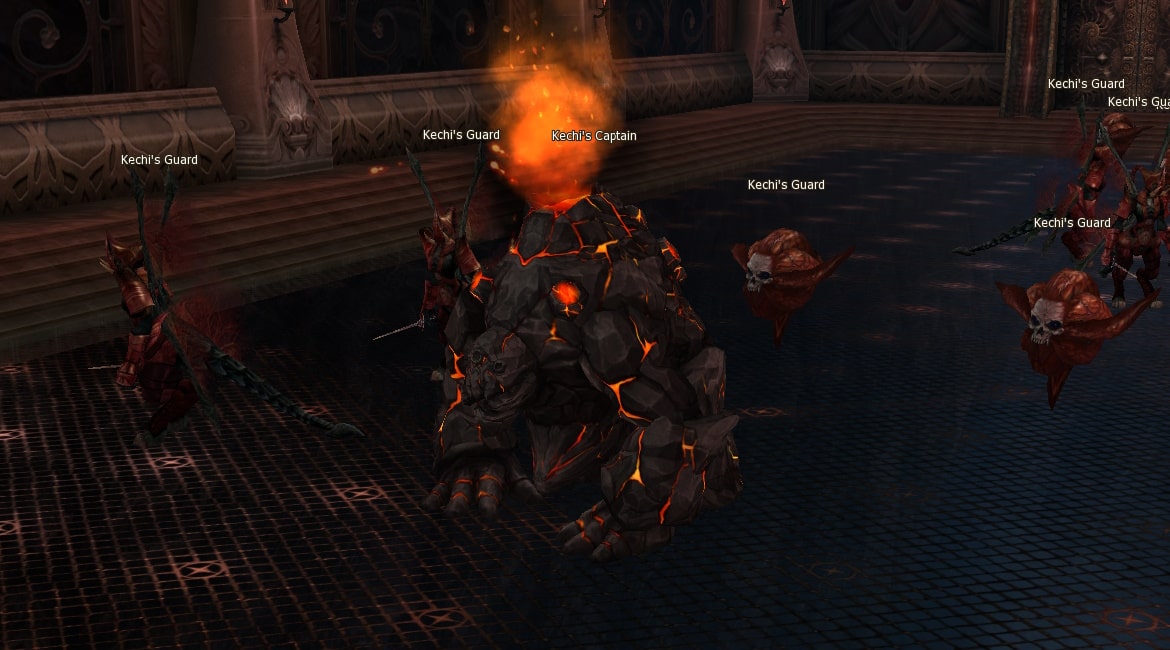
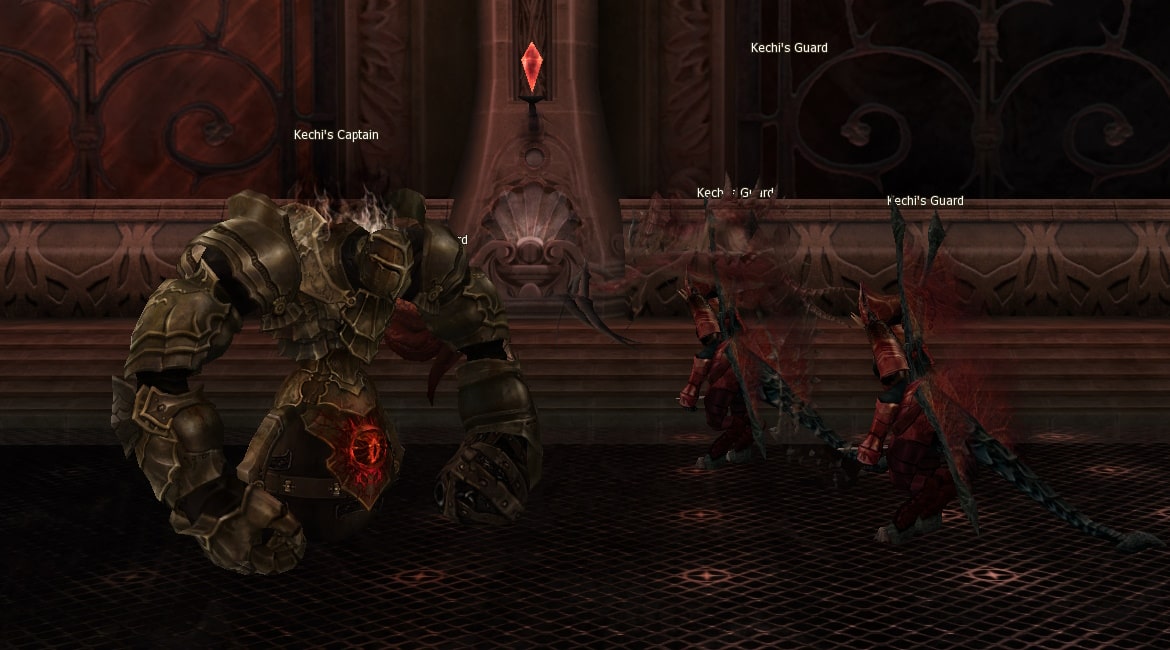
In every room Kechi's Captains with their servants are located. After Captain's death some servants disappear. In each next room monsters become stronger.
Traps, that doing fire damage, can be found also. They can't be disarmed, but can be avoided. Trap's locations marked on the screenshots below.
Tactics are same for all rooms: see monsters — kill monsters. If you are not sure in your group gear, better kill monsters by one.
1st room
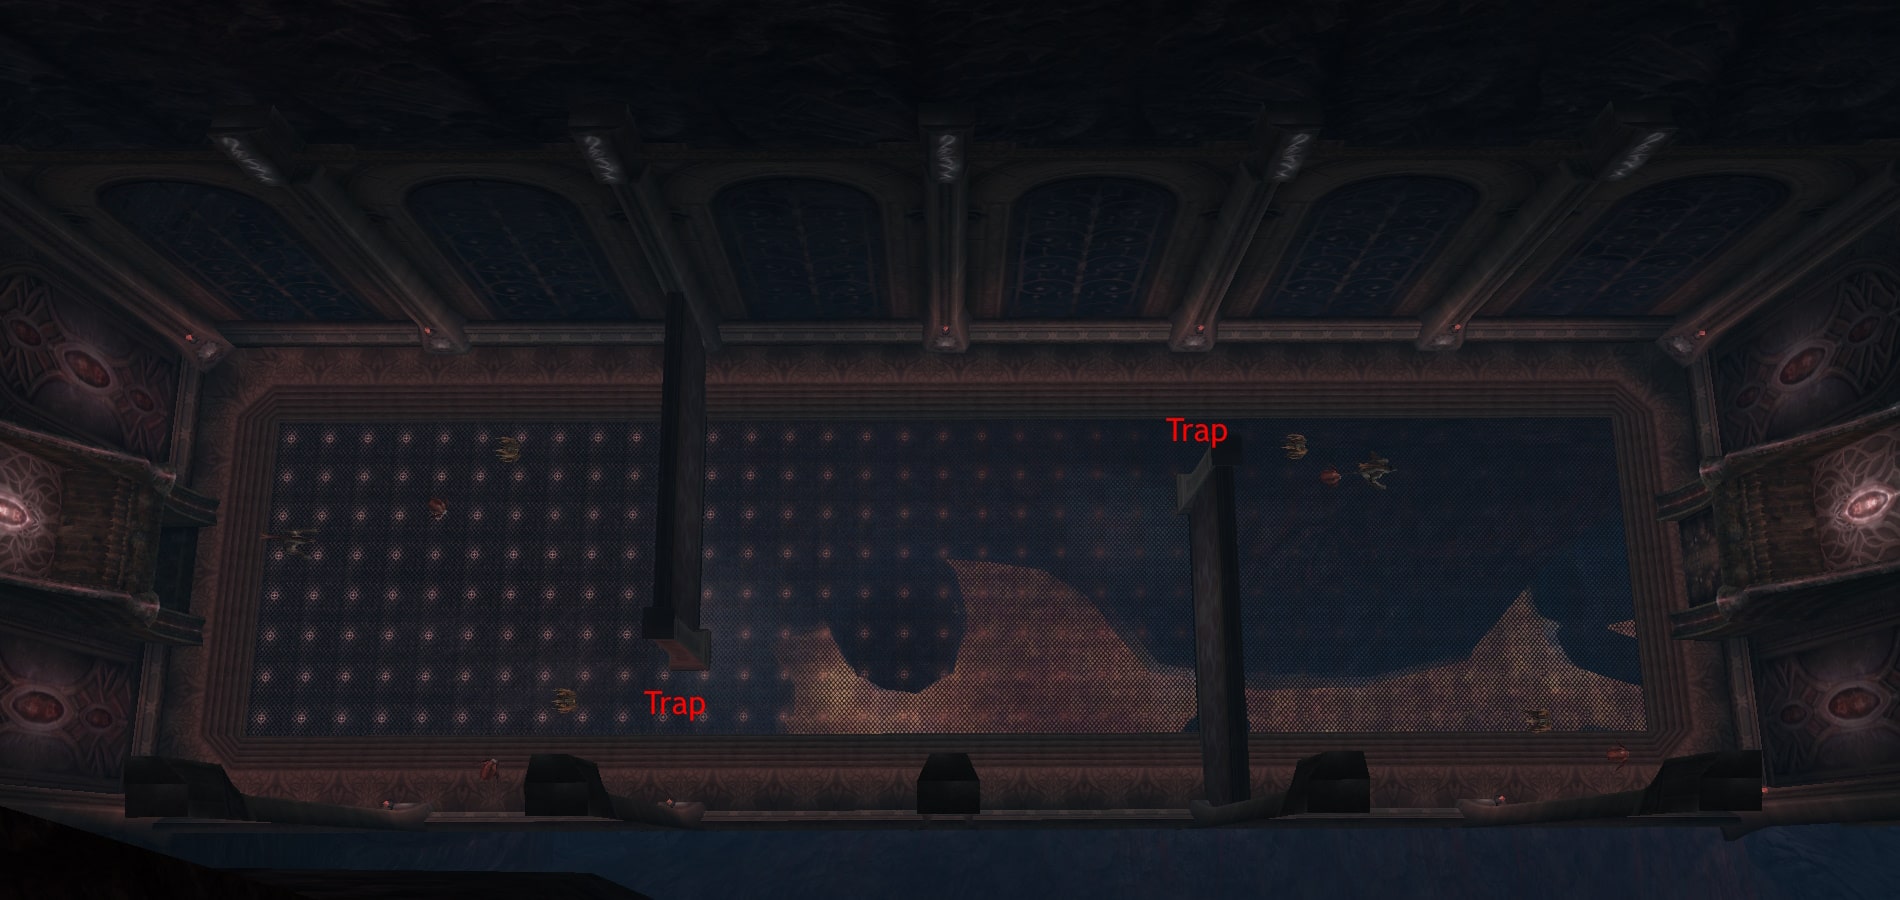
After opening Cavern gates, you will find yourself in a narrow corridor that will lead you to the first room. There are few monsters and two traps. Clear the room to move forward.
After all monsters die,
Oracle Guide
will appear.
Talk to it to teleport in a next room.
Pay attention!
Try to stay as one near the door. Teleportation can be activated by any player. After activation, everyone who where standing near the door will be teleported.
If part of the group falls behind, and not being moved to the next room, instance will be finished for them. There are no other way to get into the next room.
2nd room
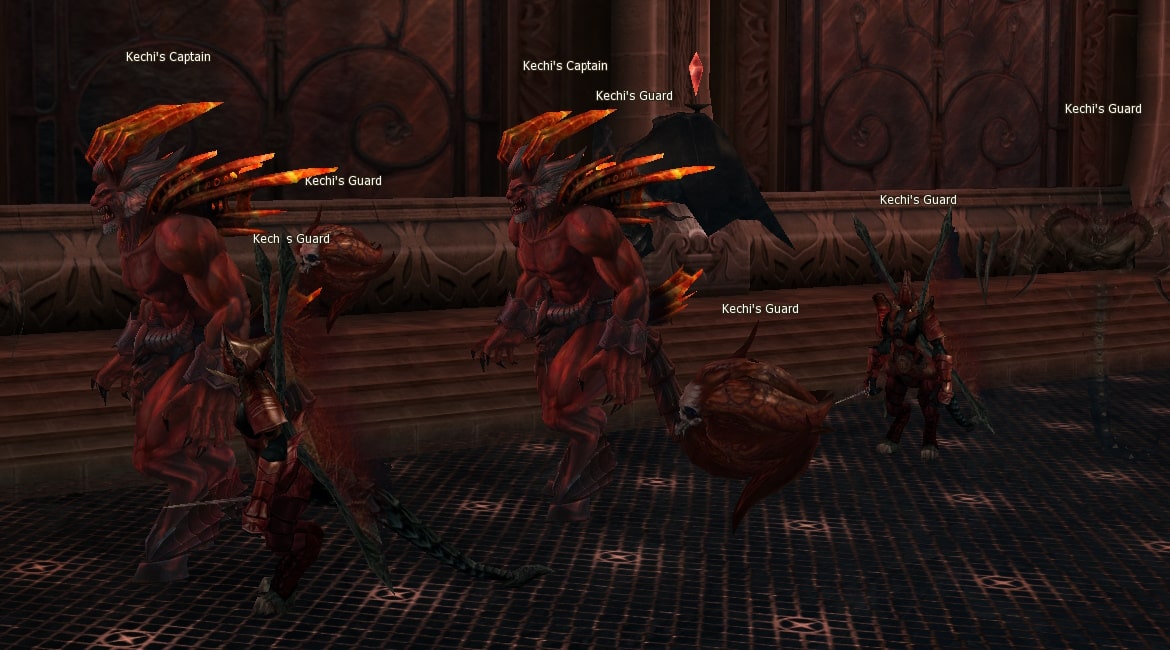
Straight corridor, there are also Kechi's Captains with guardians. They are stronger than before, and can be close to the entrance, so let your tank go first.
After all mobs die,
Oracle Guide
will appear.
Talk to it to move further.
Pay attention!
Try to stay as one near the door. Teleportation can be activated by any player. After activation, everyone who where standing near the door will be teleported.
If part of the group falls behind and not be moved to the next room, instance will be finished for them. There are no other way to get into the next room.
3rd room
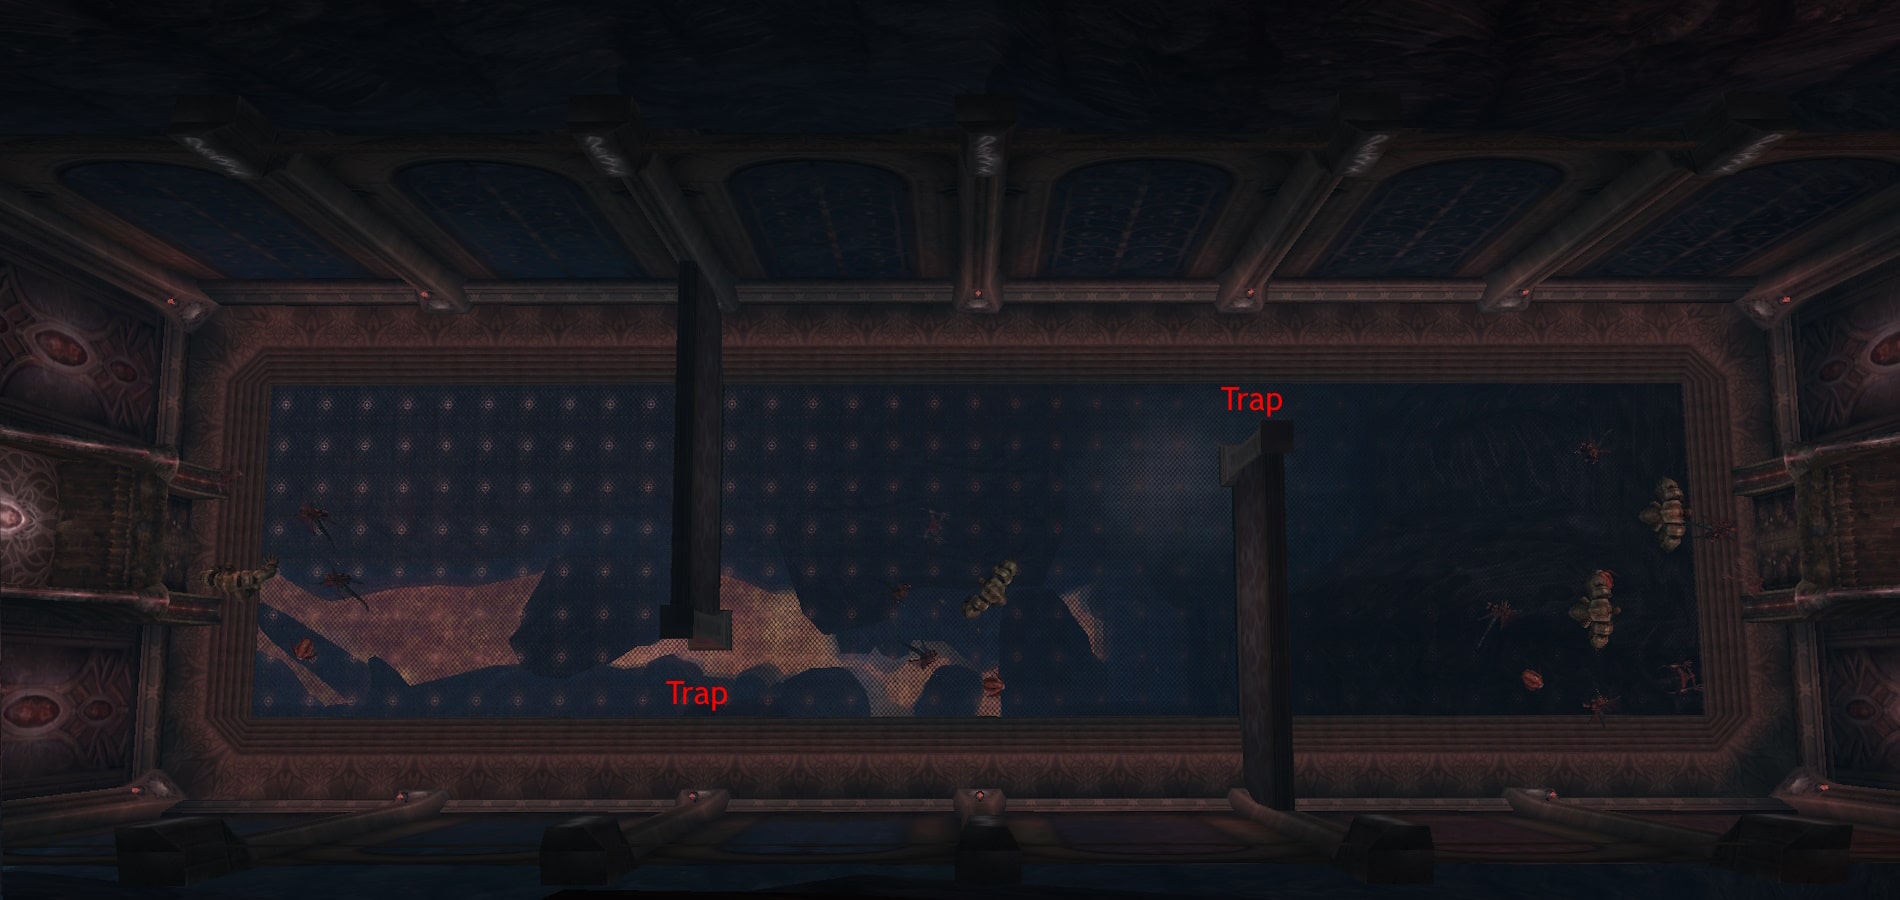
In the third room a surprise may await you in the form of a Captain standing at the entrance,
who can seriously hit whole group. If you are not confident in the strength of your group and
the speed of loading the location, use
Rhythm of Shadows Lv. 1
.
After all monsters die
Oracle Guide
will appear.
Talk to it to move further.
Pay attention!
Try to stay as one near the door. Teleportation can be activated by any player. After activation, everyone who where standing near the door will be teleported.
If part of the group falls behind and not be moved to the next room, instance will be finished for them. There are no other way to get into the next room.
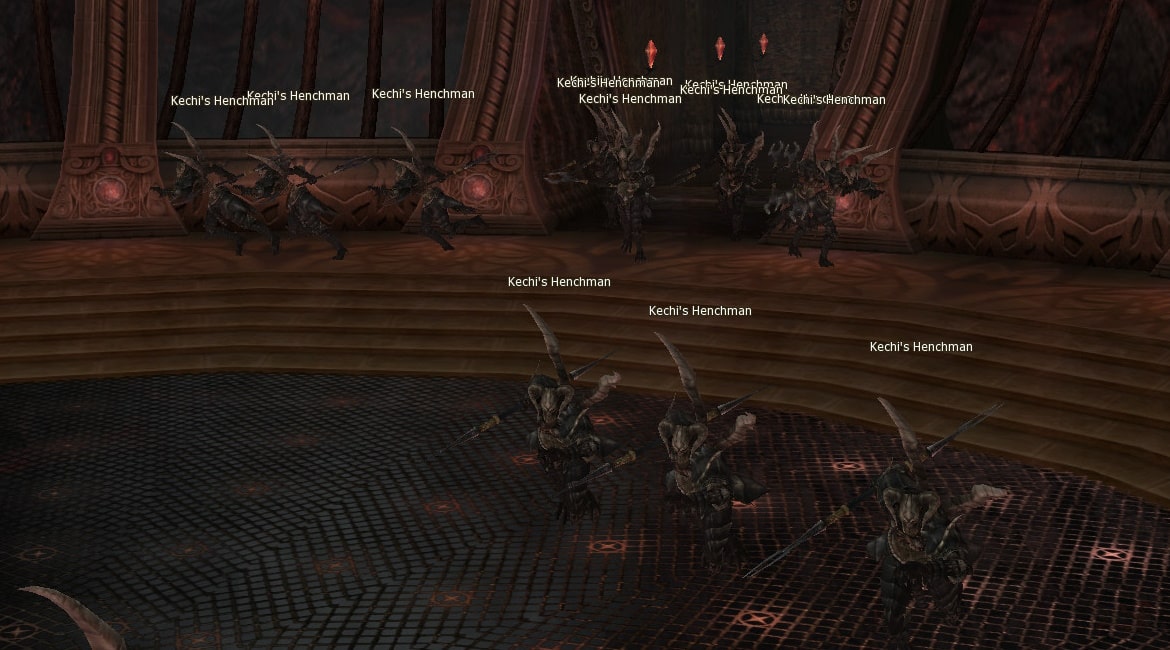
4th room
Straight corridor with strong monsters.
After all they die the entrance to boss room will open.
Fighting boss
After you clear Steam Corridor you will meet
Kechi Fire
Lv. 78
.
| HP | 1 908 879 | MP | 3 869 |
| P.Atk. | 41 127 | M.Atk. | 18 459 |
| P.Def. | 1 609 | M.Def. | 1 698 |
| EXP | 15 210 000 | SP | 2 500 000 |
| Attack Attribute | Fire, 250 | Defence Attribute |
Fire, 115 Water, 25 Wind, 65 Earth, 65 Holy, 65 Unholy, 65 |

Pay attention!
Boss have incoming damage limitations — 25 000 points.
Kechi — fairly simple boss, a group with good equipment kills him quick and easy. Main difficulty here is that Kechi summons servants every 25% of lost HP. So if you don't kill him fast enough, there will spawn to many mobs and your group can die.
There are 3 ways to kill Kechi, choose one depends on your group composition:
- Kill minions with AOE skills
- Drive minions in circles by a tank
- Kill Kechi very fast, so minions will have no time to kill you
After killing boss each party member will get
Red Crystal
NG
. NPC
Oracle Guide
,
will spawn, that can move you further to Baylor (1), or back in town (3). You can also trade your
extra crystals (2) to needed one.
Congratulations on a successful raid! Don't forget to pick up your reward in Missions.
Kechi's droplist
Masterwork 2024
| Item | Amount | Chance |
|---|
Masterwork Eternal


Tears
- Difficulty – medium, require some healing
- Requirements for group composition - no special, good equipment and alive heals are recommended
- Availability for different classes (Archers/Mages/Melee) – high
If you want to kill Tears and get Pure Crystal, party leader have to choose 3rd row at the beginning. After that path to Tears will open, no special keys required.
Tactics
After passing the corridor, you will find yourself in a round hall full of aggressive and social monsters with strong damage.
Kill monsters to get special items, that needed to complete instance. Items drops to the ground regardless of the presence of autoloot in the group. Items can be traded, any member can pick them.
Moving by circle you have to kill all monsters here. After that 2
Crystalline Golem
will appear.
They have to move from the spawn point to the small room in front of them.
To make this happen, you have to place Crystal Fragments after each other on a close distance
to make Golem follow them.

How to properly take a Golem into a room?
Assign one person on each side to lay out
 Crystal Fragment
NG
on the floor.
Crystal Fragment
NG
on the floor.
Sometimes Golem can skip the Fragment and go straight to next, after what he returns to missed one. Make sure that both Golems reached required rooms.
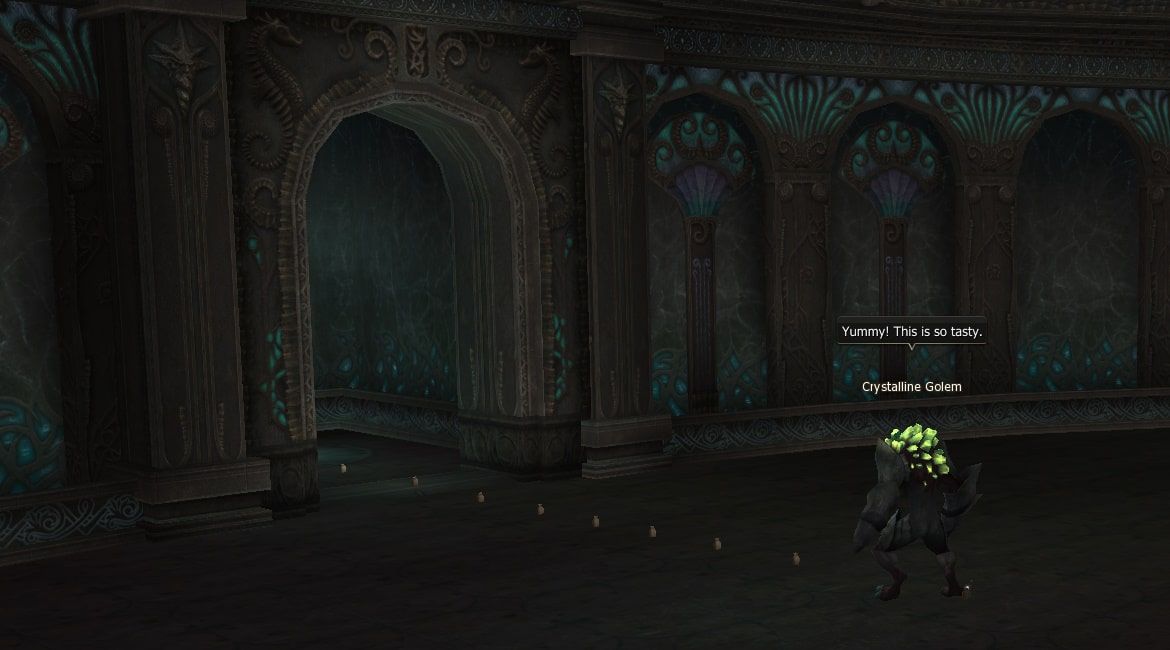
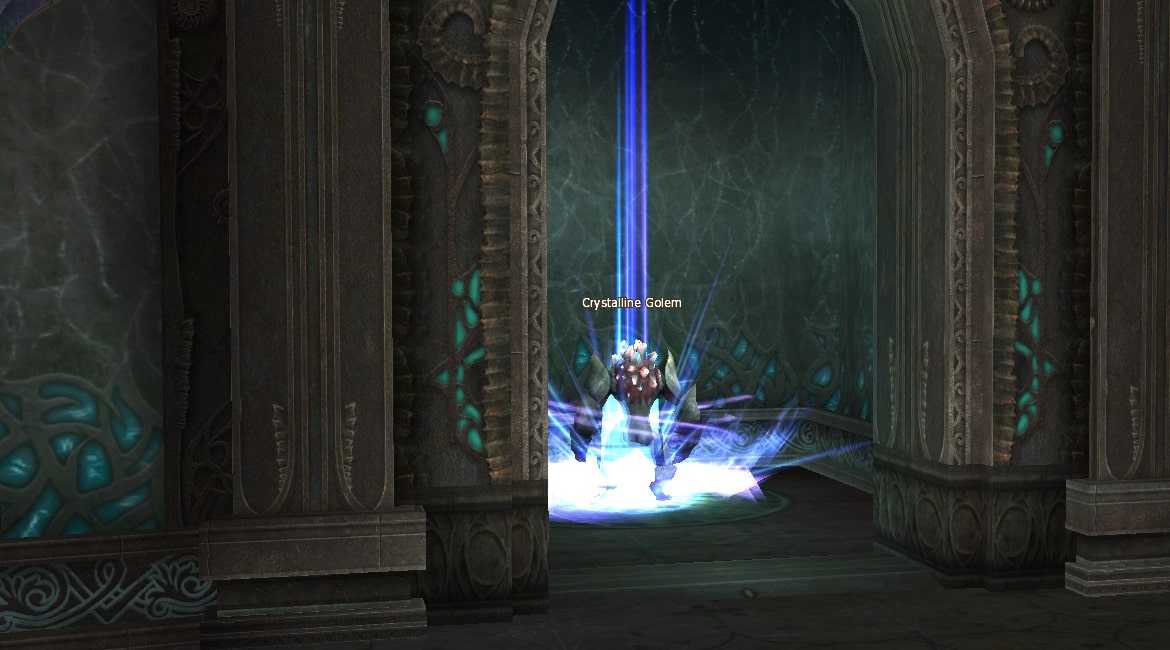
Blue light will indicate that Golem is in needed position. After that the last door to Tears will open.
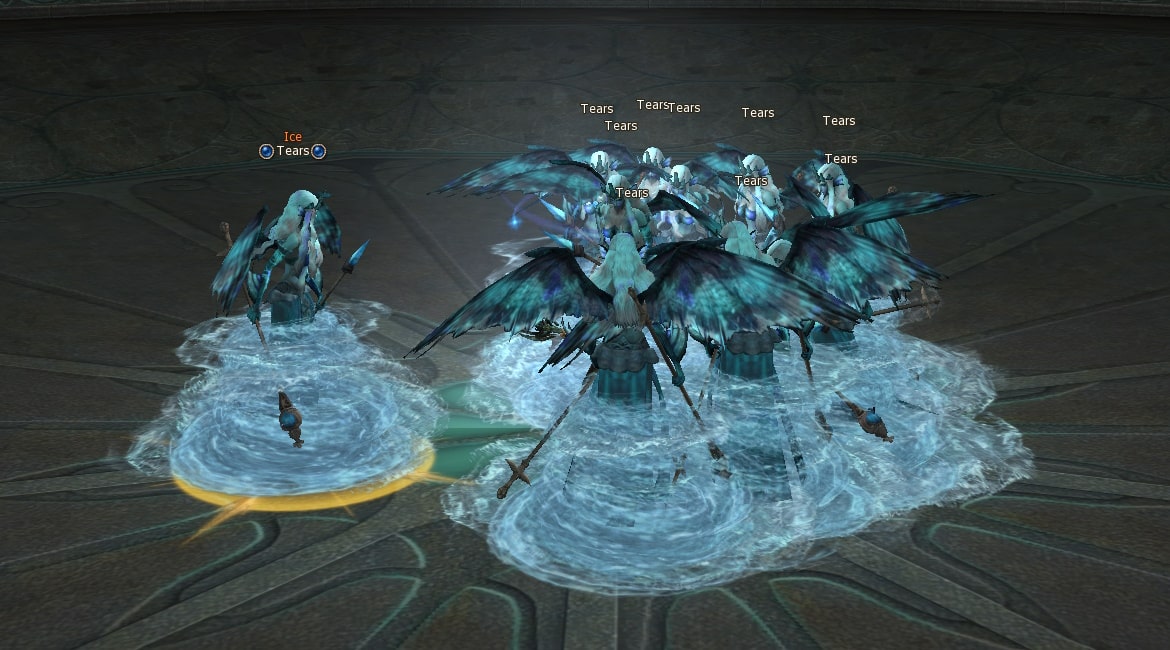
Fighting boss
After dancing with the Golems you will meet the boss
Tears Ice
Lv. 78
.
| HP | 3 235 067 | MP | 3 945 |
| P.Atk. | 40 736 | M.Atk. | 19 465 |
| P.Def. | 1 738 | M.Def. | 1 824 |
| EXP | 15 210 000 | SP | 2 500 000 |
| Attack Attribute | Water, 250 | Defence Attribute |
Fire, 25 Water, 135 Wind, 65 Earth, 65 Holy, 65 Unholy, 65 |

Pay attention!
The door will close right after you hit Tears, so make sure that everyone inside.
If someone missed the entrance, this player have to return to the city and enter instance again. He will immediately appear in a boss room.
Maximum damage can be done to boss — 25 000 points.
On Masterwork realms boss fight has been simplified — you don't have to use
 Water Dragon Scale
NG
, to remove invulnerability from Tears.
Water Dragon Scale
NG
, to remove invulnerability from Tears.
Basic battle mechanics:
Tear imposes a freeze that immobilizes characters, that can't be cleansed and do not allow you to use skills and attack.
Occasionally Tears create her copies, that will attack your group. Original boss have orange title. Fight just her, the copies will disappear soon.
After boss dies each party member will receive
Clear Crystal
NG
. NPC
Oracle Guide
will spawn, that can telepot you to Baylor (1), or back in town (3). You can also trade extra crystals (2)
for needed one.
Congratulations with a successful raid! Don't forget to pick your reward in Missions.
Tears droplist
Masterwork 2024
| Item | Amount | Chance |
|---|
Masterwork Eternal


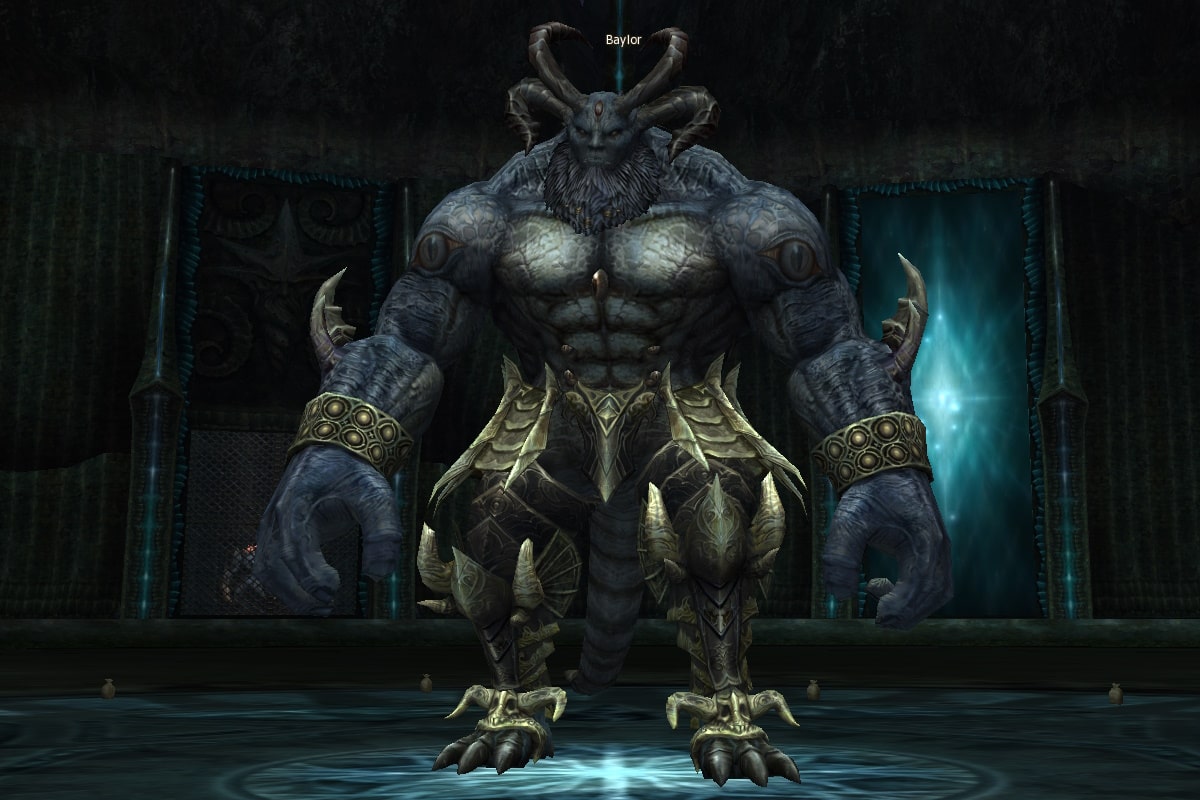
Baylor
There are 2 ways to reach Baylor. Both require all party members to have 3
crystals of different colour, received for killing other instance bosses. After entering Baylor
one crystal of each colour will disappear.
Method one. After you enter instance talk to NPC
Oracle Guide
and pick line 4 (3).
That's how you can get straight to Baylor, bypassing fights with other bosses. If you do so you will not
receive crystal for killing one of three bosses.
Method two. After killing all three bosses NPC
Oracle Guide
will appear. Select
1st lane in a dialogue window to move to Baylor.
When you teleport inside you will see a short video, that can't be skipped. In this video you will see
Baylor killing many
Crystal Prison Guard Lv. 78
.
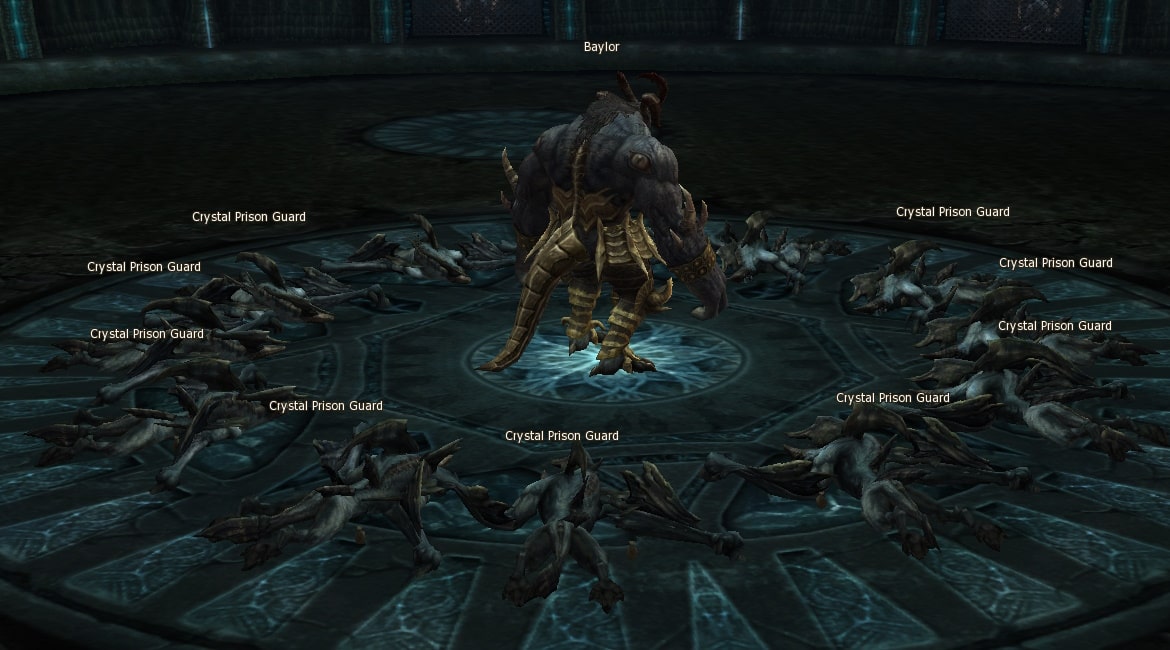
After death each Guard will leave
 Water Dragon Claw
NG
. You have to collect items, so every party member
have a couple of them in inventory. Don't forget to move claws to skill panel!
Water Dragon Claw
NG
. You have to collect items, so every party member
have a couple of them in inventory. Don't forget to move claws to skill panel!
What are the Claws needed for?
When Baylor's health level drops to 30%, he will start to cast a shield on himself
 Invincible Lv. 1
,
that blocks all incoming damage.
Invincible Lv. 1
,
that blocks all incoming damage.
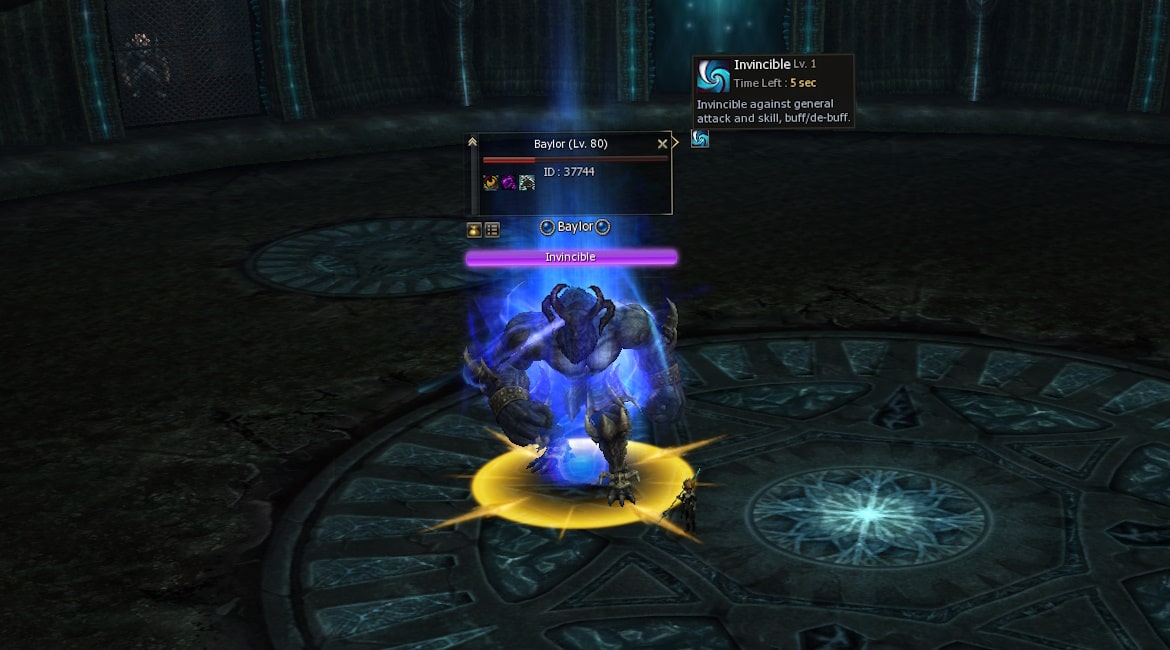
To remove shield 7 players have to target Baylor and use Claws at the same time. If everything done right, the shield will go down and Baylor will stop using it.
If you don't have enough Claws, or they ended - don't worry. From time to time
Crystal Prison Guard Lv. 78
will appear,
that can be killed to gather Claws.
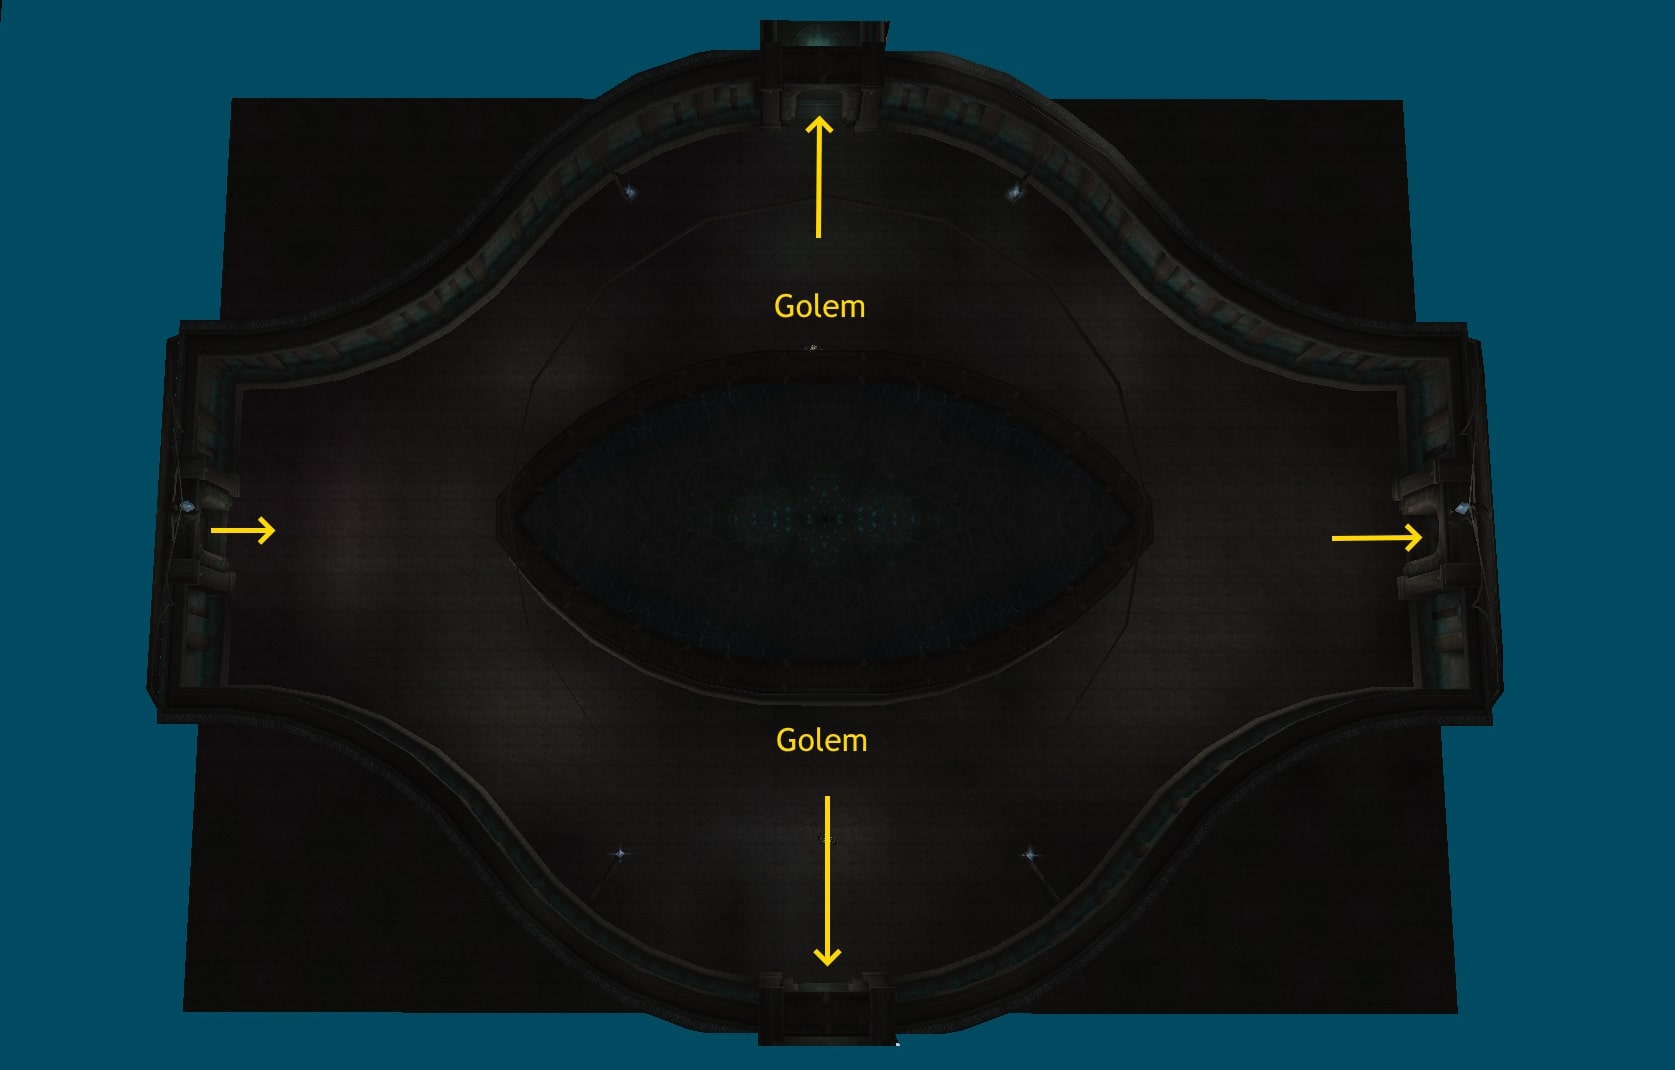
Have a look at location map. Location of Signal Beacons marked on it (Alarm) same as tanks route, that is best to run Baylor.
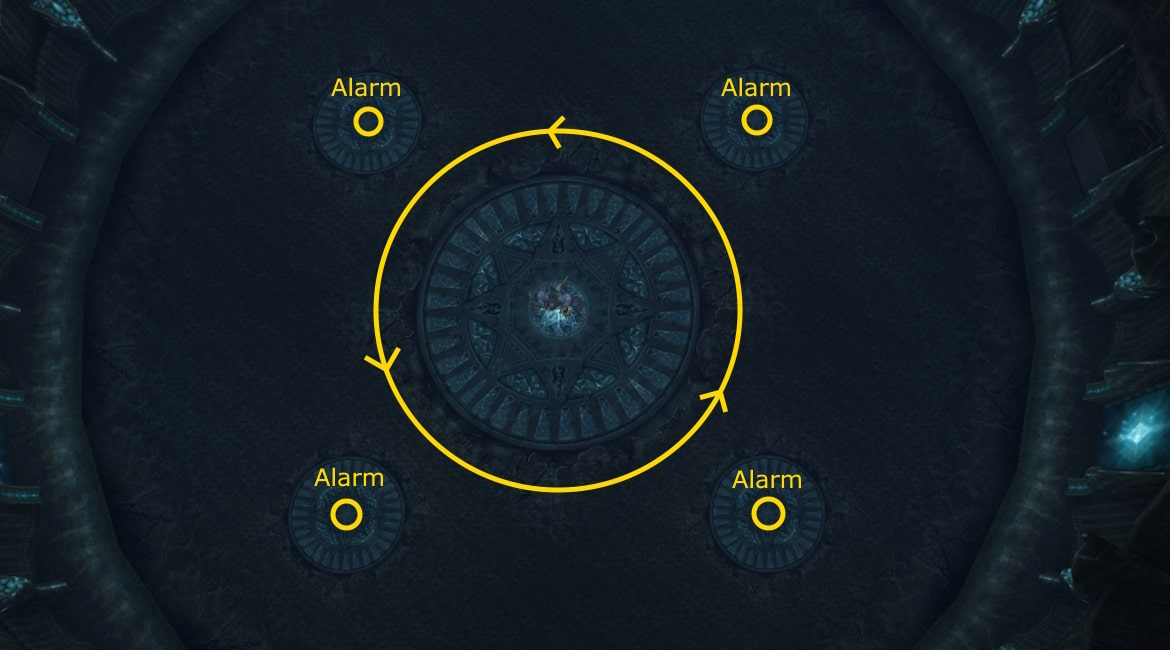
What is Alarm?
Alarm increases strength of Baylor and his buff, so brake it as soon as possible.
Boss fight
| HP | 5 422 623 | MP | 222 000 |
| P.Atk. | 105 557 | M.Atk. | 90 875 |
| P.Def. | 2 292 | M.Def. | 2 469 |
| EXP | 22 400 000 | SP | 3 500 000 |
| Attack Attribute | Unholy, 250 | Defence Attribute |
Fire, 70 Water, 70 Wind, 70 Earth, 70 Holy, 50 Unholy, 95 |
Pay attention!
Baylor damage limitations — 35 000 points.
Baylor not aggressive, so you can safely collect Claws and renew your buff. Battle with Baylor can be divided in 5 stages:
- From 100% to 70% HP. Baylor hits very hard and jumps, throwing all characters around him away.
- From 70% to 50% HP. Same as on 1st stage + Baylor start using distant attack, throwing one of characters away and making strong damage. Mages/Archers in A-grade in most cases can't survive this.
-
From 50% to 30% HP. Same as before + spawn of
Crystal Prison Guard Lv. 78
,
that have strong attacks. Better use your AOE skills.
-
30% HP. Same as before + Baylor start using shield. To remove it use
Water Dragon Claw
NG
on boss.
- From 30% to 0% HP. Same as before, but shield will not appear anymore.
Battle tactics directly depend on the composition of your group. Recommended composition: Tank, Bard, Healer, Buffer, Judicator, 4 DD's. Judicator and bard had to have bows, at least for Ivory Coin. If you have magic group, we recommend to pick +1 EE/SE at the expense of DD.
Mages and Archers + Summoners
It's more convenient when there is a class that can slow down Baylor:
- Tank provokes Baylor and start running in a circles.
- Damage dealers start doing damage and using their debuffs. Summoners use their mage or archer transformation, Phantom Summoner — don't forget to renew your cubic, other types of summoners — use your Elemental buff (cooldown) or Arcan (critical). When bosses HP get lower than 50%, everyone have to use their AOE skills on incoming monsters, or kill them by one.
- Bard and Judicator shooting from their bows, Judicator also using his debuffs.
- Healers healing and restoring MP, use debuffs, and starting from 70% HP resurrecting dead teammates.
- Buffers heal and knock out triggers.
Melees
- Tank provokes Baylor and start running in a circles.
- Damage dealers start doing damage and using their debuffs. Summoners use their mage or archer transformation, Phantom Summoner — don't forget to renew your cubic, other types of summoners — use your Elemental buff (cooldown) or Arcan (critical). If your class don't have ranged attacks, you can use bow. When bosses HP get lower than 50%, everyone have to use their AOE skills on incoming monsters, ore kill them by one.
- Bard and Judicator shooting from their bows, Judicator also using his debuffs.
- Healers healing and restoring MP, use debuffs, and starting from 70% HP resurrecting dead teammates.
- Buffers heal and knock out triggers.
If tank have his defencive skills ready (UD/Party UD), he should stop. At this moment DDs have to use their burst-damage abilities (Frenzy/Zealot), use Dance of Berserker, Appetite for Destruction. Then attack baylor in melee.
After defencive skills timer goes out, tank starts running again and all DDs — hit Baylor with ranged attacks. Repeat until boss dies.
After Baylor's death will appear
Baylor's Treasure Chest Lv. 76
— you have to break it, to get jewelery
pieces:


Pieces can be exchanged by NPC
 Pona Collectioner
in Luxury Shop in Giran. Exchange rates
you can find in article
Pona: Jewelry Upgrade.
Pona Collectioner
in Luxury Shop in Giran. Exchange rates
you can find in article
Pona: Jewelry Upgrade.
After killing the boss, an NPC
Oracle Guide
will appear. Use it to move to Parme,
talking to her will take you back to town.
Baylor's droplist
Masterwork 2024
| Item | Amount | Chance |
|---|---|---|
| Group chance: 100% | ||

 Baylor's Earring
S
Baylor's Earring
S
|
1 | 5% |
Masterwork Eternal


Upgrading SA
All bosses of the Crystal Caverns upgrade Soul Crystals (SA), chance is personal for each party member.
To successfully level up you must have in your inventory one Soul Crystal, and the quest must be taken Enhance Your Weapon.
| Monster | 10 → 11 | 11 → 12 | 12 → 13 | 13 → 14 | 14 → 15 | 15 → 16 | 16 → 17 | 17 → 18 |
|---|---|---|---|---|---|---|---|---|
|
Kechi Fire
Lv. 78
|
5% | 3.5% | 2.5% | 0% | 0% | 0% | 0% | 0% |
|
Darnel Torture Maiden
Lv. 78
|
5% | 3.5% | 2.5% | 0% | 0% | 0% | 0% | 0% |
|
Tears Ice
Lv. 78
|
5% | 3.5% | 2.5% | 0% | 0% | 0% | 0% | 0% |
|
Baylor Warden
Lv. 80
|
15% | 10% | 5% | 3.5% | 0% | 0% | 0% | 0% |
| Monster | 10 → 11 | 11 → 12 | 12 → 13 | 13 → 14 | 14 → 15 | 15 → 16 | 16 → 17 | 17 → 18 |
|---|---|---|---|---|---|---|---|---|
|
Kechi Fire
Lv. 78
|
7.5% | 5% | 3.5% | 2.5% | 1.5% | 0% | 0% | 0% |
|
Darnel Torture Maiden
Lv. 78
|
7.5% | 5% | 3.5% | 2.5% | 1.5% | 0% | 0% | 0% |
|
Tears Ice
Lv. 78
|
7.5% | 5% | 3.5% | 2.5% | 1.5% | 0% | 0% | 0% |
|
Baylor Warden
Lv. 80
|
75% | 50% | 35% | 25% | 15% | 10% | 7.5% | 5% |
Related missions
| Mission | Reward |
|---|---|
|
Defeat Kechi/ Darnel/ Tears Daily mission Defeat Kechi, Darnel or Tears to complete this mission. The entrance to the instance zone is located in Ancient City Arcan. |
 Ivory Coin
NG
x75
Ivory Coin
NG
x75 Sweet Fruit Cocktail
Physical Buffs
NG
x1
Sweet Fruit Cocktail
Physical Buffs
NG
x1 Fresh Fruit Cocktail
Magical Buffs
NG
x1
Fresh Fruit Cocktail
Magical Buffs
NG
x1 Vitality
NG
x5000
Vitality
NG
x5000 SP
NG
x650000
Ivory Coin
NG
x75
Sweet Fruit Cocktail
Physical Buffs
NG
x1
Fresh Fruit Cocktail
Magical Buffs
NG
x1
Vitality
NG
x5000
SP
NG
x650000
Ivory Coin
NG
x75
Sweet Fruit Cocktail
Physical Buffs
NG
x1
Fresh Fruit Cocktail
Magical Buffs
NG
x1
Vitality
NG
x5000x150
SP
NG
x500000 |
|
Defeat Baylor Weekly Defeat Baylor to complete this mission. The entrance to the instance zone is located in the Ancient City Arcan Target List |
 Attributes Supplies
Stones & Crystals
NG
x1
Ivory Coin
NG
x75
Sweet Fruit Cocktail
Physical Buffs
NG
x1
Fresh Fruit Cocktail
Magical Buffs
NG
x1
Attributes Supplies
Stones & Crystals
NG
x1
Ivory Coin
NG
x75
Sweet Fruit Cocktail
Physical Buffs
NG
x1
Fresh Fruit Cocktail
Magical Buffs
NG
x1 Exp
NG
x35000000
SP
NG
x7500000
Exp
NG
x35000000
SP
NG
x7500000x1500 |
Guide author — iMessiah, Masterwork player


