Four Sepulchers Instance
Guide author — 960, Masterwork player
Basics
4 tombs, 4c , 4 goblets, Halisha, sepulcher, sep — all the names for one instance. But what where and why?
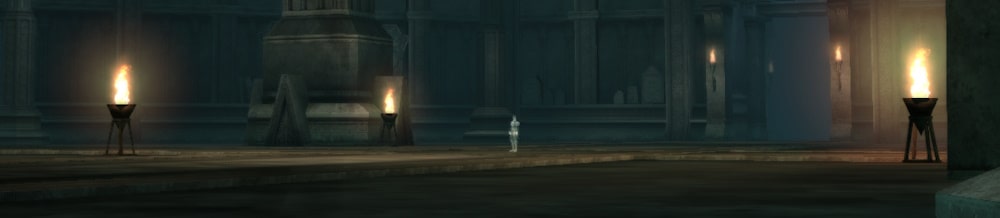
Four sepulcher — instance zone, available once an hour. Consists out of six rooms with raid boss in the end. Entrance located at the bottom of the Imperial Tomb. There are four reason to visit it:
- S grade weapon recipes, available after completing Relics of the Old Empire quest
- Fast way to obtain "fifth resonance amulet" for the third class change quest
- Four Goblets quest
-
Raid boss, containing valuable loot, such as: S grade gear,
 S grade masterwork crystals, attribute stones (at Gracia stage) along with
 materials and S grade recipe
 quest items, that is especially relevant at Interlude to Gracia stage transfer.
Entrance and cooldown
Pay attention!
Four Goblets quest required to enter instance zone.
- Party members — 4 to 9
- Lvl required — 74+
-
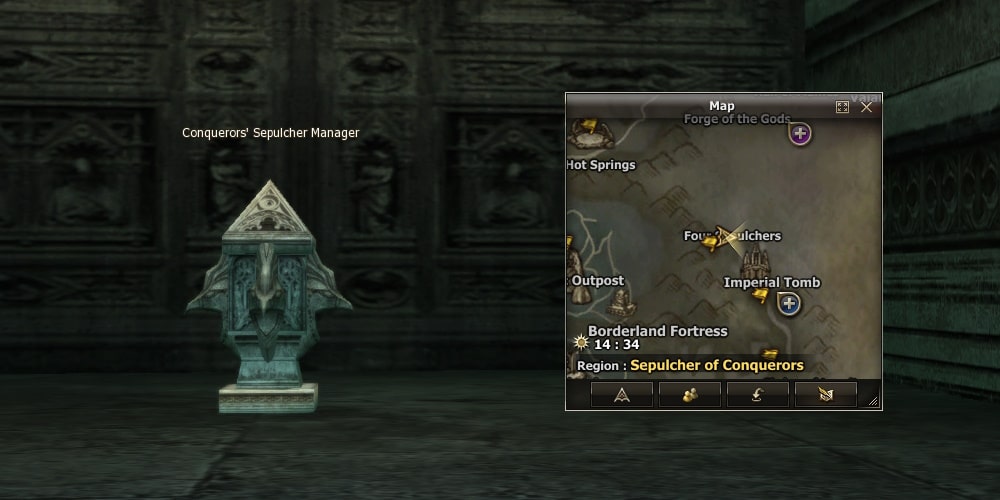
Entrance NPC —
 Conquerors' Sepulcher Manager
located at the bottom level of Imperial Tomb
Conquerors' Sepulcher Manager
located at the bottom level of Imperial Tomb
- Instance enrolment — at the end of each real-time hour, xx:55 min
- Entrance — at the beginning of each real-time hour, xx:00 min
- Time limitations — 50 min
- Cooldown — none
Recommendations
When reloging or disconnected character stays inside instance zone (Masterwork feature only).
There are only 4 instance zones available at the moment. That means that only 4 groups can enter at the same time. Instance available once an hour, 5 minutes to enter.
A-grade and above gear recommended.
Bard (swordsinger preferred) highly recommended to be in your group, at least one healer (shillien elder is a best choice), summoner (elemental for mages, warlock for melee/archer groups), strong buff and tough AOE damage dealers essential. These recommendations became less important as your character and group grow in strength.
Instance requires some skill to complete multiboxing. Extra windows require attention. Don't go AFK while you are inside! The door between rooms stay open just for 15 seconds, and closes after. All characters left won't be able to pass and finish instance! Although you can't buff through the locked doors. On Masterwork realms doors are not closing.
At the end you will meet the raid boss, although not very strong. That means that your bard might not handle tanking in a low gear.
Pay attention!
While completing instance you can catch a "bug", making some monsters immortal. That can cause inability to obtain a key, required to enter the next room.
This can happen if you fight monsters in the corner next to the door — at the moment monsters can "fall" through the door. You may see them, but from the server side NPC will be in another room and unavailable for attacks.
This issue is fixed on Masterwork realms.
How to get there
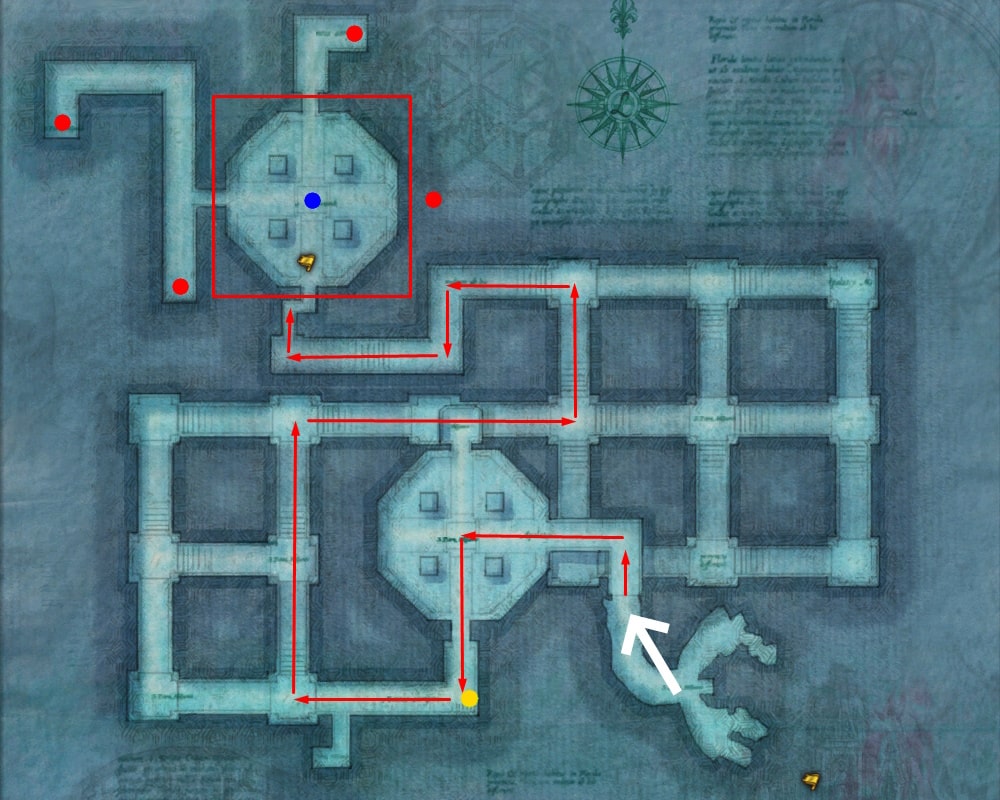
Red arrows — path to Four Sepulchers
Yellow mark — NPC
 Ghost of Adventurer
, who offers the entrance tickets quest
Ghost of Adventurer
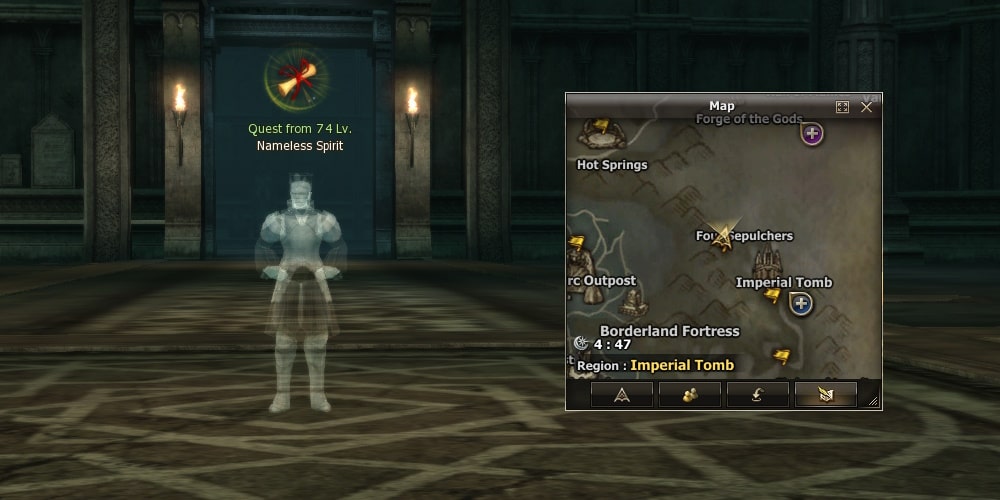
, who offers the entrance tickets quest Blue mark — NPC
Nameless Spirit Quest from 74 Lv.
, who offers the entrance quest Red mark — NPC
Conquerors' Sepulcher Manager
, allowing you to enter
To enter an instance each party member should have a special item —
 Entrance Pass to the Sepulcher
NG
.
You can buy it from other players or obtain by yourself.
Entrance Pass to the Sepulcher
NG
.
You can buy it from other players or obtain by yourself.
To acquire an Entrance Pass head over Imperial Tomb. You can do that via noblesse teleport from Goddard, MW Club
Manager, by foot through Wall of Argos or by asking someone to summon you right to the spot. Then you have to
find NPC
Ghost of Adventurer
. It located on the left, after first wide chamber, if you keep an entrance back.
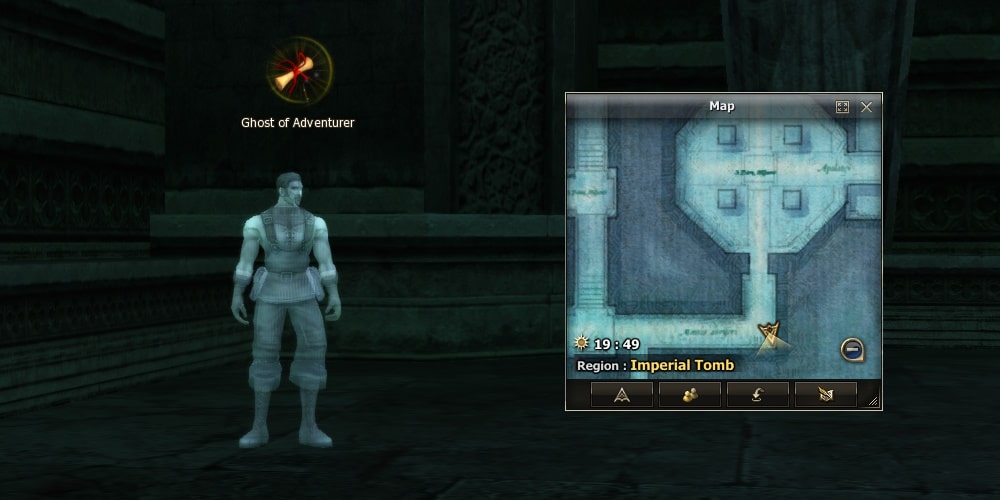
Ask him for Relics of the Old Empire.
For killing monsters in Imperial Tomb you will get
Broken Relic Part
NG
, that can be traded to S weapon
recipes and
Entrance Pass to the Sepulcher
NG
with low chance.
Pay attention!
If you bring
Broken Relic Part
NG
to NPC
Ghost of Adventurer
, you will get a random recipe.
Keep the items till the end of an instance.
So, you have a pass, what's next? Now you have to go the deep end of the location — large chamber, named Four Sepulcher. There are few ways to reach it:
- Noblesse teleport right from Goddard
- Asking for help. Please notice that summoning is not available to the Four Sepulcher. You have to move a bit out to the Imperial Tomb
-
By foot from Imperial Tomb. Highly recommend using bard's
 Rhythm of Shadows Lv. 1
-
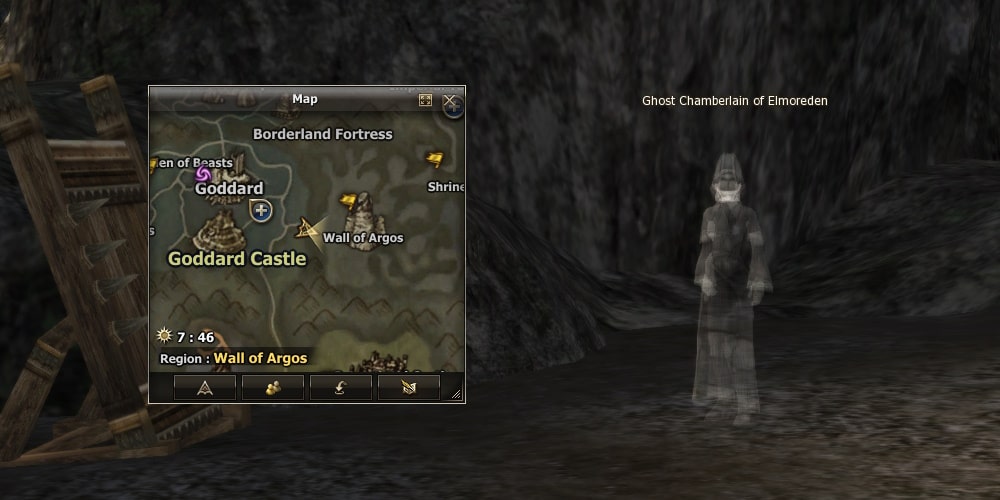
By giving
 Used Grave Pass
NG
to
Used Grave Pass
NG
to
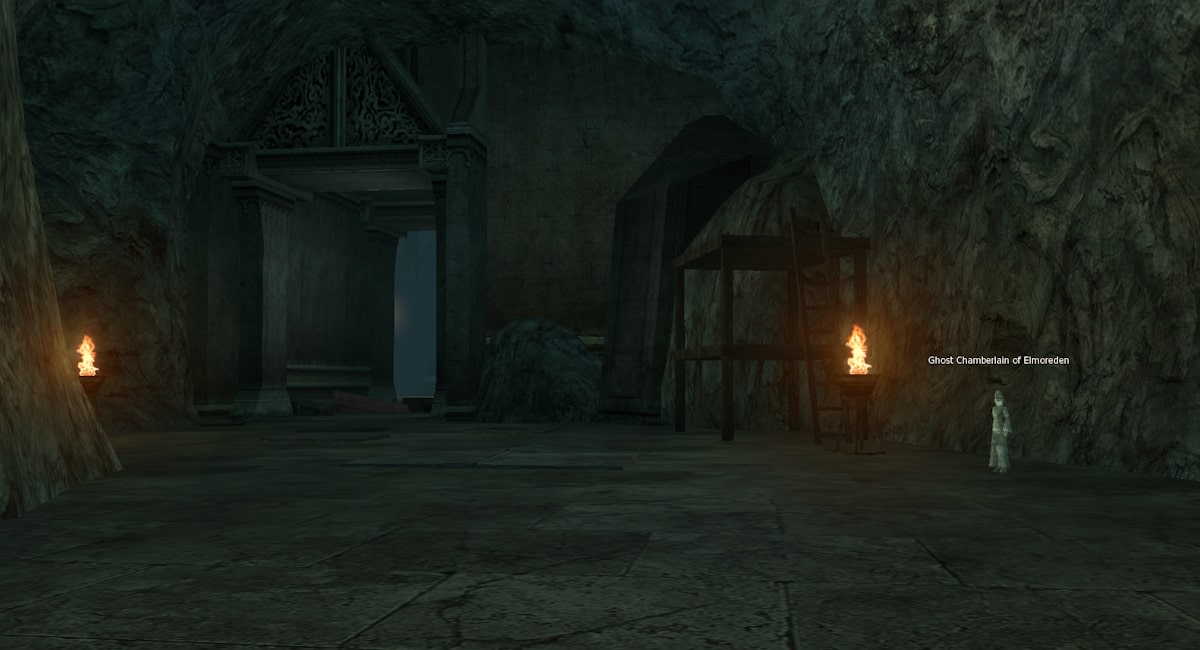
 Ghost Chamberlain of Elmoreden
, who is waiting on the right from
the teleporting point to the Wall of Argos.
Used Grave Pass
NG
you will get every time after
using
Entrance Pass to the Sepulcher
NG
Ghost Chamberlain of Elmoreden
, who is waiting on the right from
the teleporting point to the Wall of Argos.
Used Grave Pass
NG
you will get every time after
using
Entrance Pass to the Sepulcher
NG
After you reach Four Sepulchers, find in the middle of large chamber NPC
Nameless Spirit Quest from 74 Lv.
and ask him
for quest Four Goblets.
Now, when you finally have ticket and quest you are ready for instance! You just have to find NPC
Conquerors' Sepulcher Manager
in one of the hallways, heading out of the chamber.
There are only 4 NPC's, same as instance zones. Accordingly just one party can enter from each NPC.
Bring your party to manager and wait till XX:55-56 real time. NPC will notify that registration begins, and that is the moment then party leader can teleport whole group inside (in my experience teleport opens at 53rd second). Congratulations, you're inside!
Event begins at XX:00, so you still have a few minutes for a cup of team, tactics discussion, small talk. But be ready, you have to clear 5 rooms with strong monsters in and boss in the end for just 50 minutes!
Instance guide
Most important mechanics for each room:
1. NPC-chest
Mysterious Box
located in the middle of each room. Double-clicking it will launch
the room encounter. Any party member can do it. While room is still, you have time for rebuff, mana regen
and other useful activities, this time is only limited by main 50 minute gap.

2. Each room has it's own mini-boss, that appears under certain conditions. After you defeat it NPC-chest
Key Box
will appear. Interact with it to obtain
 Chapel Key
NG
that is needed
to open the next room. Any member can do that and the chest will disappear after.
Chapel Key
NG
that is needed
to open the next room. Any member can do that and the chest will disappear after.
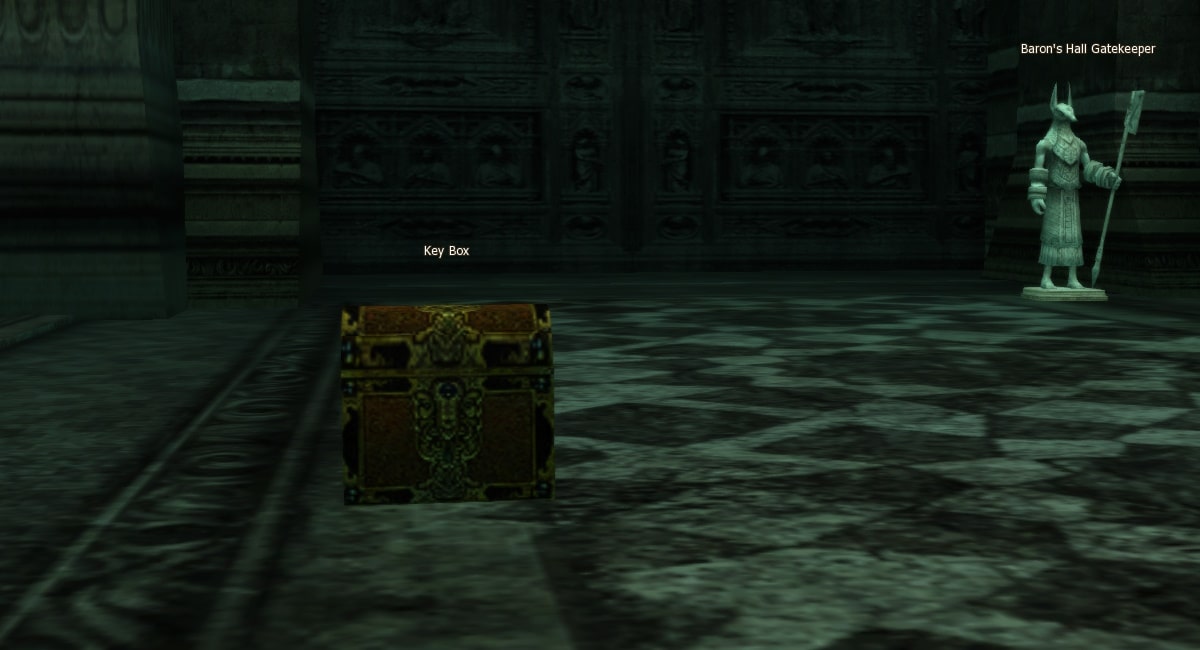
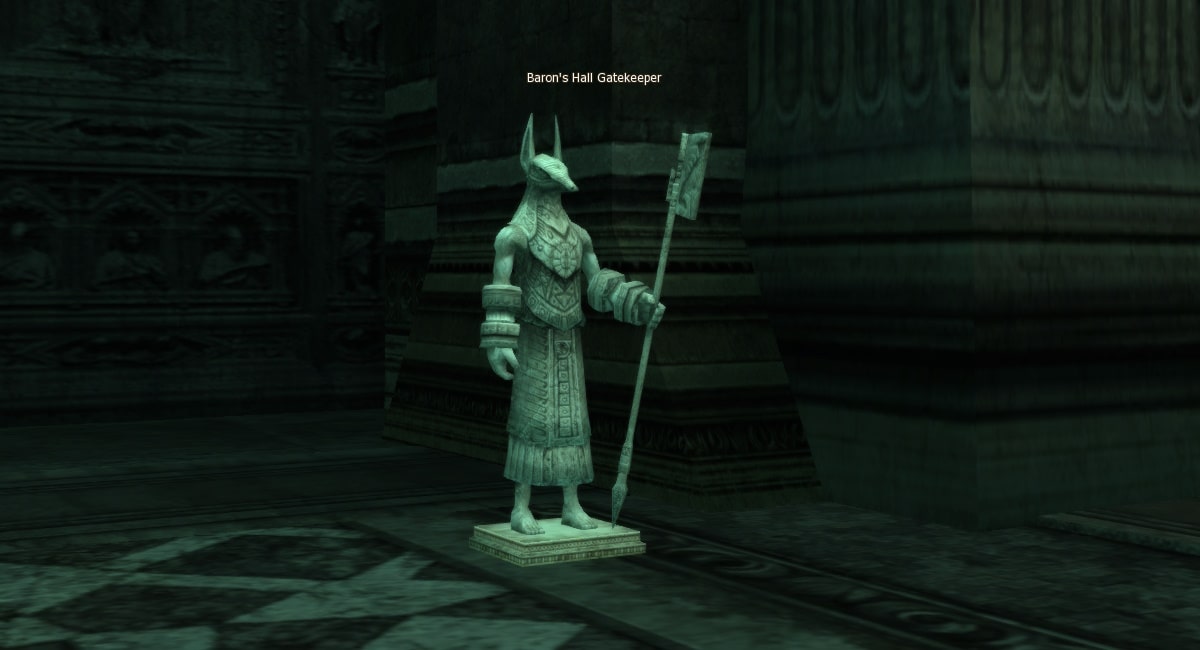
3. To change the room a key owner have to talk to NPC-statue
Baron's Hall Gatekeeper
.
Pay attention!
Door will stay open for just 15 sec, all characters have to move to the next room, otherwise they stay in previous and encounter end's for them.
On Masterwork realms doors will stay open.
4. Most of the casting monsters prefer to stay still, so it easier to slay most of the creeps in one of the corners. There are my favorites:
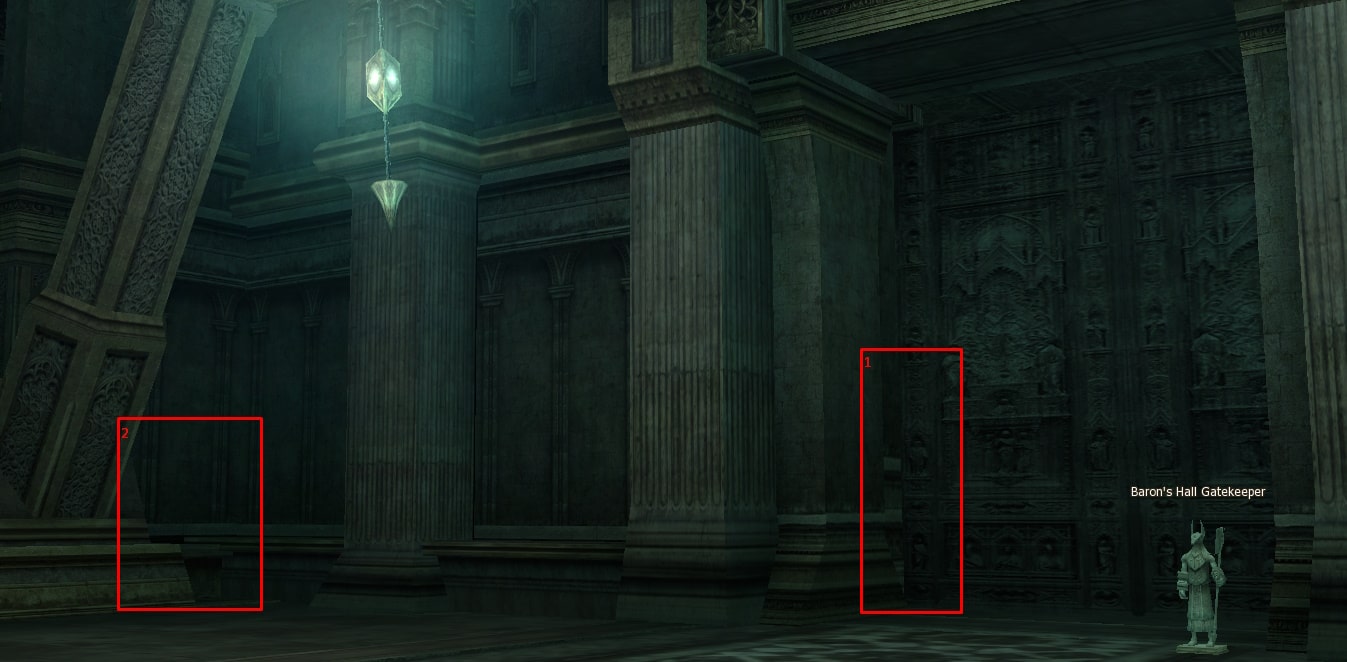
This corners are although fit to hide your support, especially #1, and one similar located behind the statue.
5. To complete the room you only have to kill the mini-boss, rest of the monsters are not necessary. If we add that most of them are not aggressive then we will see lots of opportunities to speedrun:
- One-shot mini-boss, before rest of AI will activate.
- Slay mini-boss and die, that will work if other party members won't have any aggro on them. After then resurrect DD and keep going.
Pretty sure there are few other good options.
6. Mobs in rooms respawn after death, that can be used to farm S grade recipes quest items or material chests. I personally found this activity boring, but it feels like there are more items drop then in open world. On Masterwork realms after killing boss or gaining the key mobs will stop spawn.
7. You can move the next room with monsters from the last one and kill them in calm environment without casters aiming you and not expecting new wave to spawn.
Each room are usually farmed by one algorithm:
- Enter the room and follow to the next doors
- Hide support, that able to die, in the corner
- Start the encounter by talking to NPC-box
- Hunt down room boss
- Clear rest of the monsters
- Grab the key and talk to the statue to open the door
- Go back to 1
Let's finally investigate rooms themself!
1st room
Baron's Hall
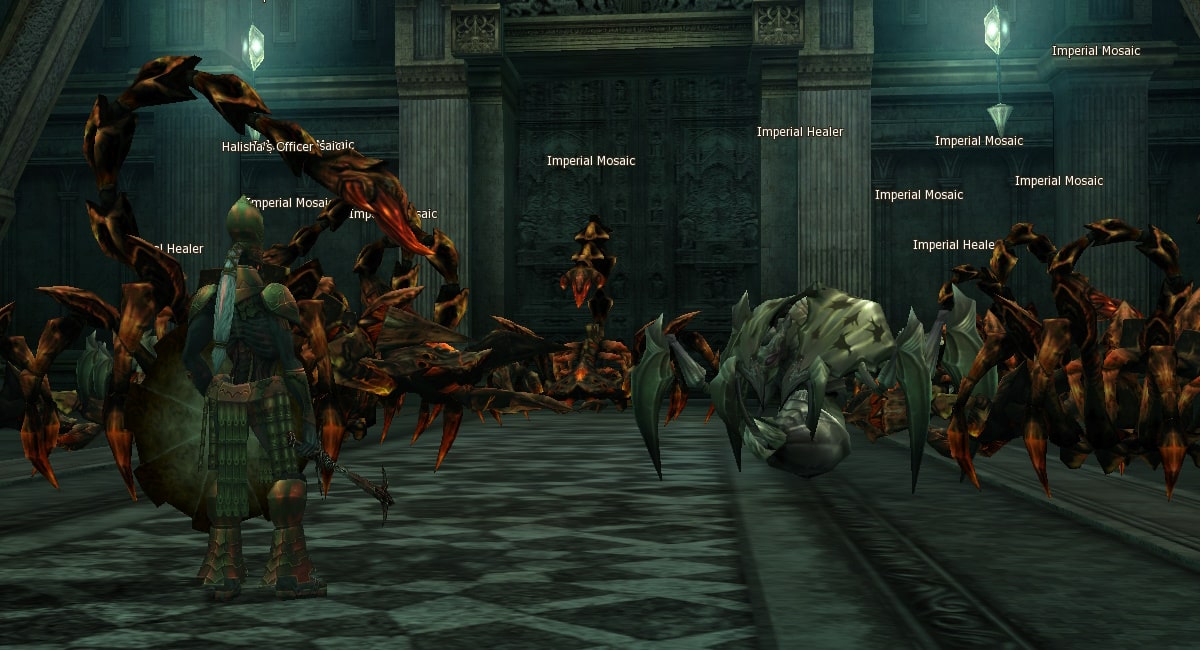
Easiest room. Few healers, well-armored scorpions, but in common monsters are not dangerous.
KIll
Halisha's Officer Lv. 81
, slay aggressive monsters, grab the key and go next.
2nd room
Viscount's Hall
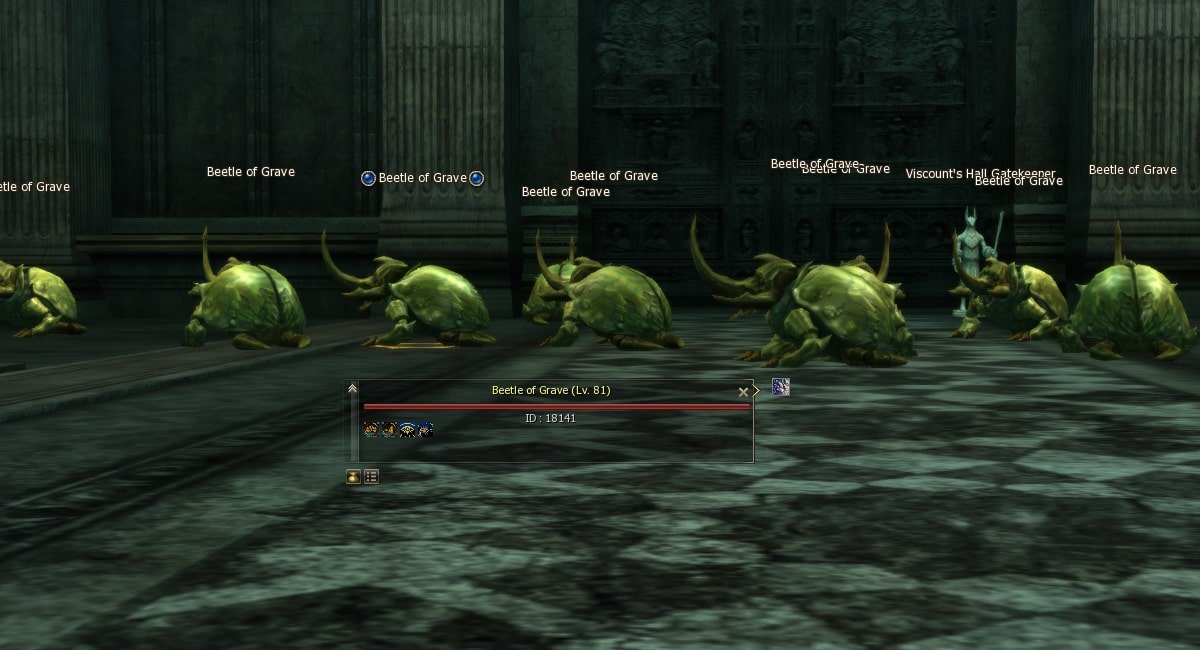
Although pretty simple room, but monsters hit harder, have huge aggro radius and can hold your character.
Encounter consists of few insects waves. New one starts right after previous died. In most cases boss appears within the third wave, but sometimes he comes with second.
Boss have the same model as other beatles. At the same time he buffs all the monsters with
 Reflect Damage Lv. 3
, reflecting 20% melee damage. Control buffs on monsters in new waves.
If you are in a melee group be very careful — AOE melee reflect can kill you very quick!
Reflect Damage Lv. 3
, reflecting 20% melee damage. Control buffs on monsters in new waves.
If you are in a melee group be very careful — AOE melee reflect can kill you very quick!
Boss stands out among other beetles only by its statuses. He has 4 — no arrow protection, but hold resistance.
Kill boss, grab the key and follow to next room.
Some advices
In that room Shillien Elder with it's
 Lord of Vampire Lv. 1
, becomes very handy if you have Warlord
or Destroyer as main DPS. At the same time
Lord of Vampire Lv. 1
, becomes very handy if you have Warlord
or Destroyer as main DPS. At the same time
 Blessed Blood Lv. 1
, will help any other
DPS/Tanking classes.
Blessed Blood Lv. 1
, will help any other
DPS/Tanking classes.
Swordsinger will be very helpful by slowing monsters with
 Psycho Symphony Lv. 1
and making them
silent by
Psycho Symphony Lv. 1
and making them
silent by
 Rhythm of Silence Lv. 1
.
Rhythm of Silence Lv. 1
.
3rd room
Count's Hall
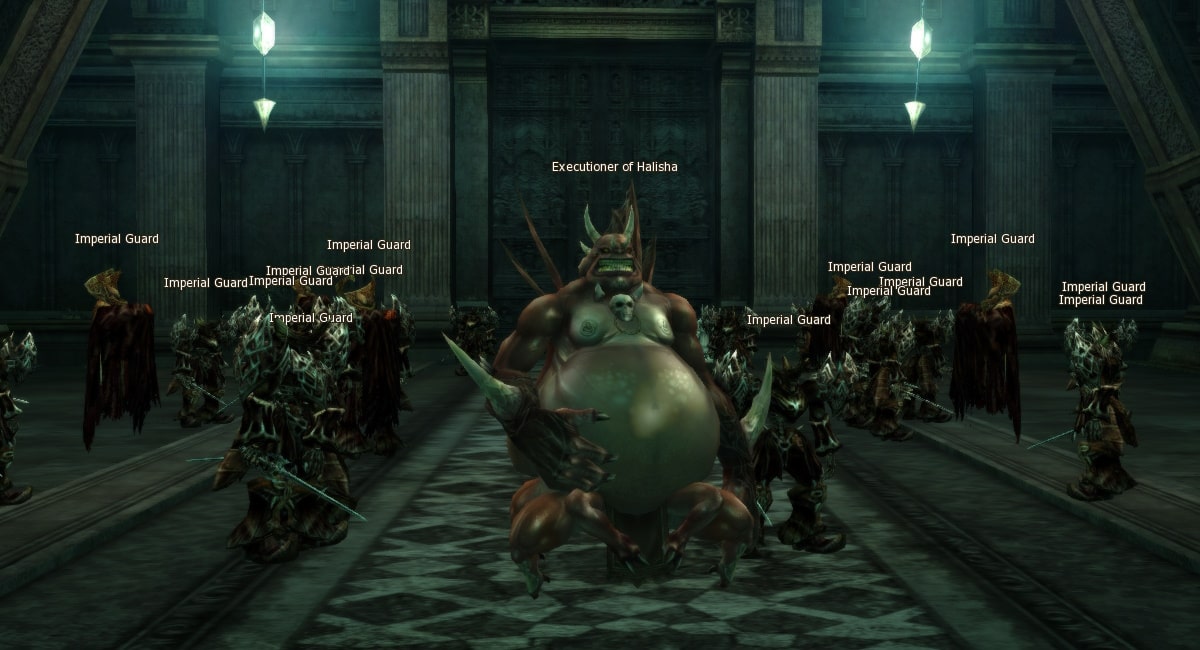
Room are full of strong undeads, and have two ways to complete.
#1 Simple option — killing boss
Boss covers under the cute face of NPC
Victim Lv. 81
, that will ask for your help. Don't trust her.
Wait until she reaches your party and kill her, or if you are not strong enough to fight with whole room, kill
her right in the room center. Otherwise, you can wait till monsters kill her.
After Victim dies room boss will appear —
 Executioner of Halisha Lv. 81
. Innoxious monster with high amount
of health and improper amount of physical or magical defence depends on your luck.
Executioner of Halisha Lv. 81
. Innoxious monster with high amount
of health and improper amount of physical or magical defence depends on your luck.
Kill it, pick the key, go next.
#2 Hard option, but with a bonus — saving Victim.
You have to keep NPC
Victim Lv. 81
alive.
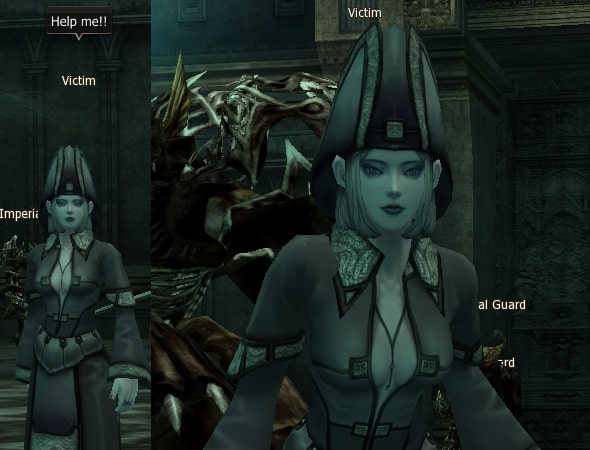
Initiate fight by the character, which is not going to stay in the center of the battlefield, healer for example. That way Victim going to follow healer with a higher chance.
Provoke mobs, then split your party as wide as possible and try to keep DPS away from Victim because she receives a lot of damage from AOE.
Keep an eye on Victim, don't forget to heal her!
Continue battle until chest appears near Victim. If you handle it — congratulations! Now Victim will follow your party till the end and use buffs, that may be very helpful. But remember she is still vulnerable.
Pay attention!
Victim's buffs using 4 buff slots.
 Scapegoat's Grace Lv. 1
|
Scapegoat's Grace. Temporarily protects against any debuff that lowers P. Def. |
 Scapegoat's Grace Lv. 1
|
Scapegoat's Grace. Temporarily protects against any debuff that lowers P. Atk. |

|
Scapegoat's Grace. Temporarily protects against poison. |
 Scapegoat's Grace Lv. 1
|
Scapegoat's Grace. Temporarily protects against any de-buff that diminishes the effect of HP recovery magic. |
Grab the key and go next.
Some advices
Dark resistance will help you a lot:
 Divine Rhythm Lv. 1
from bard,
Divine Rhythm Lv. 1
from bard,
 Resist Dark Lv. 1
from Prophet, Elven Elder or Necromancer,
Resist Dark Lv. 1
from Prophet, Elven Elder or Necromancer,
 Divine Protection Lv. 1
from Eva's Saint or Cardinal and
Divine Protection Lv. 1
from Eva's Saint or Cardinal and
 Dark Potion
NG
, that you can buy from Attribute Master located at Aden or Rune.
Dark Potion
NG
, that you can buy from Attribute Master located at Aden or Rune.
Physical classes may although like
 Holy Weapon Lv. 1
from any healer or Prophet, Shillien Elder have that skill in Inquisitor transformation.
Holy Weapon Lv. 1
from any healer or Prophet, Shillien Elder have that skill in Inquisitor transformation.
If you were unlucky and boss with high resistance to your type attacks spawns, debuffs, decreasing its protection will be very useful:
-
Do decrease physical defence
-
Hex Lv. 1
from Dark Elven warriors
-
 Piercing Attack Lv. 1
from Prophets
Piercing Attack Lv. 1
from Prophets
-
 Death Mark Lv. 1
from Soulbreaker or Inspector
Death Mark Lv. 1
from Soulbreaker or Inspector
-
 Violent Temper Lv. 1
from Berserker
Violent Temper Lv. 1
from Berserker
-
 Shock Blast Lv. 1
from Dreadnought
Shock Blast Lv. 1
from Dreadnought
-
 and
and
 Curse of Shade Lv. 1
from Phantom Summoner and his summon
Curse of Shade Lv. 1
from Phantom Summoner and his summon
- Skills with special enchant effects
-
-
To decrease magical defence
-
Death Mark Lv. 1
from Soul Breaker and Inspector
-
 Curse Gloom Lv. 1
from Necromancer
Curse Gloom Lv. 1
from Necromancer
-
Shock Blast Lv. 1
from Dreadnought
- Skills with special enchant effects
-
4th room
Marquis Hall
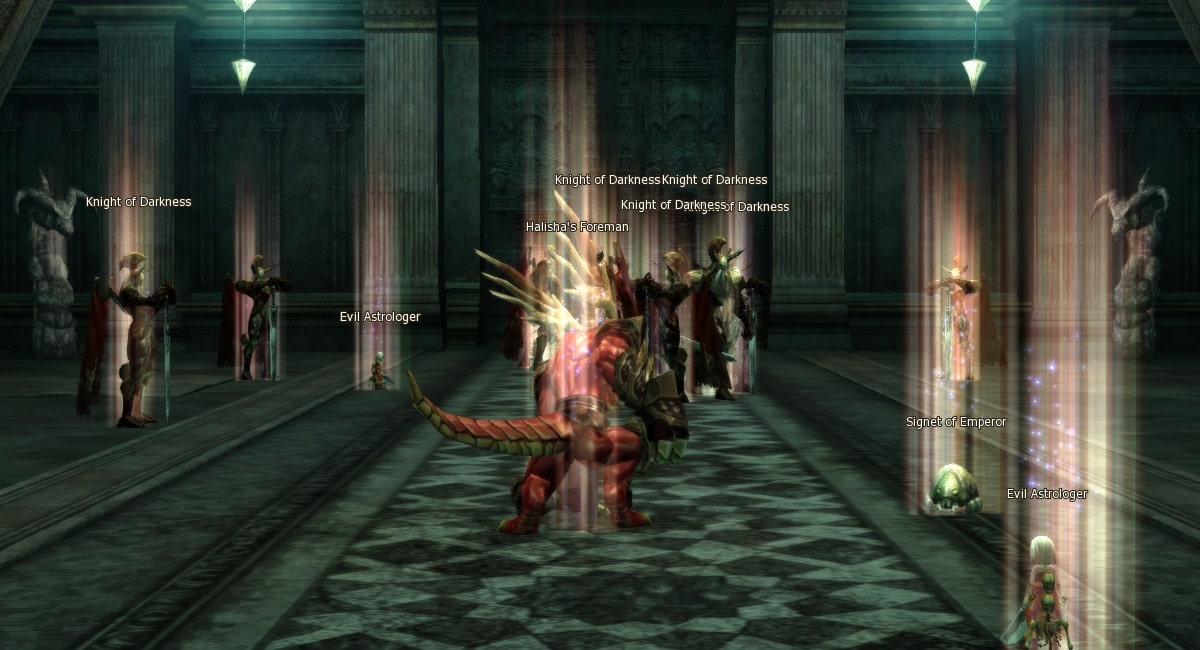
Highly dangerous and uncomfortable room — a lot of healers (dolls with knives), a lot of casters (black robe witches),
chance to spawn a huge amount of strong knights and worst of it — 4
Charm of Corner Lv. 81
,
by the corners. Each of them responsible for debuff, that will overlap in that and next rooms.
If you destroy charms debuff disappears. Besides NPC
Victim Lv. 81
, saved previously, are going
to apply protecting buffs. If you are able to sacrifice 4 buff slots make sure Victim stays alive.
There are 4 debuffs in total. Chance to apply beneath 100%, so you wouldn't have them all applied all the time.
|
Decrease P. Atk. Lv. 3
|
Decreases P.atk by 23% |
|
Decrease P. Def. Lv. 3
|
Decreases P.def 23% |
|
|
Toxin that permanently lowers HP. Almost completely covered by white health potions, which can be set to automatic use |
|
Disease Lv. 9
|
Decreases incoming healing by 100%, that fully excludes basic healing! However, it is still possible
to be healed by special spells —
 Chain Heal Lv. 1
and
Chain Heal Lv. 1
and
 Balance Life Lv. 1
|
There are one plus in that room — weak boss
Halisha's Foreman Lv. 81
. Spawns immediately, same as chest nearby.
If your group has good DPS you can slay him faster than monsters reacts.
Kill it, grab the key and go next.
Some advice
Holy attack and Dark resistance bonuses can be very helpful, same as in previous room.
dark resistance and
holy attack.
Rhythm of Silence Lv. 1
from Swordsinger and
 Seal of Silence Lv. 1
from Overlord can
be very effective versus healers.
Seal of Silence Lv. 1
from Overlord can
be very effective versus healers.
For mages parties completing instance for the first time, or not confident in their strength, I highly recommend to destroy all charms before leaving the room. Physical groups are less sensitive to debuffs, but if it is your first try I still recommend destroying charms.
5th room
Duke's Hall

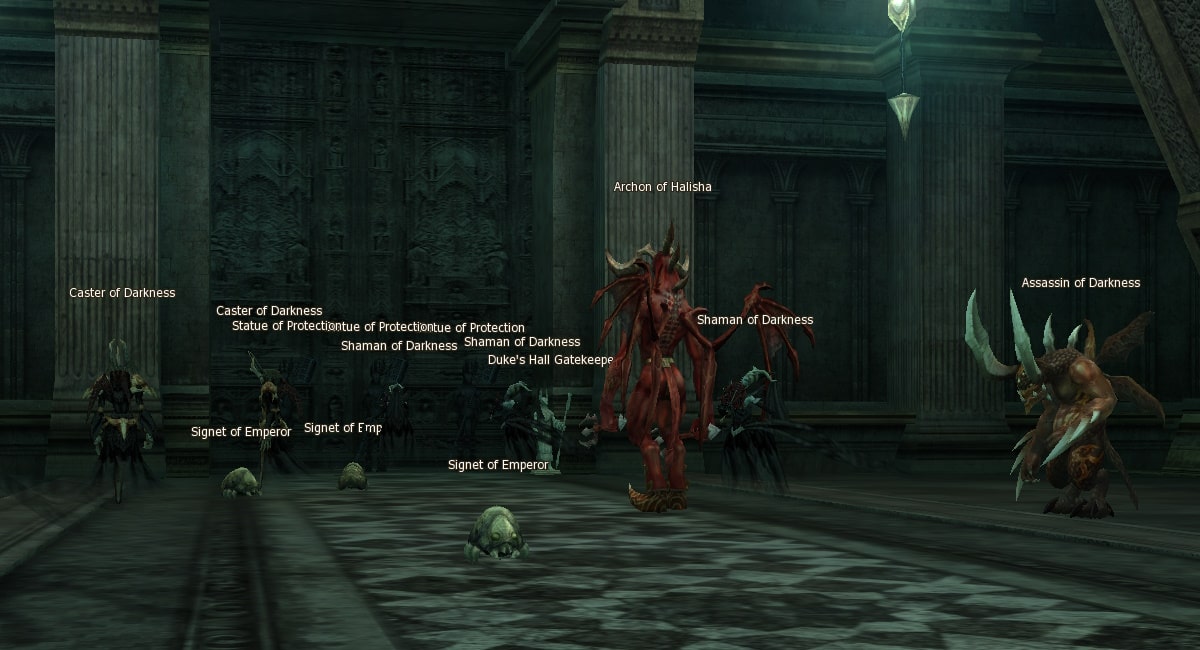
The most complicated and longest room to complete. A lot of strong casters (many of them always stays on one spot), few larvas from previous room, a lot of healers and more of assassins. All monsters have high HP and strong damage. Highly recommend not to pull the whole room, unless you're confident enough.
At the same time room contains 10 very strong
Statue of Protection Lv. 81
, whom are appears paralysed. Paralysis
lasts 3 minutes, that means that you have to clear the room before timer ends. With a high
chance them will attack supports, so be ready!
Statues are very dangerous, have a lot of HP, casting paralysis, AOE stun, provoking and saves themselves in paralysis that makes them Invulnerable!
After you destroy statues 2nd stage begins. There will spawn 3 more statues, relatively small number of monsters
and boss
Archon of Halisha Lv. 81
. The one is needed for 3rd class change.
You don't have to kill statues now, just kill boss, get the key and follow to the final boss
Some advice
Not sure about your skills — keep your support near the entrance doors. That lowers chances, that statues will aggro to support, and even this happen you will have more times to react. Same as before dark resist and holy attack will help.
Same as in previous room
dark resistance and
holy attack will be very helpful.
Rhythm of Silence Lv. 1
from Swordsinger same as
Seal of Silence Lv. 1
from Overlord
can be very effective against healers.
Although
Rhythm of Silence Lv. 1
almost completely disables the statues.
Try to kill them by one. After statue becomes invincible change target and return after invulnerability ends. Keep statues away of support — AOE stun can easily kill whole group.
There are faster way to remove paralysis — that's a buff, so it can be canceled: mages
 Cancellation Lv. 1
or
Cancellation Lv. 1
or
 Touch of Death Lv. 1
from your tank. That has low efficiency
and most of the time doesn't make lots of sense. There are although faster, but less available way —
Touch of Death Lv. 1
from your tank. That has low efficiency
and most of the time doesn't make lots of sense. There are although faster, but less available way —
 Infinity Spear
S
, heroic weapon, that cancels positive effects on enemies after critical attack.
Infinity Spear
S
, heroic weapon, that cancels positive effects on enemies after critical attack.
6th room
Emperor's Hall
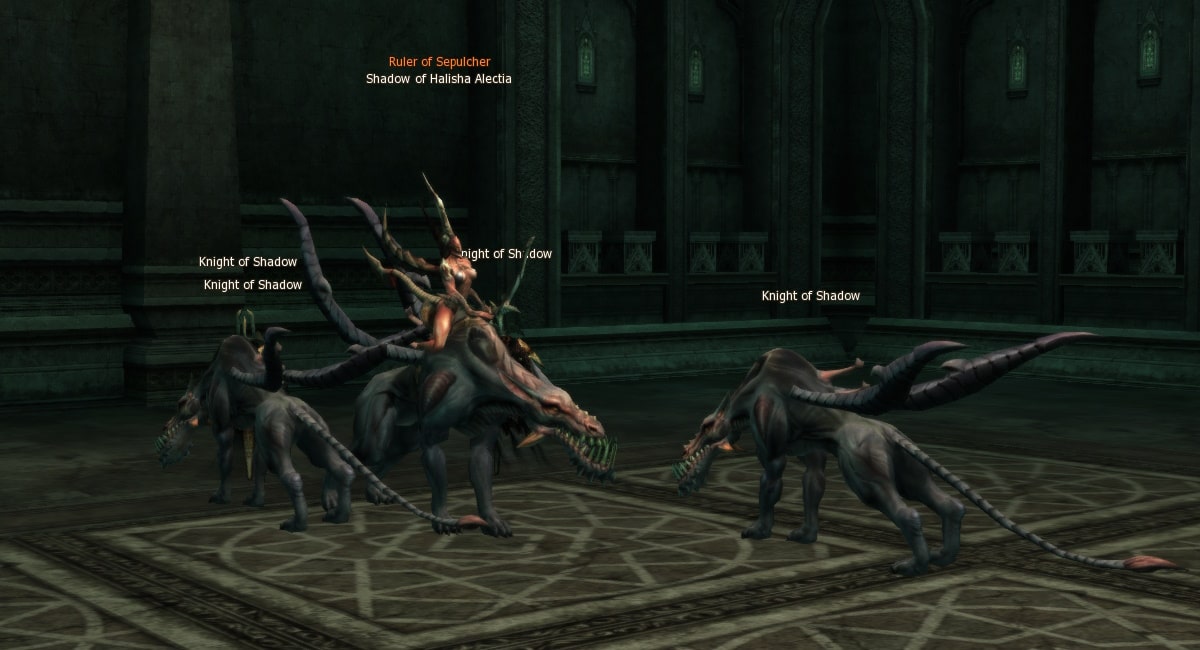
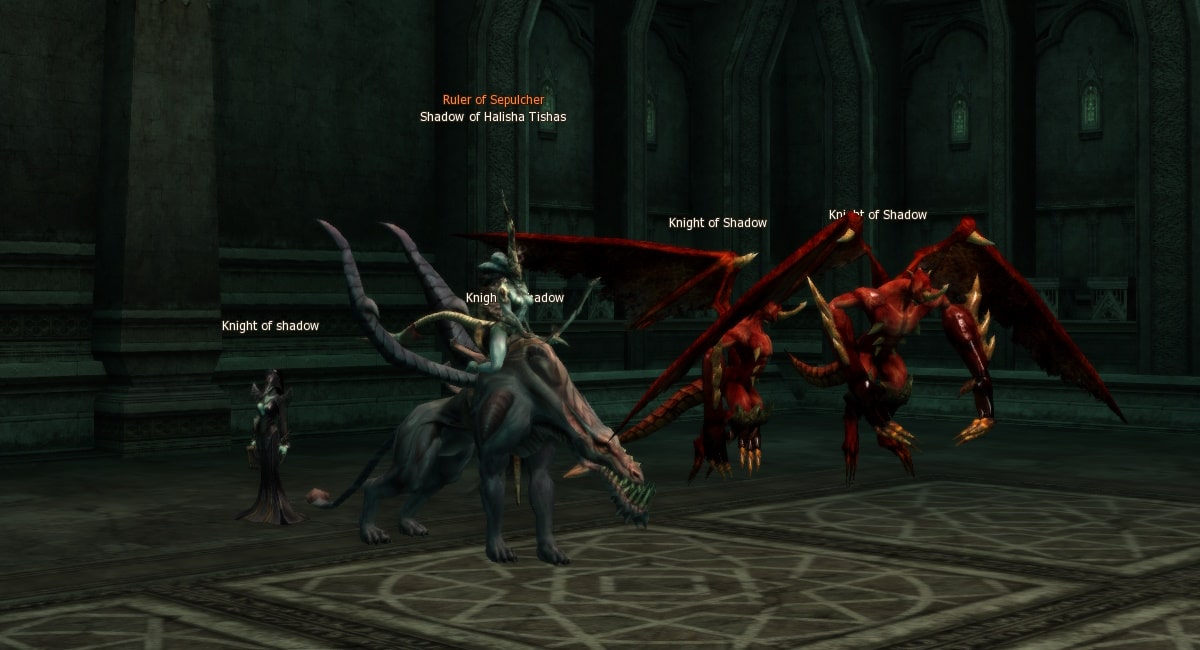
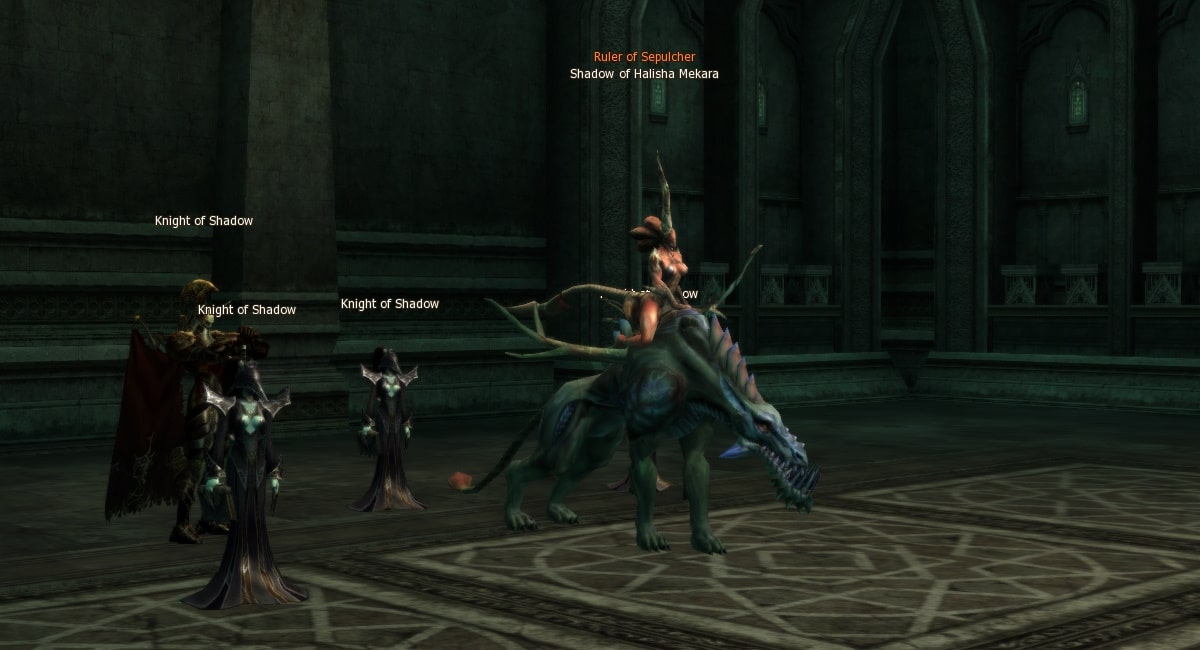
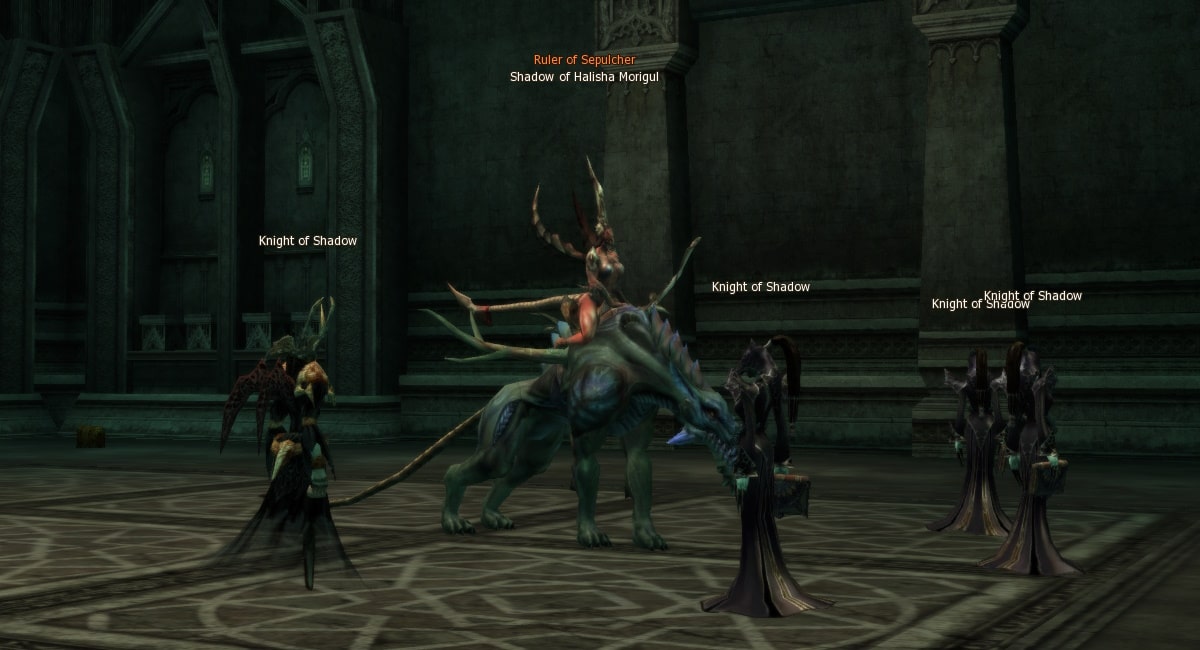
At the end you will meet 1 of 4 bosses:
-
Shadow of Halisha Alectia Ruler of Sepulcher
Lv. 80
-
Shadow of Halisha Tishas Ruler of Sepulcher
Lv. 80
-
Shadow of Halisha Mekara Ruler of Sepulcher
Lv. 80
-
Shadow of Halisha Morigul Ruler of Sepulcher
Lv. 80
Bosses spawns randomly so you can't "catch" required one.
There are no big difference between them. They all archers with high amount of physical attack, but low attack
speed. This damage is greatly decreased by
 Deflect Arrow Lv. 1
, that any bard or tank have.
Real difference between bosses in their minions and loot.
Deflect Arrow Lv. 1
, that any bard or tank have.
Real difference between bosses in their minions and loot.
Loot from Halisha Alectia


Loot from Shadow of Halisha Tishas
| Item | Amount | Chance |
|---|---|---|
| Group chance: 63.1372% | ||

 Unidentified Sealed Draconic Leather Armor
S
Unidentified Sealed Draconic Leather Armor
S
|
1 | 1.531% |
 Sealed Draconic Leather Armor Part
NG
Sealed Draconic Leather Armor Part
NG
|
3 - 9 | 98.469% |
| Group chance: 41.6797% | ||
 Unidentified Draconic Bow
S
Unidentified Draconic Bow
S
|
1 | 1.2673% |
 Draconic Bow Shaft
NG
Draconic Bow Shaft
NG
|
3 - 9 | 98.7327% |
| Group chance: 39.8503% | ||
 Blessed Scroll: Enchant Armor (S-Grade)
NG
Blessed Scroll: Enchant Armor (S-Grade)
NG
|
1 | 8.1633% |
 Blessed Scroll of Resurrection
NG
Blessed Scroll of Resurrection
NG
|
1 | 91.8367% |
| Group chance: 50% | ||
 Common Collectioner's Card
Mounts
NG
Common Collectioner's Card
Mounts
NG
|
1 - 3 | 100% |
| Group chance: 35% | ||
 Uncommon Collectioner's Card
Mounts
NG
Uncommon Collectioner's Card
Mounts
NG
|
1 - 2 | 100% |
| Group chance: 25% | ||
 Part of Elk
NG
Part of Elk
NG
|
1 - 2 | 15% |
 Part of Griffin
NG
Part of Griffin
NG
|
1 - 2 | 15% |
 Part of Pegasus
NG
Part of Pegasus
NG
|
1 - 2 | 14% |
 Part of Tame Hell
NG
Part of Tame Hell
NG
|
1 - 2 | 14% |
 Part of Air Bike
NG
Part of Air Bike
NG
|
1 - 2 | 14% |
 Part of Kukurin
NG
Part of Kukurin
NG
|
1 - 2 | 14% |
 Part of Kukuru
NG
Part of Kukuru
NG
|
1 - 2 | 14% |
| Group chance: 100% | ||
 Fire Stone
NG
Fire Stone
NG
|
1 | 33.34% |
 Earth Stone
NG
Earth Stone
NG
|
1 | 33.33% |
 Dark Stone
NG
Dark Stone
NG
|
1 | 33.33% |
| Group chance: 25% | ||
|
Fire Stone
NG
|
1 | 33.34% |
|
Earth Stone
NG
|
1 | 33.33% |
|
Dark Stone
NG
|
1 | 33.33% |
| Group chance: 73.0373% | ||
|
MasterWork Crystal: S-grade
S/ Dynasty
NG
|
1 | 1% |
Loot from Shadow of Halisha Mekara


Loot from Shadow of Halisha Morigul

Pay attention!
Remember 50 min time limitations, including boss. Exactly at ХХ:50 by real time all characters will be moved away from instance.
It's desirable to buff dark resistance and holy weapon
Make sure your tank's armor strong enough - dismiss
 Berserker Spirit Lv. 1
/
Berserker Spirit Lv. 1
/
 Chant of Berserker Lv. 1
and buff
Chant of Berserker Lv. 1
and buff
 Greater Shield Lv. 1
/
Greater Shield Lv. 1
/
 Earth Chant Lv. 1
.
Earth Chant Lv. 1
.
Always start farm from healer, that has a different skin. Try to neutralize him before he buffs
 Shield Lv. 9
, that ads enormous 50% of physical defence!
Shield Lv. 9
, that ads enormous 50% of physical defence!
This buff can be removed by
Cancellation Lv. 1
/
Touch of Death Lv. 1
. It although
easy to get rid of by
 Block Shield Lv. 1
or it's AOE analogue, that is Cardinal's, Hierophant's
and Shillien Saint's 3rd profession skill. Rest of the guard are pretty harmless.
Block Shield Lv. 1
or it's AOE analogue, that is Cardinal's, Hierophant's
and Shillien Saint's 3rd profession skill. Rest of the guard are pretty harmless.
After boss dies you will be rewarded by a little suprise - room full of
Halisha's Treasure Chest Lv. 78
.
Breaking all these chests for the first time is an unforgettable experience!
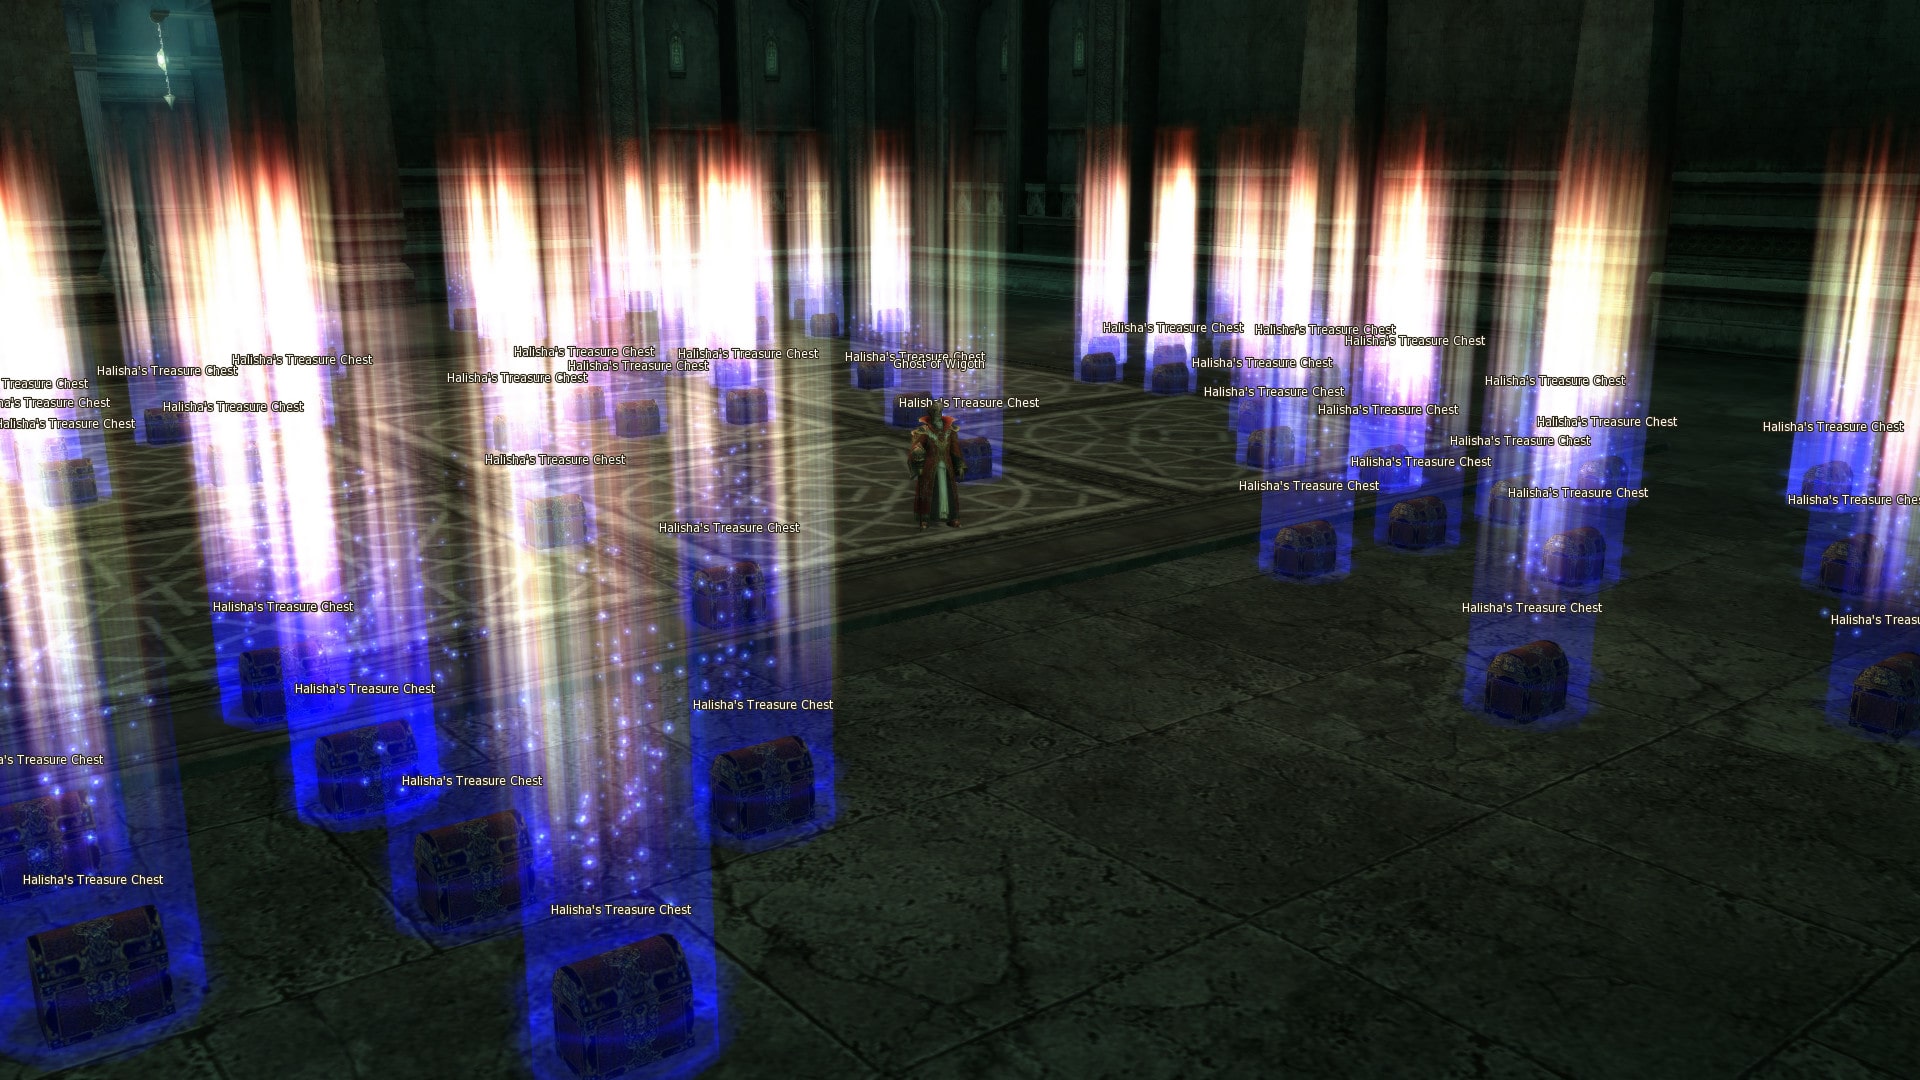
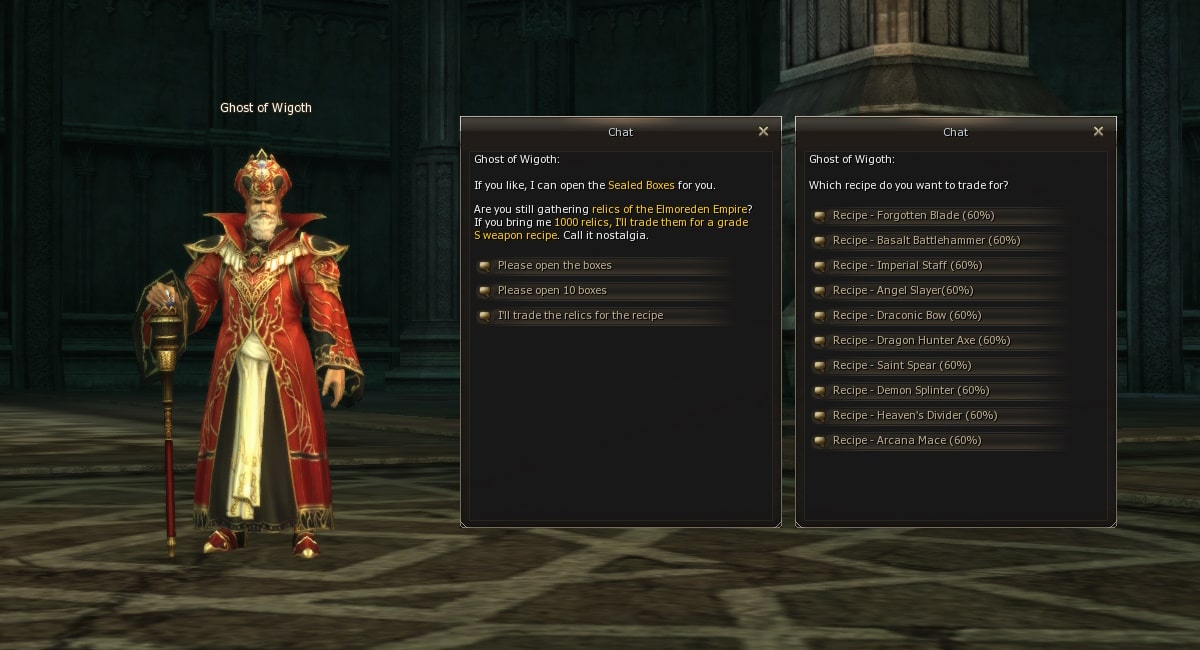
NPC
Ghost of Wigoth
will appear among the chests.
He will teleport you from the instance to a hidden hall, where he will offer to exchange 1000
Broken Relic Part
NG
for a recipe for an S-grade weapon of your choice. As well as previously knocked out
Sealed Box
NG
from monsters for various random resources and items.
You may end with a useless

![]() Cord
NG
, same as valuable
Cord
NG
, same as valuable

![]() Durable Metal Plate
NG
and although
very expensive molds, like:
Durable Metal Plate
NG
and although
very expensive molds, like:

![]() Craftsman Mold
NG
, required for A-grade weapon crafting. However, you can
sell it to vendor for 355k adena. Moreover, valuable resources drops quite often.
Craftsman Mold
NG
, required for A-grade weapon crafting. However, you can
sell it to vendor for 355k adena. Moreover, valuable resources drops quite often.
Possible Sealed Box contents:
Data is taken from game database
-
 Adena
NG
x 10 000
Adena
NG
x 10 000
-
 Cord
NG
x 42
Cord
NG
x 42
-
 Metallic Fiber
NG
x 36
Metallic Fiber
NG
x 36
-
 Mithril Ore
NG
x 4
Mithril Ore
NG
x 4
-
 Coarse Bone Powder
NG
x 6
Coarse Bone Powder
NG
x 6
-
Metallic Thread
NG
x 8
-
 Oriharukon Ore
NG
x 1
Oriharukon Ore
NG
x 1
-
 Compound Braid
NG
x 1
Compound Braid
NG
x 1
-
 Adamantite Nugget
NG
x 1
Adamantite Nugget
NG
x 1
-
 Crafted Leather
NG
x 1
Crafted Leather
NG
x 1
-
 Asofe
NG
x 1
Asofe
NG
x 1
-
 Synthetic Cokes
NG
x 1
Synthetic Cokes
NG
x 1
-
 Mold Lubricant
NG
x 1
Mold Lubricant
NG
x 1
-
 Mithril Alloy
NG
x 1
Mithril Alloy
NG
x 1
-
Durable Metal Plate
NG
x 1
-
 Oriharukon
NG
x 1
Oriharukon
NG
x 1
-
 Maestro Anvil Lock
NG
x 1
Maestro Anvil Lock
NG
x 1
-
 Maestro Mold
NG
x 1
Maestro Mold
NG
x 1
-
 Braided Hemp
NG
x 8
Braided Hemp
NG
x 8
-
 Leather
NG
x 24
Leather
NG
x 24
-
 Cokes
NG
x 4
Cokes
NG
x 4
-
 Steel
NG
x 6
Steel
NG
x 6
-
 High-Grade Suede
NG
x 6
High-Grade Suede
NG
x 6
-
 Stone of Purity
NG
x 1
Stone of Purity
NG
x 1
-
Steel Mold
NG
x 1
-
 Metal Hardener
NG
x 1
Metal Hardener
NG
x 1
-
 Mold Glue
NG
x 1
Mold Glue
NG
x 1
-
 Thons
NG
x 1
Thons
NG
x 1
-
 Varnish of Purity
NG
x 1
Varnish of Purity
NG
x 1
-
 Enria
NG
x 1
Enria
NG
x 1
-
Silver Mold
NG
x 1
-
 Mold Hardener
NG
x 1
Mold Hardener
NG
x 1
-
 Blacksmith's Frame
NG
x 1
Blacksmith's Frame
NG
x 1
-
 Artisan's Frame
NG
x 1
Artisan's Frame
NG
x 1
-
Craftsman Mold
NG
x 1
-
 Scroll: Enchant Armor (A-Grade)
NG
x 1
Scroll: Enchant Armor (A-Grade)
NG
x 1
-
 Scroll: Enchant Armor (B-Grade)
NG
x 1
Scroll: Enchant Armor (B-Grade)
NG
x 1
-
 Scroll: Enchant Armor (S-Grade)
NG
x 1
Scroll: Enchant Armor (S-Grade)
NG
x 1
-
 Scroll: Enchant Weapon (A-Grade)
NG
x 1
Scroll: Enchant Weapon (A-Grade)
NG
x 1
-
 Scroll: Enchant Weapon (B-Grade)
NG
x 1
Scroll: Enchant Weapon (B-Grade)
NG
x 1
-
 Scroll: Enchant Weapon (S-Grade)
NG
x 1
Scroll: Enchant Weapon (S-Grade)
NG
x 1
-
 Sealed Tateossian Earring Part
NG
x 1
Sealed Tateossian Earring Part
NG
x 1
-
 Sealed Tateossian Ring Gem
NG
x 1
Sealed Tateossian Ring Gem
NG
x 1
-
 Sealed Tateossian Necklace Chain
NG
x 1
Sealed Tateossian Necklace Chain
NG
x 1
-
 Sealed Imperial Crusader Breastplate Part
NG
x 1
Sealed Imperial Crusader Breastplate Part
NG
x 1
-
 Sealed Imperial Crusader Gaiters Pattern
NG
x 1
Sealed Imperial Crusader Gaiters Pattern
NG
x 1
-
Sealed Imperial Crusader Gauntlets Design
NG
x 1
-
Sealed Imperial Crusader Boots Design
NG
x 1
-
Sealed Imperial Crusader Shield Part
NG
x 1
-
Sealed Imperial Crusader Helmet Pattern
NG
x 1
-
Sealed Draconic Leather Armor Part
NG
x 1
-
Sealed Draconic Leather Gloves Fabric
NG
x 1
-
Sealed Draconic Leather Boots Design
NG
x 1
-
Sealed Draconic Leather Helmet Pattern
NG
x 1
-
Sealed Major Arcana Robe Part
NG
x 1
-
Sealed Major Arcana Gloves fabric
NG
x 1
-
Sealed Major Arcana Boots Design
NG
x 1
-
Sealed Major Arcana Circlet Pattern
NG
x 1
-
 Forgotten Blade Edge
NG
x 1
Forgotten Blade Edge
NG
x 1
-
 Basalt Battlehammer Head
NG
x 1
Basalt Battlehammer Head
NG
x 1
-
 Imperial Staff Head
NG
x 1
Imperial Staff Head
NG
x 1
-
Angel Slayer Blade
NG
x 1
-
Shining Bow Shaft
NG
x 1
-
Dragon Hunter Axe Blade
NG
x 1
-
Saint Spear Blade
NG
x 1
-
Demon Splinter Blade
NG
x 1
-
Heavens Divider Edge
NG
x 1
-
Arcana Mace Head
NG
x 1
Final word
Greet everyone who reached here. Now you are ready to complete interesting and very profitable instance, that was updated at our server! Finally, I want to share a few non-obvious tricks that, to one degree or another, can make your passage easier.
1. Entering instance doesn't remove buffs, so debuffs as well! That means that you can have diseases at Hot Springs and easy run through all rooms.
2. It is not necessary to summon non-noblesse characters for every run. After each try character obtains
Used Grave Pass
NG
, that can be used to teleport via
Ghost Chamberlain of Elmoreden
.
After you kill 4 different bosses and collect 4 goblets talk to
Nameless Spirit Quest from 74 Lv.
,
and he gifts you
 Antique Brooch
NG
, that can teleport you without using
Used Grave Pass
NG
.
Antique Brooch
NG
, that can teleport you without using
Used Grave Pass
NG
.
4. Every XX:50 min all 4 instance zone closes, and your party will be moved to such secluded place:
This concludes the guide - good luck with your loot and enjoy the game!
Guide written by — 960, Masterwork player. Translated by Tokomo©


