
Basics
On MasterWork Eternal, low-level epic bosses have been moved to instance zones to make them accessible to all players.
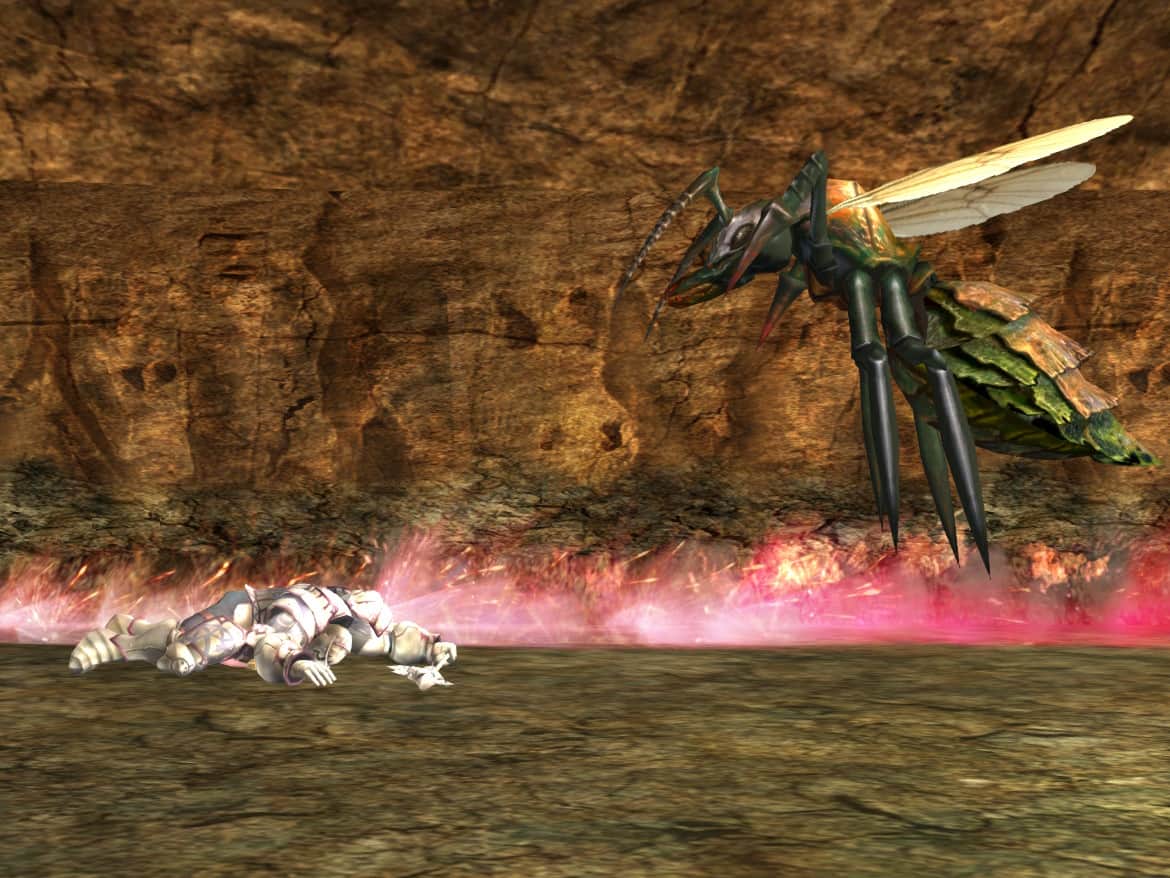
The MasterWork team presents a battle with the epic boss
 Queen Ant Inzone Boss
Lv. 83
Queen Ant Inzone Boss
Lv. 83
 in an instance-zone format. Gather a group of like-minded players, defeat the boss, and receive guaranteed
epic jewelry!
in an instance-zone format. Gather a group of like-minded players, defeat the boss, and receive guaranteed
epic jewelry!
Entry conditions and cooldown
- Instance entry:
 Queen Ant Dimensional Entrance
in the Ancient City Arcan
Queen Ant Dimensional Entrance
in the Ancient City Arcan - Number of players in the group: 7 - 9
- Player levels: 80 - 85
- Time to complete: 120 minutes
- Cooldown: 2 times a week, on Wednesday and Saturday
Pay attention!
After the battle in the first room, the instance will be locked for re-entry if you fail. Be careful and manage your strength!
Related missions
|
Defeat Queen Ant Daily
Defeat Queen Ant to complete this mission.
The entrance to the instance zone is located in Ancient City Arcan. |
 Ivory Coin
NG
Foundation
x150
Ivory Coin
NG
Foundation
x150 Booty from Queen Ant
Tradable Chest
NG
x1
Booty from Queen Ant
Tradable Chest
NG
x1 Attributes Supplies
Attribute Stone or Crystal
NG
x1
Attributes Supplies
Attribute Stone or Crystal
NG
x1 Bottle of Queen Ant's Soul
NG
x5
Bottle of Queen Ant's Soul
NG
x5 Exp
NG
x35000000
Exp
NG
x35000000 SP
NG
x15000000
SP
NG
x15000000 Fame Point
NG
x350
Fame Point
NG
x350 |
Basic mechanics
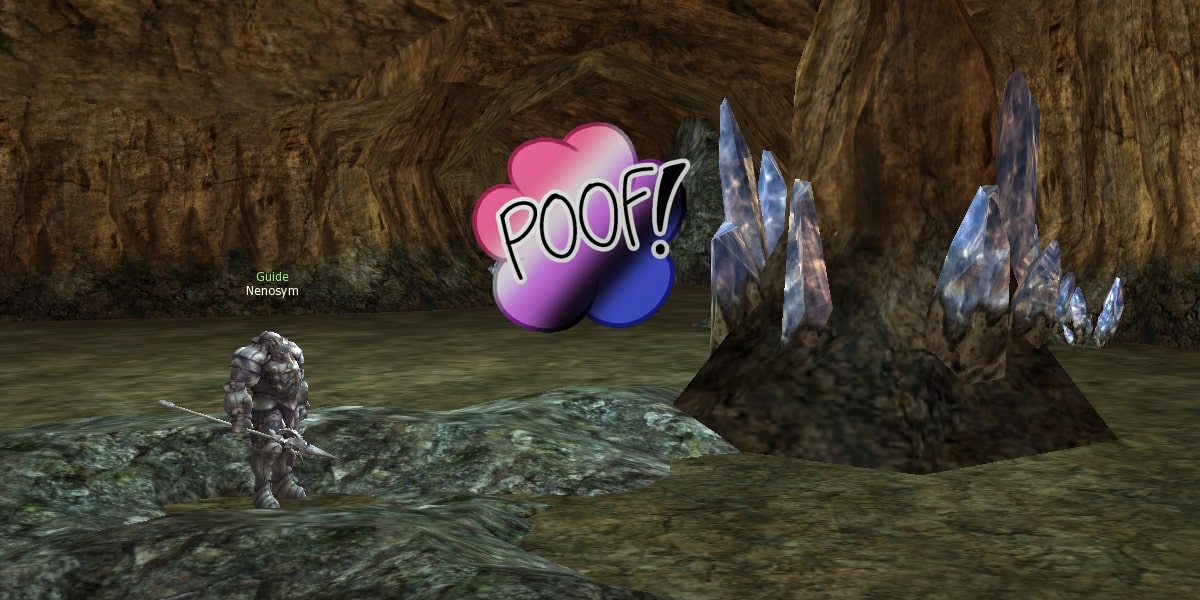
Defend Nenosym
 Nenosym Guide
— a guide who will lead the group through the
Ant Nest to the Queen Ant's lair.
Nenosym Guide
— a guide who will lead the group through the
Ant Nest to the Queen Ant's lair.
The group's task is to keep the guide alive.
Be careful, dangers lurk within the Ant Nest.
Pay attention!
If Nenosym dies at any point during the instance, the mission will fail and the instance will be forcibly terminated.
Re-entry will be possible after the next cooldown.
Tips for passing
Prepare for battle
The summoned monsters pose a great danger. It is recommended to refresh buffs, rhythms, take positions, and only then engage in battle.
Use Potions
Special potions (herbs) drop from all monsters in the instance that increase damage against insects:

 Anti-Insect Materia
NG
—
Increases your power toward insects from this dimension by 10%.
Anti-Insect Materia
NG
—
Increases your power toward insects from this dimension by 10%.
Remember that the items are personal, pick them up and use them on attacking classes.
Use attribute defense
The Queen Ant deals water attribute damage. Monsters in the Ant Nest deal earth, wind, or dark attribute damage. Items and skills with attribute resistance effects will increase the group's survivability.
Instance Map
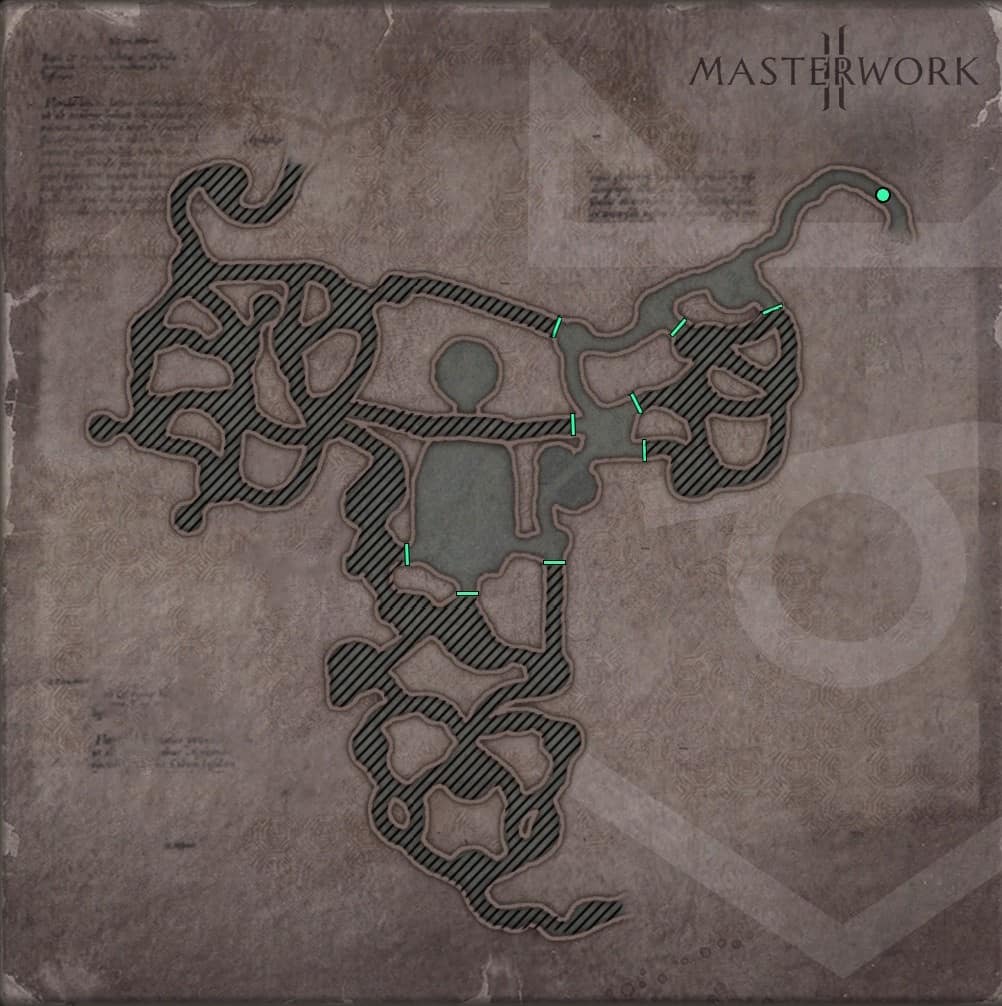
The instance is a shortened version of the Ant Nest location.
Instance zone locations:
- Instance zone entrance
- Tunnels and rooms
- Queen Ant's Lair
Ant Nest
Preparation
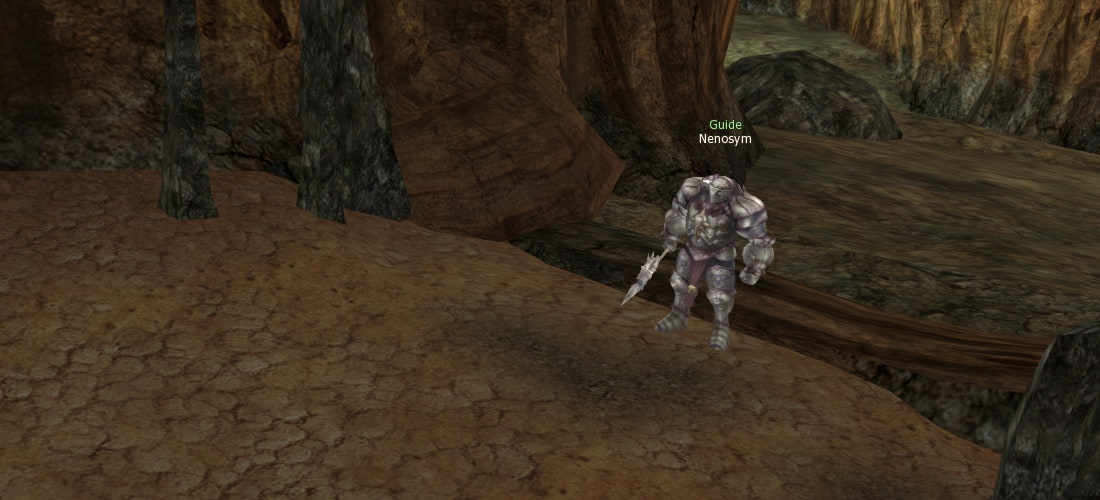
After entering the instance, the group appears at the beginning of the descent into the Ant Nest.
You will be greeted by
Nenosym Guide
, who will accompany the group to the lair
of the Queen Ant. The group's task is to reach the lair and keep the guide alive.
The party leader needs to talk to Nenosym to start the run.
Pay attention!
If Nenosym dies at any moment during the instance, the mission will fail and the instance will be forcibly terminated.
Re-entry will be possible after the next reset.
Labyrinth

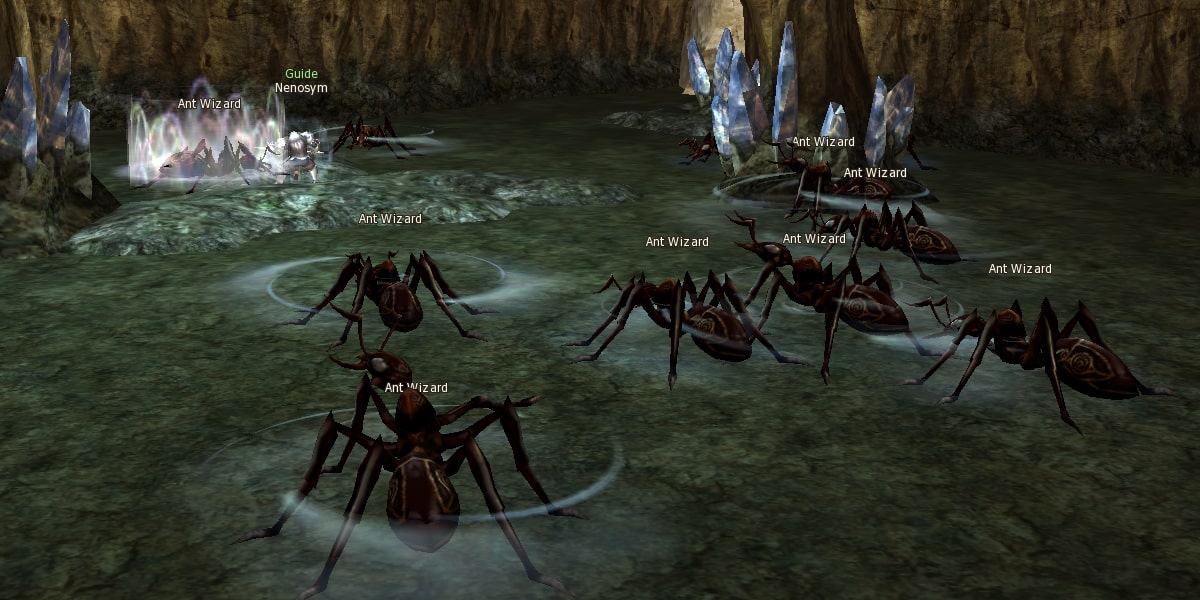
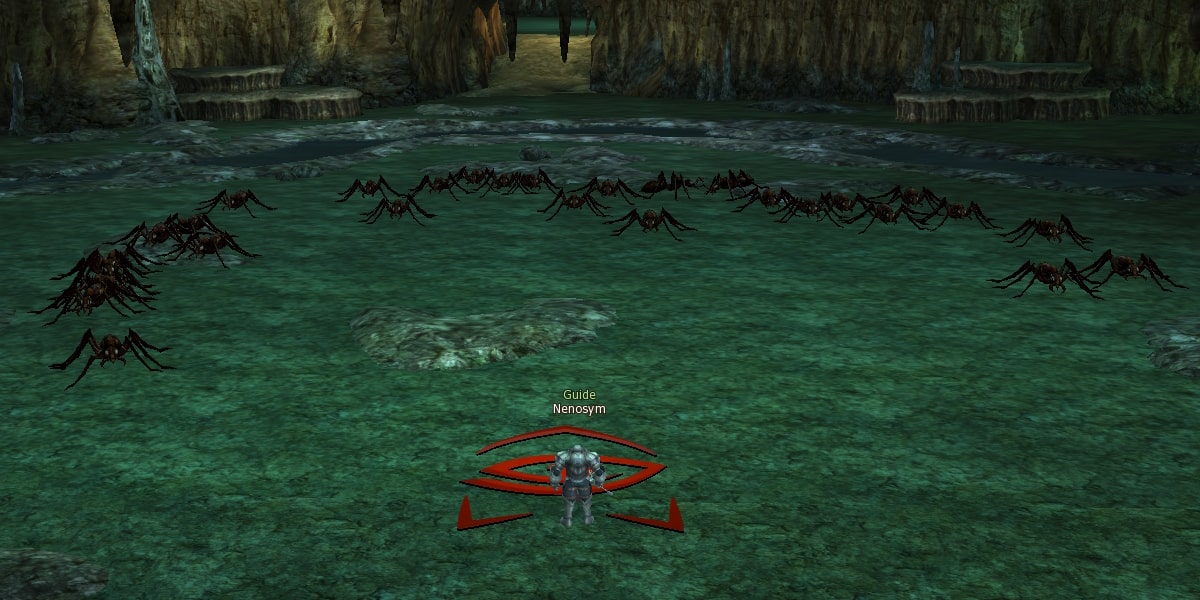
After the conversation, Nenosym will head deeper into the Ant Nest. Follow the guide and protect him from monsters.
As you move toward the lair, Nenosym will warn you about dangers lurking in the rooms of the Ant Nest. Prepare for battle and talk to the guide. Protect the guide at any cost!
There will be a total of 3 dangerous rooms along the way. Eliminate the threats in each room to move further toward the Queen's Lair.
Pay attention!
Each room will feature a random event.
Random events
Ambush
A large number of monsters of one of the following types will appear in the room:
Ant Wizard Lv. 82
Ant Guardian Lv. 82
.
Repel the ant attack to continue your path.
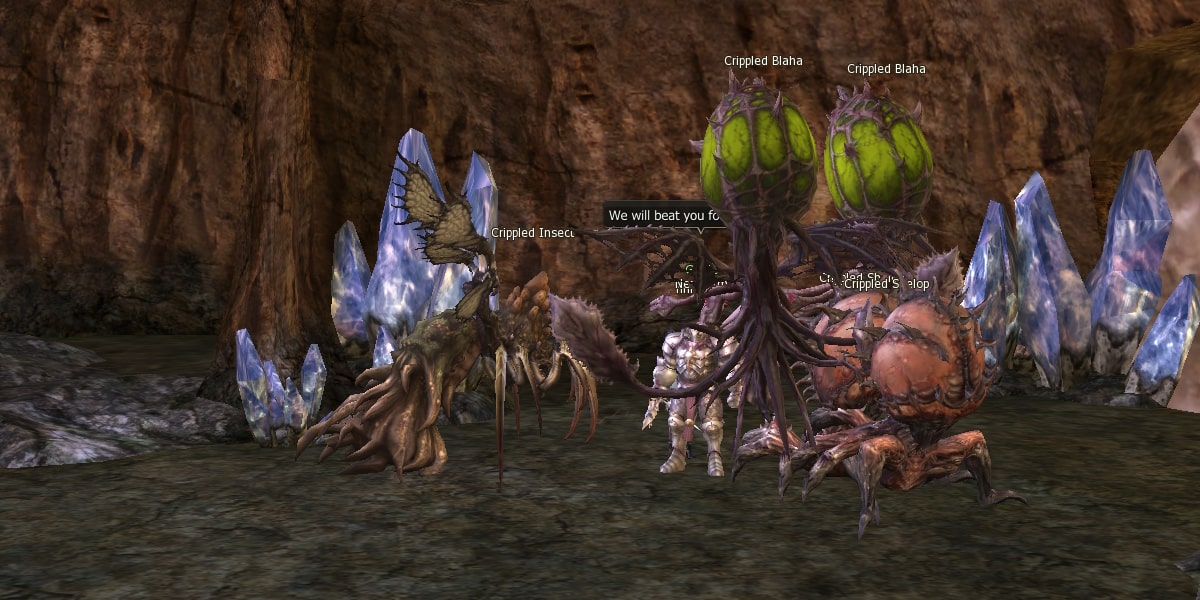
Insect Attack
The following monsters will appear in the room:
Crippled Insect Lv. 83
Crippled Shelop Lv. 82
Crippled Blaha Lv. 82
Repel the insect attack to continue your path.
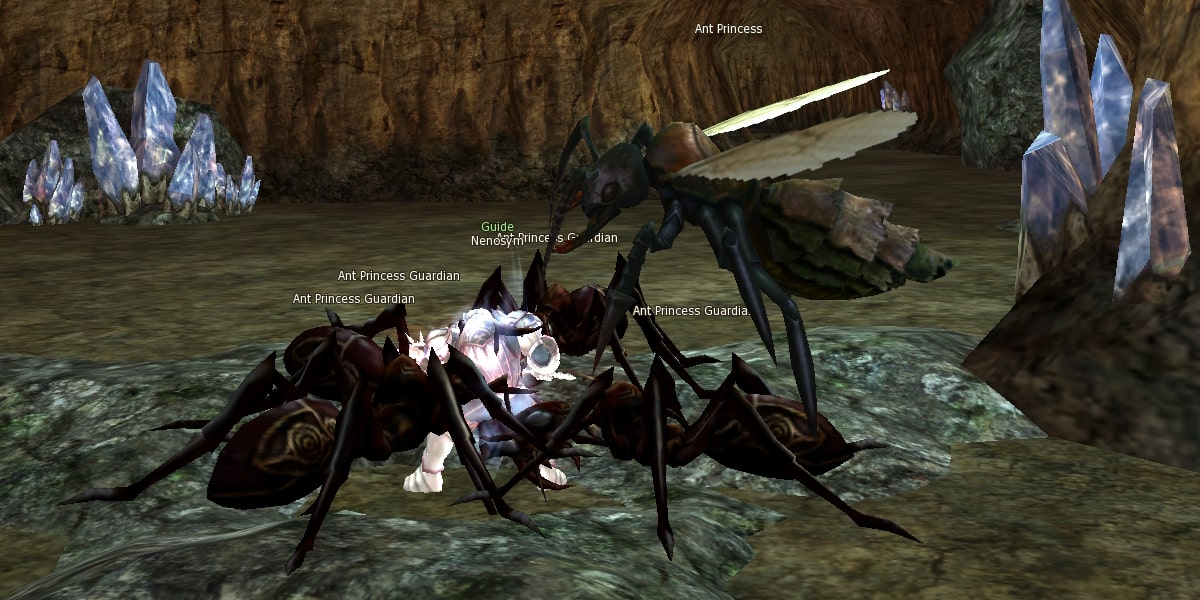
Princess Attack
The following monsters will appear in the room:
Ant Princess Lv. 83
Ant Princess Guardian Lv. 82
Repel the attack of the Ant Princess and her guardian to continue your path.
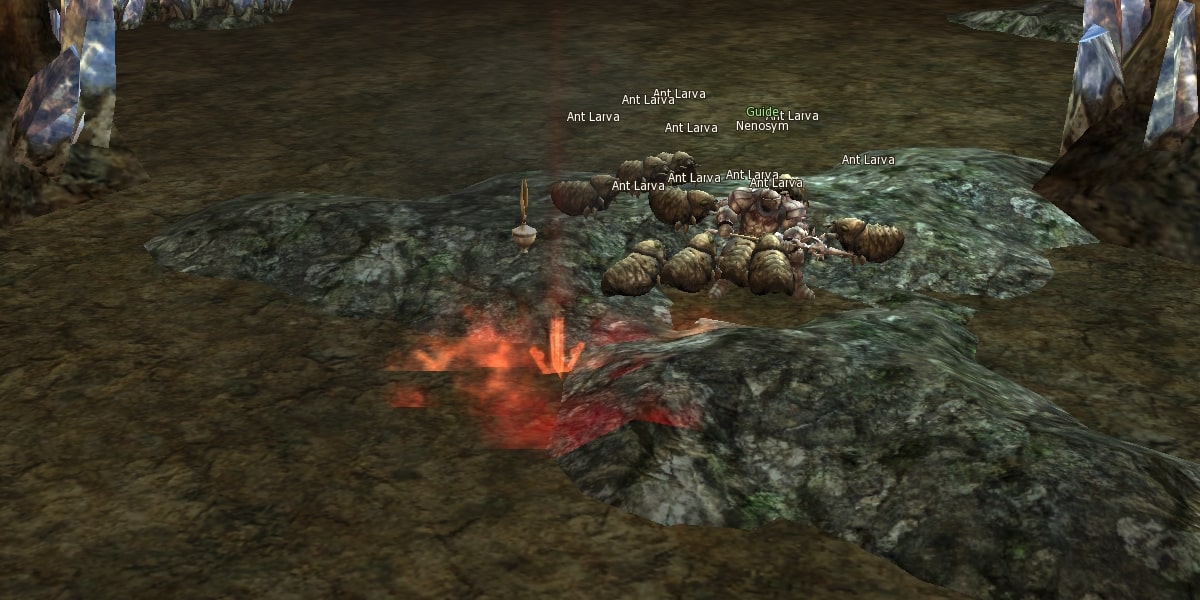
Larvae Invasion
The following monsters will appear in the room:
At the same time, fiery traps will ignite on the ground beneath the characters' feet. Move out of the trap area to avoid taking heavy fire damage.
Repel all waves of Larvae to continue your path.
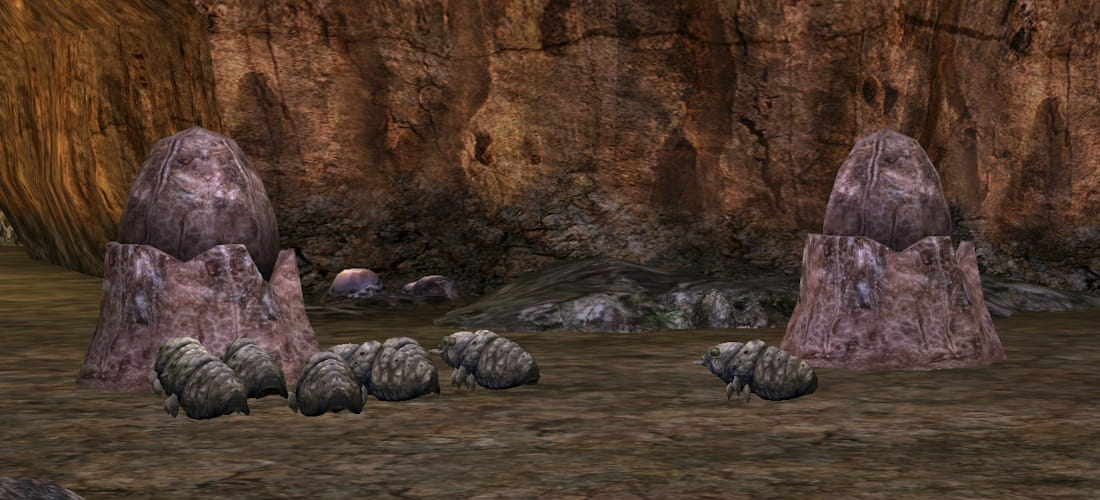
Cocoons
The following will appear in the room:
 Cocoon Ant Lv. 82
Cocoon Guard Ant Lv. 82
Destroy all Cocoons and Larvae to continue your path.
Unexpected Encounter
An unexpected visitor will burst into the room, but he will be startled by the sudden meeting and retreat back to his original location.
Observant players may notice a secret message from the random guest.
Unexpected Fortune
It seems you have found the Queen's stash.
Hurry to collect as many treasures as possible before the stash is hidden again.

Queen's Lair
Summoning Ritual
After the third room, Nenosym will lead you to the Queen Ant's nest. The guide must perform the summoning ritual, during which the ant colony will go on the offensive and direct all forces to defend the Queen. Prepare carefully for the final battle, that may be challenging.
Once your group is ready for battle, talk to Nenosym. He will start the Queen's summoning ritual. During the ritual, you must repel three waves of attacking monsters.
After speaking with the guide, a large number of monsters will rush into the room from three sides:
Ant Fighter Lv. 82
Ant Mage Lv. 82
The number of monsters increases with each new wave.
Mages will use mass healing for the warriors, so try to eliminate them first.
Once you handle the ants, a countdown for the next wave of monsters will appear on the screen. If you handle them easily and want to speed up the ritual, inform Nenosym.
Pay attention!
Do not speed up the summoning of new waves of ants unless you are confident in your strength!
Battle with the Queen
| HP | 8 925 000 | MP | 1 481 |
| P. Atk. | 81 903 | M. Atk. | 234 969 |
| P. Def. | 2 332 | M. Def. | 2 238 |
| Exp | 6 889 | SP | 7 500 000 |
| Attack Attribute | Water 300 | Defense Attribute | Fire 180, Water 180, Wind 180, Earth 180, Holy 180, Unholy 180 |

After the third wave of monsters, the ritual will be complete, and within a minute the Queen Ant will appear in the lair with her entourage:
Court Guard Ant Lv. 82
Nurse Ant Lv. 82
The guards will attack along with the Queen, while the nurses will heal her.
The Queen does not use special skills. The danger comes only from the waves of monsters.
Losing every 25% of her health, the Queen Ant summons a new wave of monsters, similar to the summoning ritual. Destroy the appearing ants before attacking the boss.
Pay attention!
The maximum damage to the boss is capped at 35 000.
After defeating the Queen Ant, speak with Nenosym to leave the instance.
SA levelling
SA is levelled on the boss
Queen Ant Inzone Boss
Lv. 83
, the chance is individual for each group member:
| 10 → 11 | 11 → 12 | 12 → 13 | 13 → 14 | 14 → 15 | 15 → 16 | 16 → 17 | 17 → 18 | |
|---|---|---|---|---|---|---|---|---|
|
Queen Ant Inzone Boss
Lv. 83
|
50% | 35% | 25% | 15% | 10% | 7.5% | 5% | 3.5% |
Personal Experience
Experience for killing the Queen Ant is now fixed for each group member, meaning it doesn't matter whether there are 7 or 9 players. Each player will receive the same amount of experience.
Pets gain experience without penalties for the level difference between the owner and the pet.
Base experience for killing
Queen Ant Inzone Boss
Lv. 83
— 25 000 000 EXP.
Base experience is modified by the fatigue level penalty, the Experience Rune bonus, and achievement buffs.
Let's calculate experience with and without boosts as an example.
Players completed the Queen Ant instance. Some had boosts, some were fatigued:
- Player 1, without boosts or fatigue, received 25 000 000 EXP
- Player 2 has the Daily Online Reward buff (+30% EXP) and Experience Rune* (+50% EXP), so he receives 25 000 000 + (25 000 000 * 0.3) + (25 000 000 * 0.5) = 25 000 000 + 7 500 000 + 12 500 000 = 45 000 000 EXP
- Player 3 has the Daily Online Reward* buff (+30% EXP) and 1 level of fatigue (received EXP x0.1), so he receives 25 000 000 * 0.1 + (2 500 000 * 0.3) = 2 500 000 + 750 000 = 3 250 000 EXP
*Daily Online Reward — reward for the "Daily Online" achievement.
*Experience Runes come in two types — +30% and +50%. Their bonuses do not stack. When using multiple runes, the player receives the bonus from the stronger one.
Loot
In the Queen Ant instance zone, all loot are personal.
Booty from Queen Ant
Tradable Chest
NG
— personal award.
Epic Jewelry -
 Physical Ring of Queen Ant
C
or
Physical Ring of Queen Ant
C
or
 Magical Ring of Queen Ant
C
will drop on the ground as before.
Magical Ring of Queen Ant
C
will drop on the ground as before.
Contents of the chest
-

 Shillien Supplies
Mid-S84 Weapon
NG
(1)
Chance-based
Shillien Supplies
Mid-S84 Weapon
NG
(1)
Chance-based
-

 Gemstone S
NG
(1)
Chance-based
Gemstone S
NG
(1)
Chance-based
-
Gemstone S
NG
(2)
Chance-based
-
Gemstone S
NG
(3)
Chance-based
-

 Unidentified Sealed Moirai Helmet
S80
(1)
Chance-based
Unidentified Sealed Moirai Helmet
S80
(1)
Chance-based
-
 Unidentified Sealed Moirai Leather Helmet
S80
(1)
Chance-based
Unidentified Sealed Moirai Leather Helmet
S80
(1)
Chance-based
-
 Unidentified Sealed Moirai Circlet
S80
(1)
Chance-based
Unidentified Sealed Moirai Circlet
S80
(1)
Chance-based
-
 Unidentified Sealed Moirai Shield
S80
(1)
Chance-based
Unidentified Sealed Moirai Shield
S80
(1)
Chance-based
-
 Unidentified Sealed Moirai Sigil
S80
(1)
Chance-based
Unidentified Sealed Moirai Sigil
S80
(1)
Chance-based
-
 Sealed Moirai Helmet Piece
NG
(1)
Chance-based
Sealed Moirai Helmet Piece
NG
(1)
Chance-based
-
Sealed Moirai Helmet Piece
NG
(2)
Chance-based
-
Sealed Moirai Helmet Piece
NG
(3)
Chance-based
-
 Sealed Moirai Leather Helmet Piece
NG
(1)
Chance-based
Sealed Moirai Leather Helmet Piece
NG
(1)
Chance-based
-
Sealed Moirai Leather Helmet Piece
NG
(2)
Chance-based
-
Sealed Moirai Leather Helmet Piece
NG
(3)
Chance-based
-
 Sealed Moirai Circlet Piece
NG
(1)
Chance-based
Sealed Moirai Circlet Piece
NG
(1)
Chance-based
-
Sealed Moirai Circlet Piece
NG
(2)
Chance-based
-
Sealed Moirai Circlet Piece
NG
(3)
Chance-based
-
 Sealed Moirai Shield Piece
NG
(1)
Chance-based
Sealed Moirai Shield Piece
NG
(1)
Chance-based
-
Sealed Moirai Shield Piece
NG
(2)
Chance-based
-
Sealed Moirai Shield Piece
NG
(3)
Chance-based
-
 Sealed Moirai Sigil Piece
NG
(1)
Chance-based
Sealed Moirai Sigil Piece
NG
(1)
Chance-based
-
Sealed Moirai Sigil Piece
NG
(2)
Chance-based
-
Sealed Moirai Sigil Piece
NG
(3)
Chance-based
-
 Unidentified Sealed Moirai Breastplate
S80
(1)
Chance-based
Unidentified Sealed Moirai Breastplate
S80
(1)
Chance-based
-
 Unidentified Sealed Moirai Gaiters
S80
(1)
Chance-based
Unidentified Sealed Moirai Gaiters
S80
(1)
Chance-based
-
 Unidentified Sealed Moirai Leather Breastplate
S80
(1)
Chance-based
Unidentified Sealed Moirai Leather Breastplate
S80
(1)
Chance-based
-
 Unidentified Sealed Moirai Leather Legging
S80
(1)
Chance-based
Unidentified Sealed Moirai Leather Legging
S80
(1)
Chance-based
-
 Unidentified Sealed Moirai Tunic
S80
(1)
Chance-based
Unidentified Sealed Moirai Tunic
S80
(1)
Chance-based
-
 Unidentified Sealed Moirai Stockings
S80
(1)
Chance-based
Unidentified Sealed Moirai Stockings
S80
(1)
Chance-based
-
 Sealed Moirai Breastplate Piece
NG
(1)
Chance-based
Sealed Moirai Breastplate Piece
NG
(1)
Chance-based
-
Sealed Moirai Breastplate Piece
NG
(2)
Chance-based
-
Sealed Moirai Breastplate Piece
NG
(3)
Chance-based
-
 Sealed Moirai Gaiter Piece
NG
(1)
Chance-based
Sealed Moirai Gaiter Piece
NG
(1)
Chance-based
-
Sealed Moirai Gaiter Piece
NG
(2)
Chance-based
-
Sealed Moirai Gaiter Piece
NG
(3)
Chance-based
-
 Sealed Moirai Leather Breastplate Piece
NG
(1)
Chance-based
Sealed Moirai Leather Breastplate Piece
NG
(1)
Chance-based
-
Sealed Moirai Leather Breastplate Piece
NG
(2)
Chance-based
-
Sealed Moirai Leather Breastplate Piece
NG
(3)
Chance-based
-
 Sealed Moirai Leather Legging Piece
NG
(1)
Chance-based
Sealed Moirai Leather Legging Piece
NG
(1)
Chance-based
-
Sealed Moirai Leather Legging Piece
NG
(2)
Chance-based
-
Sealed Moirai Leather Legging Piece
NG
(3)
Chance-based
-
 Sealed Moirai Tunic Piece
NG
(1)
Chance-based
Sealed Moirai Tunic Piece
NG
(1)
Chance-based
-
Sealed Moirai Tunic Piece
NG
(2)
Chance-based
-
Sealed Moirai Tunic Piece
NG
(3)
Chance-based
-
 Sealed Moirai Stockings Piece
NG
(1)
Chance-based
Sealed Moirai Stockings Piece
NG
(1)
Chance-based
-
Sealed Moirai Stockings Piece
NG
(2)
Chance-based
-
Sealed Moirai Stockings Piece
NG
(3)
Chance-based
-
 Unidentified Sealed Moirai Gauntlets
S80
(1)
Chance-based
Unidentified Sealed Moirai Gauntlets
S80
(1)
Chance-based
-
 Unidentified Sealed Moirai Boots
S80
(1)
Chance-based
Unidentified Sealed Moirai Boots
S80
(1)
Chance-based
-
 Unidentified Sealed Moirai Leather Gloves
S80
(1)
Chance-based
Unidentified Sealed Moirai Leather Gloves
S80
(1)
Chance-based
-
 Unidentified Sealed Moirai Leather Boots
S80
(1)
Chance-based
Unidentified Sealed Moirai Leather Boots
S80
(1)
Chance-based
-
 Unidentified Sealed Moirai Gloves
S80
(1)
Chance-based
Unidentified Sealed Moirai Gloves
S80
(1)
Chance-based
-
 Unidentified Sealed Moirai Shoes
S80
(1)
Chance-based
Unidentified Sealed Moirai Shoes
S80
(1)
Chance-based
-
 Sealed Moirai Gauntlets Piece
NG
(1)
Chance-based
Sealed Moirai Gauntlets Piece
NG
(1)
Chance-based
-
Sealed Moirai Gauntlets Piece
NG
(2)
Chance-based
-
Sealed Moirai Gauntlets Piece
NG
(3)
Chance-based
-
 Sealed Moirai Boots Piece
NG
(1)
Chance-based
Sealed Moirai Boots Piece
NG
(1)
Chance-based
-
Sealed Moirai Boots Piece
NG
(2)
Chance-based
-
Sealed Moirai Boots Piece
NG
(3)
Chance-based
-
 Sealed Moirai Leather Gloves Piece
NG
(1)
Chance-based
Sealed Moirai Leather Gloves Piece
NG
(1)
Chance-based
-
Sealed Moirai Leather Gloves Piece
NG
(2)
Chance-based
-
Sealed Moirai Leather Gloves Piece
NG
(3)
Chance-based
-
 Sealed Moirai Leather Boots Piece
NG
(1)
Chance-based
Sealed Moirai Leather Boots Piece
NG
(1)
Chance-based
-
Sealed Moirai Leather Boots Piece
NG
(2)
Chance-based
-
Sealed Moirai Leather Boots Piece
NG
(3)
Chance-based
-
 Sealed Moirai Gloves Piece
NG
(1)
Chance-based
Sealed Moirai Gloves Piece
NG
(1)
Chance-based
-
Sealed Moirai Gloves Piece
NG
(2)
Chance-based
-
Sealed Moirai Gloves Piece
NG
(3)
Chance-based
-
 Sealed Moirai Shoes Piece
NG
(1)
Chance-based
Sealed Moirai Shoes Piece
NG
(1)
Chance-based
-
Sealed Moirai Shoes Piece
NG
(2)
Chance-based
-
Sealed Moirai Shoes Piece
NG
(3)
Chance-based
-
Unidentified Sealed Vesper Helmet
S84
(1)
Chance-based
-
Unidentified Sealed Vesper Leather Helmet
S84
(1)
Chance-based
-
Unidentified Sealed Vesper Circlet
S84
(1)
Chance-based
-
 Unidentified Sealed Vesper Shield
S84
(1)
Chance-based
Unidentified Sealed Vesper Shield
S84
(1)
Chance-based
-
 Unidentified Sealed Vesper Sigil
S84
(1)
Chance-based
Unidentified Sealed Vesper Sigil
S84
(1)
Chance-based
-
 Sealed Vesper Helmet Piece
NG
(1)
Chance-based
Sealed Vesper Helmet Piece
NG
(1)
Chance-based
-
Sealed Vesper Helmet Piece
NG
(2)
Chance-based
-
Sealed Vesper Helmet Piece
NG
(3)
Chance-based
-
 Sealed Vesper Leather Helmet Piece
NG
(1)
Chance-based
Sealed Vesper Leather Helmet Piece
NG
(1)
Chance-based
-
Sealed Vesper Leather Helmet Piece
NG
(2)
Chance-based
-
Sealed Vesper Leather Helmet Piece
NG
(3)
Chance-based
-
 Sealed Vesper Circlet Piece
NG
(1)
Chance-based
Sealed Vesper Circlet Piece
NG
(1)
Chance-based
-
Sealed Vesper Circlet Piece
NG
(2)
Chance-based
-
Sealed Vesper Circlet Piece
NG
(3)
Chance-based
-
 Sealed Vesper Shield Piece
NG
(1)
Chance-based
Sealed Vesper Shield Piece
NG
(1)
Chance-based
-
Sealed Vesper Shield Piece
NG
(2)
Chance-based
-
Sealed Vesper Shield Piece
NG
(3)
Chance-based
-
 Sealed Vesper Sigil Piece
NG
(1)
Chance-based
Sealed Vesper Sigil Piece
NG
(1)
Chance-based
-
Sealed Vesper Sigil Piece
NG
(2)
Chance-based
-
Sealed Vesper Sigil Piece
NG
(3)
Chance-based
-
Unidentified Sealed Vesper Breastplate
S84
(1)
Chance-based
-
Unidentified Sealed Vesper Gaiters
S84
(1)
Chance-based
-
Unidentified Sealed Vesper Leather Breastplate
S84
(1)
Chance-based
-
Unidentified Sealed Vesper Leather Leggings
S84
(1)
Chance-based
-
Unidentified Sealed Vesper Tunic
S84
(1)
Chance-based
-
Unidentified Sealed Vesper Stockings
S84
(1)
Chance-based
-
 Sealed Vesper Breastplate Piece
NG
(1)
Chance-based
Sealed Vesper Breastplate Piece
NG
(1)
Chance-based
-
Sealed Vesper Breastplate Piece
NG
(2)
Chance-based
-
Sealed Vesper Breastplate Piece
NG
(3)
Chance-based
-
 Sealed Vesper Gaiter Piece
NG
(1)
Chance-based
Sealed Vesper Gaiter Piece
NG
(1)
Chance-based
-
Sealed Vesper Gaiter Piece
NG
(2)
Chance-based
-
Sealed Vesper Gaiter Piece
NG
(3)
Chance-based
-
 Sealed Vesper Leather Breastplate Piece
NG
(1)
Chance-based
Sealed Vesper Leather Breastplate Piece
NG
(1)
Chance-based
-
Sealed Vesper Leather Breastplate Piece
NG
(2)
Chance-based
-
Sealed Vesper Leather Breastplate Piece
NG
(3)
Chance-based
-
 Sealed Vesper Leather Legging Piece
NG
(1)
Chance-based
Sealed Vesper Leather Legging Piece
NG
(1)
Chance-based
-
Sealed Vesper Leather Legging Piece
NG
(2)
Chance-based
-
Sealed Vesper Leather Legging Piece
NG
(3)
Chance-based
-
 Sealed Vesper Tunic Piece
NG
(1)
Chance-based
Sealed Vesper Tunic Piece
NG
(1)
Chance-based
-
Sealed Vesper Tunic Piece
NG
(2)
Chance-based
-
Sealed Vesper Tunic Piece
NG
(3)
Chance-based
-
 Sealed Vesper Stockings Piece
NG
(1)
Chance-based
Sealed Vesper Stockings Piece
NG
(1)
Chance-based
-
Sealed Vesper Stockings Piece
NG
(2)
Chance-based
-
Sealed Vesper Stockings Piece
NG
(3)
Chance-based
-
Unidentified Sealed Vesper Gauntlets
S84
(1)
Chance-based
-
Unidentified Sealed Vesper Boots
S84
(1)
Chance-based
-
Unidentified Sealed Vesper Leather Gloves
S84
(1)
Chance-based
-
Unidentified Sealed Vesper Leather Boots
S84
(1)
Chance-based
-
Unidentified Sealed Vesper Gloves
S84
(1)
Chance-based
-
Unidentified Sealed Vesper Shoes
S84
(1)
Chance-based
-
 Sealed Vesper Gauntlets Piece
NG
(1)
Chance-based
Sealed Vesper Gauntlets Piece
NG
(1)
Chance-based
-
Sealed Vesper Gauntlets Piece
NG
(2)
Chance-based
-
Sealed Vesper Gauntlets Piece
NG
(3)
Chance-based
-
 Sealed Vesper Boots Piece
NG
(1)
Chance-based
Sealed Vesper Boots Piece
NG
(1)
Chance-based
-
Sealed Vesper Boots Piece
NG
(2)
Chance-based
-
Sealed Vesper Boots Piece
NG
(3)
Chance-based
-
 Sealed Vesper Leather Gloves Piece
NG
(1)
Chance-based
Sealed Vesper Leather Gloves Piece
NG
(1)
Chance-based
-
Sealed Vesper Leather Gloves Piece
NG
(2)
Chance-based
-
Sealed Vesper Leather Gloves Piece
NG
(3)
Chance-based
-
 Sealed Vesper Leather Boots Piece
NG
(1)
Chance-based
Sealed Vesper Leather Boots Piece
NG
(1)
Chance-based
-
Sealed Vesper Leather Boots Piece
NG
(2)
Chance-based
-
Sealed Vesper Leather Boots Piece
NG
(3)
Chance-based
-
 Sealed Vesper Gloves Piece
NG
(1)
Chance-based
Sealed Vesper Gloves Piece
NG
(1)
Chance-based
-
Sealed Vesper Gloves Piece
NG
(2)
Chance-based
-
Sealed Vesper Gloves Piece
NG
(3)
Chance-based
-
 Sealed Vesper Shoes Piece
NG
(1)
Chance-based
Sealed Vesper Shoes Piece
NG
(1)
Chance-based
-
Sealed Vesper Shoes Piece
NG
(2)
Chance-based
-
Sealed Vesper Shoes Piece
NG
(3)
Chance-based
-
 MasterWork Crystal: S80-grade
Moirai/ Icarus
S80
(1)
Chance-based
MasterWork Crystal: S80-grade
Moirai/ Icarus
S80
(1)
Chance-based
-
 MasterWork Crystal: S84-grade
Vesper
S84
(1)
Chance-based
MasterWork Crystal: S84-grade
Vesper
S84
(1)
Chance-based
-
 MasterWork Crystal: S85-grade
Vorpal
S84
(1)
Chance-based
MasterWork Crystal: S85-grade
Vorpal
S84
(1)
Chance-based
-
 Scroll: Enchant Armor (S-Grade)
NG
(1)
Chance-based
Scroll: Enchant Armor (S-Grade)
NG
(1)
Chance-based
-
 Blessed Scroll: Enchant Armor (S-Grade)
NG
(1)
Chance-based
Blessed Scroll: Enchant Armor (S-Grade)
NG
(1)
Chance-based
-
 Scroll: Enchant Weapon (S-Grade)
NG
(1)
Chance-based
Scroll: Enchant Weapon (S-Grade)
NG
(1)
Chance-based
-
 Blessed Scroll: Enchant Weapon (S-Grade)
NG
(1)
Chance-based
Blessed Scroll: Enchant Weapon (S-Grade)
NG
(1)
Chance-based
-
 Forgotten Scroll: Protection of Elemental
NG
(1)
Chance-based
Forgotten Scroll: Protection of Elemental
NG
(1)
Chance-based
-
 Forgotten Scroll: Protection of Alignment
NG
(1)
Chance-based
Forgotten Scroll: Protection of Alignment
NG
(1)
Chance-based
-
 Forgotten Scroll: Protection of Rune
NG
(1)
Chance-based
Forgotten Scroll: Protection of Rune
NG
(1)
Chance-based
-
 Forgotten Scroll: Fighter's Will
NG
(1)
Chance-based
Forgotten Scroll: Fighter's Will
NG
(1)
Chance-based
-
 Forgotten Scroll: Archer's Will
NG
(1)
Chance-based
Forgotten Scroll: Archer's Will
NG
(1)
Chance-based
-
 Forgotten Scroll: Magician's Will
NG
(1)
Chance-based
Forgotten Scroll: Magician's Will
NG
(1)
Chance-based
Enhanced Jewelry
The stats of the Queen Ant's Rings can be upgraded. For more details on upgrading epic jewelry, see the article Pona: Jewelry Upgrade.
Pay attention!
The magical defense of the Queen Ant's jewelry changes as the season progresses.
|
Physical Ring of Queen Ant
C
|
Max MP +21 P. Atk. +2% P. Crit. Power +15% Accuracy +2 Resistance to Poison +30% Poison Chance +30% Resistance to Hold +20% Hold Chance +20%. |
|
Magical Ring of Queen Ant
C
|
Max MP +21 M. Atk. +4% M. Crit. Power +15% Resistance to Poison +30% Poison Chance +30% Resistance to Hold +20% Hold Chance +20%. |
 Enchanted Physical Ring of Queen Ant
S80
Enchanted Physical Ring of Queen Ant
S80
|
Max MP +25 P. Atk. +3% P. Crit. Power +20% Accuracy +3 Resistance to Poison +40% Poison Chance +40% Resistance to Hold +30% Hold Chance +30% Resistance to Fire/ Water/ Wind/ Earth Attributes +5. |
 Enchanted Magical Ring of Queen Ant
S80
Enchanted Magical Ring of Queen Ant
S80
|
Max MP +25 M. Atk. +6% M. Crit. Power +20% Resistance to Poison +40% Poison Chance +40% Resistance to Hold +30% Hold Chance +30% Resistance to Fire/ Water/ Wind/ Earth Attributes +5. |


 Kamaloka Hall of the Abyss
 Pailaka — Song of Ice and Fire (35-45)
 Instance-boss Queen Ant 80+
 Instance-boss Zaken 60/73+
 Prison (Castle Dungeon) 64+
 Four Sepulchers Instance 74+
 Crystal Caverns aka Baylor 76+
 Frintezza Instance 80+
 Instance Twins 75+
 Instance Tiat 78+
 Seed of Destruction. Attribute collection 78+
 New S-Grade Sets Bonuses
 Masterwork Item Bonuses
 Ingame calendar
 Achievements
 Clan Academy
 Squads Passive Skills
 Clan Active Skills
 Autoloot Agathions MasterWork
 Compound of belts
 MasterWork Olympiad
 Library: Books of Exp
 Dual daggers and blunts
 Judicator - main class. Quest Seeds of Chaos 76+
 Training Olympiad
 Hellbound: Epidos
 Pets: new skins
 Life Stones on Masterwork
 Cyclic Macros and Assist Manager
 Missions
 Starter quest Eternal
 Crafting cost changes (season 2024)
 Mid Company on Masterwork
 Summoner's Transformations
 Fortresses on Masterwork
 Game event: Hot spot
 Fatigue System
 Masterwork Weapon Bonuses
 Blacksmith of Mammon: Weapon Upgrade/Exchange
 Location Keeper Ankou
 Luxury Shop
 Dragon Valley. Lord Ishka
 Beleth on MasterWork
 Raid Bosses
 Harbingers of Ankou